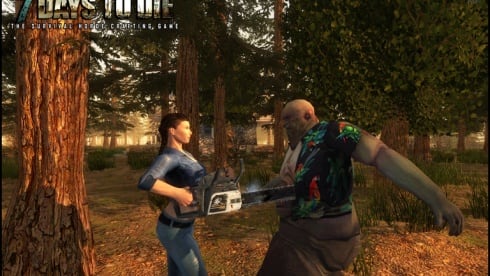
7 Days To Die — Сюжет расскажет о пост-апокалиптическом мире 2034 года, где осталось мало выживших, а большинство населения заражено неизвестным вирусом… Ну это уже словно штамп.
Трейлер игры: смотреть
Пример геймплея игры: смотреть
Видеоинструкция по соединению по локальной сети сети или RadminVPN (Способ 1): смотреть
Видеоинструкция по соединению через Stem (Способ 2): смотреть
Рекомендуемые системные требования:
— Процессор: Intel Core 2 Quad 3.0 Ghz / AMD Phenom II X4 3.4 Ghz
— Оперативная память: 12 Гб
— HD: 12 Гб свободного пространства
— Видеокарта: Nvidia GeForce GTX 1050 с 4 Gb памяти
Соединение через: LAN и эмуляторы LAN, Steam
Кооператив: до 16 игроков
Мультиплеер: до 16 игроков
Способ №1. Игра по локальной сети.
Подготовка к запуску:
1. Скачиваем и устанавливаем игру: «7 Days To Die v20.6, b9 by Pioneer«.
В пути к игре не должно быть русских букв.
2. Скачиваем и распаковываем в папку с игрой фикс: «7DaysToDie-Fix-LAN«
Запуск игры:
1. Запускаем эмулятор локальной сети (RadminVPN) и подключаемся к сети 7 Days To Die (можно создать свою частную, либо используем настоящую локальную сеть)
2. Запускаем игру через ярлык на рабочем столе.
В игре:
Подключение:
Присоединиться к игре —> Выбираем раздел «Друзья» —> Выбираем сервер из списка и подключаемся к нему —>Подключить (Вас подключит к игре).
Создание сервера:
New Game/Новая игра / Продолжить —> Настраиваем сервер по своему желанию —> Start/Начать.
Примечания:
-
Смена ника: открываем файл \settings\account_name.txt и прописываем СВОЙ ник .
-
Смена языка: открываем файл \settings\language.txt и вписываем предпочитаемый язык.
-
Если при подключении через ip выходит сразу ошибка, значит по указанному ip нет никакого сервера. Он либо не запущен, либо неверно скопирован, либо закрыты порты.
———————————————————————————————————————————————————
Способ №2. Игра через Steam.
Подготовка к запуску:
1. Скачиваем и устанавливаем игру: «7 Days To Die v20.6, b9 by Pioneer«.
В пути к игре не должно быть русских букв.
2. Если у вас игра с другого источника, скачиваете и распаковываете в папку с игрой фикс: «7DTD-Steam-Fix-V4«.
Запуск игры:
1. Запускаем Steam и входите в свой аккаунт.
2. Запускаем игру через ярлык на рабочем столе или файл 7DaysToDie.exe.
В игре:
Подключение:
Присоединиться к игре —> Выбираем раздел «Друзья» —> Выбираем сервер из списка и подключаемся к нему —>Подключить (Вас подключит к игре).
Либо же просто принимаете приглашение в игру от друга.
Создание сервера:
Продолжить игру/Новая игра —> Настраиваем сервер по своему желанию —> Начать —> ESC —> Пригласить друзей —> Выбираем в списке друга и отправляем ему приглашение.
Руководство представлено исключительно в ознакомительных целях.
После ознакомления рекомендуем приобрести игру, чтобы поддержать разработчика!

19 сен. 2023

13 сен. 2023

25 авг. 2023

24 авг. 2023

17 авг. 2023

11 авг. 2023

10 авг. 2023

3 авг. 2023

26 июл. 2023

25 июл. 2023

18 июл. 2023

18 июл. 2023

14 июл. 2023

22 июн. 2023

30 мая. 2023

19 мая. 2023

2 мая. 2023

24 апр. 2023

6 апр. 2023

27 мар. 2023

24 мар. 2023

23 фев. 2023

11 фев. 2023

18 ноя. 2022

10 ноя. 2022
122 801
24

В избранное
В избранном
![]()
v 21.1, b16 [Новая Версия] на Русском
(Полная версия) Последняя в доп. раздачах
-
Дата выхода:
14 дек. 2013
2013 год - Разработчик: The Fun Pimps
- Жанр: Игры по сети
Отзывы в steam:
Очень положительные
88%
из 189535 обзоров пользователей положительные.
Обновлено — 13 августа 2023, 12:28.
подробности обновления
7 Days To Die — зомби-выживастик в открытом мире, предлагающий подключиться по интернету онлайн, чтобы вместе с другом на пиратке сразиться с ордой нежити. Можно играть по сети, бесплатно используя возможность кроссплатформы. Истреблять мертвечину позволяется в одиночку, в кооперативе или играя совместно с несколькими игроками. Игровой процесс содержит элементы тауэр дефенса и RPG, позволяя прокачивать способности и навыки. По мере того, как выкашиваются разнообразные зомби, копятся очки опыта, которые необходимо распределить по дереву навыков, изучая тот или иной скилл.
Песочница позволяет заниматься крафтом, грабежами, добычей полезных ресурсов, исследованиями и т.д. Карта содержит огромное количество разнообразных биомов, где представлены уникальные типы сырья для сбора. Оружие, доспехи, транспортные средства и многое другое можно ремонтировать самому. В 7 Days To Die доступно более 500 рецептов для изучения. Сетевая игра позволяет объединить усилия,чтобы захватить разрушенную крепость или же построить новую. Используя возможность бесплатной сетевой игры, необходимо скооперироваться таким образом, чтобы установить по периметру ловушки, электроэнергию, автоматические турели, автоматические двери и все, что поможет защититься от нападения.
Позволяется как выступать в одной команде, так и противостоять другим участникам. Исследуя локации, доступно для сбора более 800 предметов и почти 2000 строительных блоков. Каждый персонаж имеет 5 дисциплин на для развития. Некоторые навыки повышаются после того, как прочесть специальные книги, которых в игре представлено 100 штук. Кампания Навезген может похвастаться случайной генерацией событий, поселков, озер, долин и т.д. Всего представлено 400 локаций. Сражаться предстоит с 50 видами живых мертвецов. Доступны основные и второстепенные квесты. Перед началом игры позволяется создать собственный аватар, чтобы отправиться исследовать ландшафты на машинах, мотоциклах, велосипедах и т.д. Введены механики охоты и выращивания овощей.
Скачать торрент
Скриншоты из игры


Видео из игры

Пиратка (Игра по сети)
Версия: v Alpha 21 b324
Настройка для сетевой игры:
Не работает контроллер?
FAQ:
Примечание
Как играть по сети на пиратке?
Читайте информацию под спойлером!
Более актуальная версия: v 21.1, b16
находится в блоке — Дополнительные раздачи.
Размер:11.5 ГБ
Публикация обновлена — 13 августа 2023, 12:28.
Информация
- Дата выхода: 14 дек. 2013
- Жанр: Экшены, Приключения, Инди, RPG, Симуляторы, Стратегии, Выживание
- Разработчик: The Fun Pimps
-
Интерфейс:
Русский -
Озвучка:
Английская
Системные требования
- ОС: Windows 7 / 8 / 10 (64-bit)
- Процессор: Dual Core 2.4 Ghz
- Оперативная память: 8 GB
- Видеокарта: 2 GB
- Место на диске: 12 GB
Ознакомьтесь с особенностями — НАЖМИТЕ на ×
Мы обновляем все раздачи до последних версий.
Дополнительные раздачи:
RePack от Pioneer + Multiplayer
Версия: v 21.1, b16
Зомби, Открытый мир, Воксельная графика, Постапокалипсис, Строительство базы, Исследования, Строительство, Песочница, Кастомизация персонажа, Tower Defense, Процедурная генерация, Игры с геймпадом
A Server is used for playing with multiple people in the same world. Servers can be hosted by yourself, as well as by a server hosting company.
How to host a server[ | ]
Serverconfig.xml[ | ]
This is a table for the serverconfig.xml file that comes with 7 Days to Die as of A20.6.
Only change the data in the «value=» part of the file, otherwise, it will not work.
| Option | Default Value | Description |
|---|---|---|
| Server representation | GENERAL SERVER SETTINGS | |
| ServerName | My Game Host | Whatever you want the name of the server to be. |
| ServerDescription | A 7 Days to Die server | Whatever you want the server description to be, will be shown in the server browser. |
| ServerWebsiteURL | Website URL for the server, will be shown in the serverbrowser as a clickable link | |
| ServerPassword | Password to gain entry to the server | |
| ServerLoginConfirmationText | If set the user will see the message during joining the server and has to confirm it before continuing. For more complex changes to this window you can change the «serverjoinrulesdialog» window in XUi | |
| Region | NorthAmericaEast | The region this server is in. Values: NorthAmericaEast, NorthAmericaWest, CentralAmerica, SouthAmerica, Europe, Russia, Asia, MiddleEast, Africa, Oceania |
| Language | English | Primary language for players on this server. Values: Use any language name that you would users expect to search for. Should be the English name of the language, e.g. not «Deutsch» but «German» |
| Networking | ||
| ServerPort | 26900 | Port you want the server to listen on. Keep it in the ranges 26900 to 26905 or 27015 to 27020 if you want PCs on the same LAN to find it as a LAN server. |
| ServerVisibility | 2 | Visibility of this server: 2 = public, 1 = only shown to friends, 0 = not listed. As you are never friend of a dedicated server setting this to «1» will only work when the first player connects manually by IP. |
| ServerDisabledNetworkProtocols | SteamNetworking | Networking protocols that should not be used. Separated by comma. Possible values: LiteNetLib, SteamNetworking. Dedicated servers should disable SteamNetworking if there is no NAT router in between your users and the server or when port-forwarding is set up correctly. |
| ServerMaxWorldTransferSpeedKiBs | 512 | Maximum (!) speed in kiB/s the world is transferred at to a client on first connect if it does not have the world yet. Maximum is about 1300 kiB/s, even if you set a higher value. |
| Slots | ||
| ServerMaxPlayerCount | 8 | Maximum Concurrent Players (8 is the maximum supported player count. Anything over 30 will cause corrupted save data.) |
| ServerReservedSlots | 0 | Out of the MaxPlayerCount this many slots can only be used by players with a specific permission level. |
| ServerReservedSlotsPermission | 100 | Required permission level to use reserved slots above |
| ServerAdminSlots | 0 | This many admins can still join even if the server has reached MaxPlayerCount |
| ServerAdminSlotsPermission | 0 | Required permission level to use the admin slots above |
| Admin interfaces | ||
| ControlPanelEnabled | false | Enable/Disable the web control panel |
| ControlPanelPort | 8080 | Port of the control panel webpage |
| ControlPanelPassword | CHANGEME | Password to gain entry to the control panel |
| TelnetEnabled | true | Enable/Disable the telnet |
| TelnetPort | 8081 | Port of the telnet server |
| TelnetPassword | Password to gain entry to telnet interface. If no password is set the server will only listen on the local loopback interface | |
| TelnetFailedLoginLimit | 10 | After this many wrong passwords from a single remote client the client will be blocked from connecting to the Telnet interface |
| TelnetFailedLoginsBlocktime | 10 | How long will the block persist (in seconds) |
| TerminalWindowEnabled | true | Show a terminal window for log output / command input (Windows only) |
| Folder and file locations | ||
| AdminFileName | serveradmin.xml | Server admin file name. Path relative to the SaveGameFolder |
| UserDataFolder | absolute path | Use this to override where the server stores all generated data, including RWG generated worlds. Do not forget to uncomment the entry! |
| SaveGameFolder | absolute path | Use this to only override the save game path. Do not forget to uncomment the entry! |
| Other technical settings | ||
| EACEnabled | true | Enables/Disables EasyAntiCheat |
| HideCommandExecutionLog | 0 | Hide logging of command execution. 0 = show everything, 1 = hide only from Telnet/ControlPanel, 2 = also hide from remote game clients, 3 = hide everything |
| MaxUncoveredMapChunksPerPlayer | 131072 | Override how many chunks can be uncovered on the ingame map by each player. Resulting max map file size limit per player is (x * 512 Bytes), uncovered area is (x * 256 m²). Default 131072 means max 32 km² can be uncovered at any time. Setting this too large will corrupt player data. |
| PersistentPlayerProfiles | false | If disabled a player can join with any selected profile. If true they will join with the last profile they joined with |
| World | GAMEPLAY | |
| GameWorld | Navezgane | «RWG» (see WorldGenSeed and WorldGenSize options below) or any already existing world name in the Worlds folder (currently shipping with e.g. «Navezgane», «PREGEN01», …) |
| WorldGenSeed | asdf | If RWG this is the seed for the generation of the new world. If a world with the resulting name already exists it will simply load it |
| WorldGenSize | 6144 | If RWG this controls the width and height of the created world. It is also used in combination with WorldGenSeed to create the internal RWG seed thus also creating a unique map name even if using the same WorldGenSeed. Has to be a multiple of 2048 between 2048 and 16384, though large map sizes will take long to generate / download / load |
| GameName | My Game | Whatever you want the game name to be. This affects the save game name as well as the seed used when placing decoration (trees etc) in the world. It does not control the generic layout of the world if creating an RWG world |
| GameMode | GameModeSurvival | GameModeSurvival (This is a depreciated option, but it still remains in the config.) |
| Difficulty | ||
| GameDifficulty | 2 | 0 — 5, 0=easiest, 5=hardest |
| BlockDamagePlayer | 100 | How much damage do players to blocks (percentage in whole numbers) |
| BlockDamageAI | 100 | How much damage do AIs to blocks (percentage in whole numbers) |
| BlockDamageAIBM | 100 | How much damage do AIs during blood moons to blocks (percentage in whole numbers) |
| XPMultiplier | 250 | XP gain multiplier (percentage in whole numbers) |
| PlayerSafeZoneLevel | 5 | If a player is less or equal this level he will create a safe zone (no enemies) when spawned |
| PlayerSafeZoneHours | 5 | Hours in world time this safe zone exists |
| BuildCreate | false | cheat mode on/off |
| DayNightLength | 60 | real time minutes per in game day: 60 minutes |
| DayLightLength | 18 | in game hours the sun shines per day: 18 hours day light per in game day |
| DropOnDeath | 0 | 0 = nothing, 1 = everything, 2 = toolbelt only, 3 = backpack only, 4 = delete all |
| DropOnQuit | 0 | 0 = nothing, 1 = everything, 2 = toolbelt only, 3 = backpack only |
| BedrollDeadZoneSize | 15 | Size (box «radius», so a box with 2 times the given value for each side’s length) of bedroll deadzone, no zombies will spawn inside this area, and any cleared sleeper volumes that touch a bedroll deadzone will not spawn after they’ve been cleared. |
| BedrollExpiryTime | 45 | Number of days a bedroll stays active after owner was last online |
| Performance related | ||
| MaxSpawnedZombies | 64 | This setting covers the entire map. There can only be this many zombies on the entire map at one time. Changing this setting has a huge impact on performance. Anything over 90 will tank performance. |
| MaxSpawnedAnimals | 50 | If your server has a large number of players you can increase this limit to add more wildlife. Animals don’t consume as much CPU as zombies.
NOTE: That this doesn't cause more animals to spawn arbitrarily: The biome spawning system only spawns a certain number of animals in a given area, but if you have lots of players that are all spread out then you may be hitting the limit and can increase it. |
| ServerMaxAllowedViewDistance | 12 | Max viewdistance a client may request (6 — 12). High impact on memory usage and performance. |
| Zombie settings | ||
| EnemySpawnMode | true | Enable/Disable enemy spawning |
| EnemyDifficulty | 0 | 0 = Normal, 1 = Feral |
| ZombieFeralSense | 0 | 0-3 (Off, Day, Night, All) |
| ZombieMove | 0 | 0-4 (walk, jog, run, sprint, nightmare) |
| ZombieMoveNight | 3 | 0-4 (walk, jog, run, sprint, nightmare) |
| ZombieFeralMove | 3 | 0-4 (walk, jog, run, sprint, nightmare) |
| ZombieBMMove | 3 | 0-4 (walk, jog, run, sprint, nightmare) |
| BloodMoonFrequency | 7 | What frequency (in days) should a blood moon take place. Set to «0» for no blood moons |
| BloodMoonRange | 0 | How many days can the actual blood moon day randomly deviate from the above setting. Setting this to 0 makes blood moons happen exactly each Nth day as specified in BloodMoonFrequency |
| BloodMoonWarning | 8 | The Hour number that the red day number begins on a blood moon day. Setting this to -1 makes the red never show. |
| BloodMoonEnemyCount | 8 | This is the number of zombies that can be alive (spawned at the same time) at any time PER PLAYER during a blood moon horde, however, MaxSpawnedZombies overrides this number in multiplayer games. Also note that your game stage sets the max number of zombies PER PARTY. Low game stage values can result in lower number of zombies than the BloodMoonEnemyCount setting. Changing this setting has a huge impact on performance. |
| Loot | ||
| LootAbundance | 250 | percentage in whole numbers NOTE: This only affects stack sizes. It does not affect the chance for loot to drop. |
| LootRespawnDays | 1 | days in whole numbers |
| AirDropFrequency | 24 | How often airdrop occur in game-hours, 0 == never |
| AirDropMarker | true | Sets if a marker is added to map/compass for air drops. |
| Multiplayer | ||
| PartySharedKillRange | 100 | The distance you must be within to receive party shared kill xp and quest party kill objective credit. |
| PlayerKillingMode | 3 | Player Killing Settings (0 = No Killing, 1 = Kill Allies Only, 2 = Kill Strangers Only, 3 = Kill Everyone) |
| Land claim options | ||
| LandClaimCount | 1 | Maximum allowed land claims per player. |
| LandClaimSize | 41 | Size in blocks that is protected by a keystone. Must be an odd number |
| LandClaimDeadZone | 30 | Keystones must be this many blocks apart (unless you are friends with the other player) |
| LandClaimExpiryTime | 7 | The number of days a player can be offline before their claims expire and are no longer protected |
| LandClaimDecayMode | 0 | Controls how offline players land claims decay. 0=Slow (Linear) , 1=Fast (Exponential), 2=None (Full protection until claim is expired). |
| LandClaimOnlineDurabilityModifier | 4 | How much protected claim area block hardness is increased when a player is online. 0 means infinite (no damage will ever be taken). Default is 4x |
| LandClaimOfflineDurabilityModifier | 4 | How much protected claim area block hardness is increased when a player is offline. 0 means infinite (no damage will ever be taken). Default is 4x |
| LandClaimOfflineDelay | 0 | The number of minutes after a player logs out that the land claim area hardness transitions from online to offline. Default is 0 |
| Dynamic Mesh | ||
| DynamicMeshEnabled | true | Is Dynamic Mesh system enabled |
| DynamicMeshLandClaimOnly | true | Is Dynamic Mesh system only active in player LCB areas |
| DynamicMeshLandClaimBuffer | 3 | Dynamic Mesh LCB chunk radius |
| DynamicMeshMaxItemCache | 3 | How many items can be processed concurrently, higher values use more RAM |
| Twitch Integration | ||
| TwitchServerPermission | 90 | Required permission level to use twitch integration on the server |
| TwitchBloodMoonAllowed | false | If the server allows twitch actions during a blood moon. This could cause server lag with extra zombies being spawned during blood moon. |
To host a server just edit the startdedicated.bat file and the serverconfig.xml using notepad or notepad++. You shouldn’t need to edit the startdedicated.bat. In the batch file you will see the following text:
startdedicated.bat
@echo off

rem
rem Starts a dedicated server
rem
rem -quit, -batchmode, -nographics: Unity commands
rem -configfile			  : Allows server settings to be set up in an xml config file. Use no path if in same dir or full path.
rem -dedicated                    : Has to be the last option to start the dedicated server.

echo|set /p="251570" > steam_appid.txt

start 7daystodie -quit -batchmode -nographics -configfile=serverconfig.xml -dedicated

echo Wait until game started
timeout 15

echo.
echo Connect to the service interface. use 'shutdown' to stop the server
echo.
if exist "Tools/bin/putty.exe" (
     "Tools/bin/putty.exe" -raw localhost 8081
) else (
     telnet localhost 8081
)

echo.
echo Server is running in background, you can close this window
echo.

pause
Finding your Public IP[ | ]
To find your Public IP Address which your friends need to use to connect to your dedicated server search «my ip» in any major search engine. Send it to your friends and they should be able to join if you have already finished Port Forwarding.
Looking for servers[ | ]
If you are looking for a server to play on, you can find one on the the server browser on your game client.
- For computers on the same local network as the server you can connect to it by using its LAN IP address, simply enter this and the chosen port number into the two boxes at the bottom of the games server browser screen.
- To find the LAN IP address «Go to start, click run or search, type cmd. In the window that opens type ipconfig. You’ll see a list of information. You’re looking for the IP address.»
Example:
Ethernet adapter Local Area Connection:
  Connection-specific DNS Suffix. : home
     IPv4 Address. . . . . . . . . . . : 192.168.1.102
  Subnet Mask . . . . . . . . . . . : 255.255.255.0
  Default Gateway . . . . . . . . . : 192.168.1.1
Where mine says 192.168.1.100 that’s the IP your server has.
- If your client and server are running on the same machine it is possible to use the loopback IP address, which is either accessed via «localhost» or 127.0.0.1
Automated Installation via AMP[ | ]
Creating a server using AMP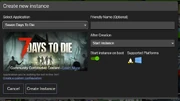
AMP is a popular game server management panel you can run on your own PC/server that supports 7 Days to Die and makes it easier to get the server going from its web interface. You can run it on both Windows and Linux. AMP also makes it possible to host 7 Days servers on ARM systems such as Oracle Cloud (including their free tier)
Once you have AMP itself up and running (Tutorial and Guide), click «Create Instance» and then select «7 Days to Die» from the list of games. Once you’ve done that, select «Create Instance».
After that, double click the new 7 Days to Die instance to manage it and select «Update» from the status screen. This will download the 7 Days to Die server and required files. You can take a moment at this point to look through the configuration and set up the server as you please.
Once the download is complete you can hit Start and after a few moments the server will start up. Once the startup has completed you can connect as normal.
Renting a server[ | ]
There are several companies/websites that allow you to rent a server from them. This rented server will reside in a data center and hosted by them.
These servers are mostly 24/7 servers. This is useful because you won’t need to keep your computer running 24/7. You can rent servers to many different specifications, some may not be powerful enough to host a server. Generally, network connections at a datacenter far exceed what is available to residential ISPs, which will cut down on latency that you might experience hosting at home.
Dedicated Server Providers
Managing a server[ | ]
Before setting up a server manager, it is strongly recommended to install Alloc’s Server Fixes. Website
Then you have a large selection of tools to choose from for managing your server.
- Botman — Website — Forum thread
- Notes: Website says it’s A20 compatible, and still has A16-A19 compatibility available
- CSMM — Cloud hosted server manager — Website — Forum thread
- Notes: A20 compatible as of v1.27.0 [1]
- RAT Server Manager — Website — Forum thread
- Notes: A20 compatible as of RAT 3
- ServerTools- Website — Forum thread
- Notes: As of Version 20.5.2, it is compatible with A20 [2]
Video Tutorials[ | ]
How to set a server up through the Steam Application:
Video walkthrough of using a Hosted (game server hosting company) Server, how to select options and get it up and running!
How do you Admin your server? Here’s how to manage it on a Hosted Platform:
Below video walks through setting up a dedicated 7 Days to Die server using steamcmd.
The video below walks through setting up the 7D2D RAT — Remote Admin tool, a Server Manager tool.
See also[ | ]
- Linux Server
- OSX Server
- Server: serveradmin.xml
- Server: serverconfig.xml
- Dedicated Server Providers
References[ | ]
- ↑ CSMM Github Release Notes
- ↑ Server Tools Forum Thread
- Общая настройка
- Настройка сервера 7 Days to Die для многопользовательской игры
- Подключение к многопользовательской игре 7 Days to Die
- Поиск команды
- Устранение неполадок
Общая настройка
1. Убедитесь, что вы используете одну и ту же версию игры 7 Days to Die.
2. Загрузите и установите Radmin VPN.
3. Создайте сеть и предоставьте имя и пароль сети тем людям, с которыми хотите играть. Все эти действия интуитивно понятны, однако, если у вас возникли какие-либо проблемы или вам необходимо узнать больше об администрировании сети Radmin VPN, ознакомьтесь со следующим руководством.
Настройка сервера 7 Days to Die для многопользовательской игры

Main menu -> New game (Главное меню -> Новая игра)
- Присвойте новой игре любое имя. Выберите карту и максимальное количество игроков.
- Настройте пароль, если хотите, чтобы к игре подключались только те люди, которые его знают.
- Не меняйте ПОРТ.
Нажмите START (СТАРТ).
Подключение к многопользовательской игре 7 Days to Die

Main menu -> Connect to server -> Connect to IP (Главное меню -> Подключиться к серверу -> Подключиться к IP-адресу) в появившемся меню
Скопируйте IP-адрес хоста из Radmin VPN — щелкните правой кнопкой мыши имя хоста и выберите Copy IP address (Скопировать IP-адрес).

Поиск команды
В Radmin VPN имеются игровые сети.
В Radmin VPN откройте вкладку «Сеть» -> «Присоединиться к сети» -> «Выбрать игровую сеть».

Устранение неполадок
Если вы не видите друзей на каких-либо серверах игры, выполните следующие действия:
- Убедитесь, что вы находитесь в одной сети Radmin VPN.
- Убедитесь, что вы используете одну версию игры.
- Попробуйте подключиться в игре напрямую к IP-адресу хоста (IP-адресу Radmin VPN).
- Настройте брандмауэр
- Если вы сталкиваетесь с неполадками в работе Radmin VPN — это бывает очень редко, но бывает. Решения для них разобраны здесь.
Copyright © 1999-2023 Famatech Corp. Все права защищены.