
Preface
Please read this manual thoroughly before testing. It provides all information you need to use the product. Please only purchase test strips in your country. Use of test strips from different countries might get deviated test results under such circumstance. We hereafter call RightestTM GM100 Blood Glucose Monitoring System as GM100 BGMS, RightestTM GM100 Blood Glucose Meter as GM100 meter, and RightestTM GS100 Blood Glucose Test Strip as GS100 test strip for short. It is recommended to monitor blood glucose regularly. To prevent derived complications effectively, it is recommended to monitor blood glucose regularly. GM100 BGMS accurate and easy-to-use, is your reliable assistant for diabetes management.
GM100 BGMS was manufactured and supported by BionimeCorporation and its authorized representative. If you have any question or concern, please contact your localBionimeCustomerServiceoremailto rightest@bionime.com. We will provide best assistance and solutions for you.
Intended Use
GM100 BGMS is intended for in vitro (oustside the body) diagnostic use and self-testing only. Coding is not required. The testing result is calibrated to plasma equivalent with fresh capillary whole blood samples from the fingertip, palm or forearm. You may consult your healthcare professional for instructions how to use the system correctly. Our customer support staff is also available to assist you.
Package of Meter Kit

- GM100 Meter (with one CR2032 battery installed)
- GS100 Test Strips (0/10/25 pcs) *
- Control Solution *
- GM100 meter Instructions for Use
- GS100 Test Strips Package Insert *
- GD500 Lancing Device *
- Disposable Lancets (10pcs) *
- Instructions for the lancing device *
- Log Book
- Warranty Card + Emergency Card
- Carrying Case *
(Different packages have different bundled items. Some of packages might not include items.)
The RightestTM Meter

Test Strip Port
Insert test strip here until you hear a click.
Display Window
Show your test result, messages and relative information.
Main Button
For operating the meter, please check details in following sections.
Plastic Tape
Pull it off to activate meter. (If time and date of your meter has been set in advance, the plastic tape will be removed. Hence, please discard this step)
Battery Cover
Slide cover to change battery.
Precautions
GS100 Test Strips
GM100 meter is designed to use with GS100 test strip only. Please note that misuse of other test strips might cause unexpected damage or produce inaccurate test results.
Sample Entry
Apply a drop of blood or Control Solution here. The test request is only 1.4 µL of blood.
Hand Bar
Grip here to insert test strip into meter.
View Window
This window is yellow before applying blood sample. It gradually turns red when filled with blood.
Indication Symbol
Insert strip with indication symbol up and toward meter.
Electrode Contacts
Sensing signal output terminals.
PRECAUTION
- Re-cap the test strip vial immediately after removing a test strip.
- Do not reuse test strips.
- Do not use expired test strips.
- Record the date of opening a new test strip vial for the first time. Discard the vial of test strips after 3 months from opening.
- Store the test strips in a cool and dry location. Do not expose to direct sunlight or heat.
- For detailed information, please refer to the GS100 Test Strips Package Insert.
Battery Installation
Your meter comes with one CR2032, 3 volt, battery installed. One new battery will provide power to perform about 1,000 tests under normal use. Before using it, please pull off the plastic tape and press the main button to activate the meter (If time and date of your meter has been set in advance, the plastic tape will be removed. Hence, please discard this step).
- Turn the meter over. Press and push battery cover to open.
- Install the battery. Be sure to put battery in correct direction.

- Slide the battery cover back until it snaps into place.
- The meter performs a self-test and all symbols on the display will blink.
- Press any button to exit the self-test and enter Setting Mode.
- Set the time and date when the battery is replaced. See Setting the Date, Time and Unit section. Prior test results are still stored in the memory.


PRECAUTION
- Danger of explosion might happen if the battery is incorrectly replaced.
- Please follow the local regulation and discard a used battery properly.
Setting Up Your Meter-Setting the Date, Time, and Unit……
You can enter Setting Mode by below two ways.
- Reload battery
After removing the battery, please press the main button for several times until no signal on screen, then follow the battery installation steps to load battery. The meter will do self test. Press the main button to close the test and enter Setting Mode. - With Battery inserted
Press the main button first to turn on the meter. Then press and hold the main button for 5 seconds (the meter will be turned off during this period, please keep pressing) until you hear a beep, indicating you have successfully entered Setting Mode. The display screen will show setting data.
 NOTE
NOTE
- When you keep pressing the main button for 2 seconds, the display on screen will turn off. Please don’t care it. Keep pressing the main button till entering setting data.
- Quick press the main button allows you to change setting while hold it for 2 seconds will confirm the setting. However, if you press and hold the main button over 5 seconds it will escape from setting mode and return to time screen.
- Year setting
With the year format blinking, press the main button to adjust it. Then hold the same button for 2 seconds to confirm it. Meantime, it will shift to next digit for setting. Repeat the above action until the year setting is completed. Then it will move to month setting. - Month setting
With the month blinking, press the main button until the current month appears. Then hold the same button for 2 seconds to confirm it and move to day setting. - Day setting
With the day blinking, press the main button to adjust it. Then hold the same button for 2 seconds to confirm it. Meantime, it will shift to next digit for setting. Repeat the above action until the day setting is completed. Then it will move to time format setting. - Time format
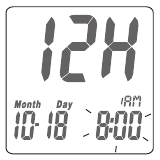
12/24H selection With the time format blinking, press the main button to adjust it. Then hold the same button for 2 seconds to confirm it and move to hours setting. - Hour setting
With the hour blinking, press the main button until the current hour appears. Then hold the same button for 2 seconds to confirm it and move to minute setting. - Minute setting
With the minute blinking, press the main button to adjust it. Then hold the same button for 2 seconds to confirm it. Meantime, it will shift to next digit for setting. Repeat the above action until the minute setting is completed. Then it will move to measurement of unit setting. - Ending setting
After confirming the setting, you’ll hear a sound of » beep «. All the settings are saved and completed and will return to time screen.


 NOTE
NOTE
- When you do not do any settings of meter for over 2 minutes, the meter will leave setting mode and power off automatically.
- Any time you would like to escape from the setting mode, please press and hold the main button for over 5 seconds. Meantime, all the current settings will be saved.
Turning on /off the Meter
- How to turn on the Power
- Press the main button
- Insert one piece of test strip
- Manual Power off
If you want to turn off the meter, please keep pressing the main button for 2 seconds. - Auto Power off
The meter will power off automatically if you don’t operate it over 2 minutes.
Performing a Blood Test

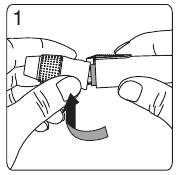
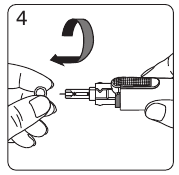
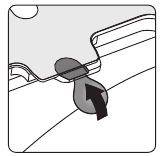
- Hold the adjustable cap in one hand and hold the hub in the other hand. Bend the cap towards the down side. When a gap appears between the cap and hub, pull them off in opposite directions.
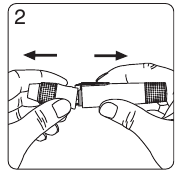
- Pull off the depth adjustable cap.
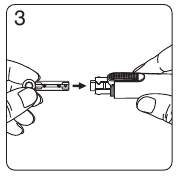
- Insert a new disposable lancet firmly into lancet carrier.
- Twist off and set aside the protective cover of the disposable lancet.
- Replace the depth adjustable cap.
- Choose a depth of penetration by rotating the top portion of the depth adjustable cap until the setting depth matches the window. Settings are based on skin type «» for soft or thin skin; «» for average skin; «» for thick or calloused skin.
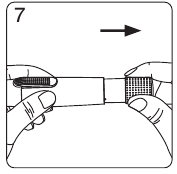
- Hold the hub in one hand and pull on the plunger in the other hand. The device will be cocked. Release the plunger, it will automatically move back to its original position near the hub.
- Wash your hands with warm soapy water and dry thoroughly.
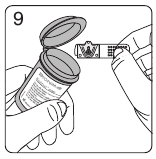
- Take one strip from the vial. Re-cap the vial cap immediately.
- Insert the strip into the strip port on meter with the indication symbol facing up.
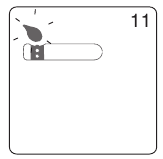
- While the blood drop symbol flashing, you are ready to apply the blood sample.
- Place the lancing device against the pad of your fingertip and press the release button. The best puncture sites are on the middle or ring fingers. Press the release button.
- Touch and hold the drop to the edge of sample entry until you hear a » beep » and the view window is totally filled with blood. If the view window is not totally filled with blood or the test does not start. Please discard the test strip and repeat the test with a new test strip.
- You will see the countdown mode on the screen. After 8 seconds, the test result appears.
- Pull off the depth adjustable cap. Without touching the used disposable lancet, stick the lancet tip into the protective cover.
- Hold the release button in one hand and pull on the plunger in the other hand will safely eject the used disposable lancet.
- Discard the used disposable lancet into an appropriate puncture-proof or biohazard container.
- Replace the depth adjustable cap after finishing the test.


PRECAUTION
Do not touch your blood drop to the sample entry on the strip until you see the « » appear. The meter is performing an internal test and will display «» and «
 » if you apply blood too soon. Then you will waste a test strip.
View window appearance
Make sure your blood sample covers the whole area of the View Window to get an accurate test result. Insufficient blood sample will cause inaccurate test result. Repeat the test with a new test strip.
PRECAUTION

- Check the expiration date printed on the package every time you use a test strip. Do not use expired test strips.
- Use each test strip immediately after removing from the vial.
- Do not reuse test strips.
- Do the test at least 30 minutes after moving into a different location with significant change in temperature.
- Place the blood drop only on the sample entry of the test strip.
- Please don’t drip or inject the blood sample directly by syringe to the entry port of test strip. Doing this might contaminate the meter or cause damage and is not recommended.
Blood glucose test results are shown on the meter as mg/dL or mmol/L, depending on which unit of measurement you have chosen. ( This meter * for some countries is fixed at mmol/L or mg/dL and is not able to be changed freely.) Consult your healthcare professional before making any changes to your diabetes medication program. If your blood glucose result is unusually high or low, or if you question your testing results, repeat the test with a new test strip. You can also run a Quality Control Test with to check your meter and test strip. If the test result still remains unusually high or low, contact your healthcare professional immediately. If you are experiencing symptoms that are not consistent with your blood glucose test results and you have made sure to follow all instructions of this manual, contact your healthcare professional immediately.
Recalling Test Result & Average
The GM100 meter is able to store 150 test results with time and date automatically. If your meter has stored 150 results, which is the maximum memory of the meter, the newest test result will replace the oldest one.
To recall your test memory, start with the meter without test strip inserted.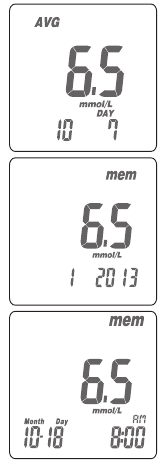
- Press the main button to switch to screen to memory function, you will see «AVG» symbol on the up left corner of the screen. The display sequence will be 1-day, 7-day, 14-day, 30-day, 90- day average, and then memory 1 reading, memory 2 reading,…until memory 150 reading which will show «MEM» on the up right corner of the screen.
- Under average screen, the number on the down right corner of the screen means how many days of readings have been calculated as the average while the number on the down left corner of the screen means how many readings have been counted in. Under memory screen, it will show the sequence number on the down left corner and then display date and time.
- Quick Searching: you could also quick press the main button twice, and then it will automatically display the average and memory by sequence. Anytime you want to stop it, you could just press the main button again. It will stop and display the reading right at the moment you press the main button. You could just apply the way above; especially when you find a particular reading you want to check with.
- Reading right after test: if you just finish the test and press the main button to review. The display sequence will be the latest reading, 1-day, 7-day, 14- day, 30-day, 90-day average, and the memory 2 reading until the oldest one (memory 150 reading).
The GM100 meter displays results between 0.6 and 33.3 mmol/L. If your test result is below 0.6 mmol/L, « » will appear on the screen. Please repeat your test again by a new test strip. If you still get » » result, you should immediately contact your healthcare professional.
If your test result is above the high end of the system’s detection range 33.3 mmol/L, « » will appear on the screen. Please repeat your test again by a new test strip. If you still get «
 » result, you should immediately contact your healthcare professional.
PRECAUTION
Quality Control Test
Please use Control Solution tested with GM100 BGMS under Control Solution Mode. If the test result is within the Control Solution Range printed on the strip vial label, the GM100 BGMS passes Quality Control Test. That means your GM100 BGMS is working correctly.
Entering Control Solution Mode
Insert the strip into the strip port on meter. While the blood drop symbol flashing, press and hold the main button for over 5 seconds. Then you will see « » symbol blinking on the screen indicating that you’ve successfully entered the Control Solution Mode. Control Solution Range
Control Solution Range
Example of Control Solution Range printed on your test strip vial label.
When should perform a Quality Control Test?
Before doing a blood glucose test with your meter for the first time.
When you open and start using a new test strip vial.
When your meter is dropped or splashed with liquids.
Whenever you think your test result does not consistent with the way you feel.
Whenever you want to check if your system is working properly or not. Whenever you want to practice testing and check correct procedure.
The possible reasons your Control Solution results are out of the range:
- Your Control Solution has expired or after 3 months since opened.
- Your test strip has expired.
- You leave the cap off the vial of test strips or Control Solution for a long time.
- You didn’t perform the test proce — Malfunction of the meter.
If Control Solution results are out of the range, your GM100 BGMS may not be working properly. Repeat the Quality Control Test. If your Control Solution results outside the range still exist, do not use the GM100 BGMS to test your blood glucose. And contact Bionime authorized representative or Customer Service.
PRECAUTION
Each time you open a new bottle of Control Solution, write the discard date on the label. Control Solution is good for 3 months after opening the bottle, or until the expiration date printed on the label, whichever comes first.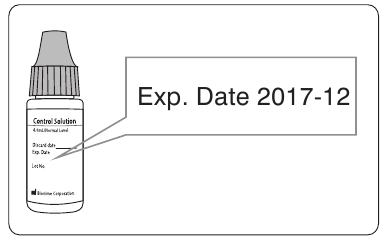
Performing a Quality Control Test
Use with Control Solution


PRECAUTION
Maintenance
Keep your meter and test strip free of dust, water or any other liquid. Store the meter in the carrying case when not in use. If meter is dropped or damaged, perform a Quality Control Test before doing a blood glucose test.
Cleaning Meter
Clean the outside of the meter with a damp cloth and mild soap/detergent. Keep the test strip port from getting wet.
Error Message and Trouble Shooting
Er1 — The inserted test strip has been used or damaged. Please use a new test strip from vial.
Er2 — Meter has malfunctioned. Do the Quality Control Test or reinstall the battery to see if the meter works properly.
Er3 — Signal transmission is disrupted, repeat the test. Above, if error screen still appears contact Bionime authorized representative or Customer Service.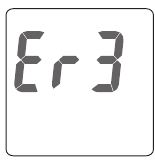
Battery Error

Temperature Error
In order to get accurate test result, perform testing between 10 ~40 ˚C (50 ~ 104 ˚F).
Sampling Error
Before « » appears. Please don’t apply the blood to the entry of the strip because the meter is still doing internal check. If you do so, the meter will show «
 » and ««. Please remove the test strip and insert a new one to do the test again.
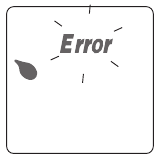
Meter Malfunction
If you find the meter can’t be switched on, please follow the steps below for quick inspection.
- Open the battery cover, take out the battery.
- Wait for 5 minutes and reload the new battery.
The meter should be work normally after finishing above steps. If not, please contact Bionime authorized representative or Customer Service.
Specification
| Measurement Technology | Oxidase Electrochemical Sensor |
| Sample | Capillary whole blood |
| Minimum Sample Volume | 1.4 microliters ( µL ) |
| Measuring Range | 0.6 — 33.3 mmol/L |
| Test Time | 8 seconds |
| Memory Capacity | 150 blood glucose test results with date and time |
| Power Saving | Turn off automatically after 2 minutes no use. Or press the « » button for 2 seconds. » button for 2 seconds. |
| Operating Temperature | 10 ~ 40 ˚C (50 ~ 104 ˚F) |
| Operating Relative Humidity | 10 — 90 % |
| Hematocrit | 35 — 48 % |
| Power Supply | One CR2032 battery |
| Battery Life | About 1,000 tests |
| Meter Dimension | 95.0 mm x 43.8 mm x 13.0 mm |
| Meter Weight | 43.0 g with batteries |
| Monitor Display Area | LCD display 38.0 mm x 29.0 mm |
| Meter Storage Conditions | -10 ~ 60 ˚C (14 ~ 140 ˚F) |
| Test Strip Storage Conditions | 4~30 ˚C(39~86 ˚F), < 90% relative humidity |
Limitations
- GM100 BGMS is not intended for serum or plasma test.
- Inaccurate test results may be obtained at high altitude more than about 10,000 feet ( 3,048 meters ) above sea level.
- Severe dehydration and excessive water loss may cause inaccurately low results.
- GM100 BGMS has not been validated for use on neonates.
- The glucose test may be interfered under abnormal concentration of
Ascorbic Acid ≧ 5 mg/dL ( 0.28 mmol/L )
Dopamine Hcl ≧ 2 mg/dL ( 0.11 mmol/L )
L-Dopa ≧ 3 mg/dL ( 0.15 mmol/L )
Tolazamide ≧ 15 mg/dL ( 0.48 mmol/L )
Cholesterol ≧ 500 mg/dL ( 12.93 mmol/L )
Glutathione reduced ≧ 60 mg/dL ( 1.95 mmol/L )
Hemoglobin ≧ 6,000 mg/dL ( 0.94 mmol/L )
Uric acid ≧ 9 mg/dL ( 0.54 mmol/L )
Customer Service
We sincerely like to provide complete, considerate services to our customers. Please review all the instructions to make sure you are performing the steps correctly. If you have any questions or problems of RightestTM GM100 products, please contact your local Bionime distributor. Or email to rightest@bionime.com.
Warranty
Bionime Corporation warrants that your GM100 Meter will be free from defects in materials and workmanship for five years from the date of purchase.
This warranty does not apply to the performance of a GM100 Meter that has been altered, misused, tampered with or abused in any way.
This warranty applies only to the original purchaser of the meter. Please complete and return the enclosed warranty card to Bionime authorized representative.
Different models have different specifications. Some of the models are not included with the warranty card.
Parts of Critical Component
Blood Glucose Meter, Test Strip, Control Solution and Lancing Device
Manufacturer: Bionime Corp.
Product complied with In Vitro Diagnostic Medical Device Directive 98/79/EC.
(CE 0197)
EU Rep: BIONIME GmbH; Tramstrasse 16, 9442 Berneck, Switzerland E-mail: info@bionime.ch
Disposable Sterile Lancets
Manufacturer: SteriLance Medical (SuZhou) Inc.
No.68 LiTangHe RD, XiangCheng, SuZhou, JiangSu 215133, P.R. China EC- Rep:
EMERGO EUROPE, Molenstraat 15, 2513 BH The Hague, The Netherlands
Product complied with Medical Device Directive 93/42/EEC ( CE0197 ).
 BIONIME CORPORATION
No. 100, Sec. 2, Daqing St., South Dist.,
Taichung City 40242, Taiwan
Tel: +886 4 23692388
Fax: +886 4 22617586
E-mail: info@bionime.com
http://www.bionime.com

Bionime GmbH
Tramstrasse 16
9442 Berneck
Switzerland
E-mail: info@bionime.ch


Here you can download full pdf version of manual, it may contain additional safety instructions, warranty information, FCC rules, etc.
Manual, Instructions For Use for BIONIME Rightest GM100 Blood Glucose Meter (2 pages)
File Specifications:1213/1213723-rightest_gm100.pdf file (30 Jun 2023) |
Accompanying Data:
BIONIME Rightest GM100 Blood Glucose Meter PDF Instructions For Use (Updated: Friday 30th of June 2023 07:25:48 AM)
Rating: 4.7 (rated by 53 users)
Compatible devices: Rightest GM782, GM232B, Rightest GS260, Rightest GT100, rightest GM260, Rightest GM700, Rightest ALPHA, RIGHTEST HR310.
Recommended Documentation:
Manual, Instructions For Use (Text Version):
(Ocr-Read Summary of Contents of some pages of the BIONIME Rightest GM100 Document (Main Content), UPD: 30 June 2023)
-
1, 4. Time format 12/24H selection With the time format blinking, press the main button to adjust it. Then hold the same button for 2 seconds to confirm it and move to hours setting. 5. Hour setting With the hour blinking, press the main button until the current hour appears. Then hold the same button for 2 seconds to confirm it and move to minute setting. 6. Minute setting With the minute …
-
2, 101-3GM100-114 EN(US) Battery Error battery as soon as you can. You can still do the test. Meter can not do the strip test. Please change the battery immediately. 1. The » » symbol is blinking when the battery power is low. Please change 2. The » » and » » symbols are blinking when the battery is too low. 3. After changing the battery, perform a quality control test. Temperature Error perform…
-
BIONIME Rightest GM100 User Manual
-
BIONIME Rightest GM100 User Guide
-
BIONIME Rightest GM100 PDF Manual
-
BIONIME Rightest GM100 Owner’s Manuals
Recommended: HDT-1X, T1006, ENP100, D-7
Links & Tools
Operating Impressions, Questions and Answers:
Описание товара
Именно в таких ситуациях важны скрининговые мероприятия для выявления диабета. Наличие глюкометра в семье, где есть риск диабета, во многих странах давно уже стало нормой.
Глюкометр Bionime GM100 занимает лидирующие позиции на мировом рынке товаров для диабетиков. Удобство его использования и эталонная точность измерений (особенно на низких сахарах) – выше всяких похвал. Часто складывается ощущение, что этот продукт разработан людьми, которые сами больны диабетом – настолько он продуман и прост в обращении.
Bionime GM100 не требует введения кода для идентификации тестовой полоски, что в разы сокращает время проведения процедуры измерения. В течение всего 8 секунд Вы можете получить результат содержания глюкозы в крови, сопоставимый с лабораторными исследованиями. Глюкометр Bionime GM 100 – настоящая поликлиника на дому!
Прибор способен удержать в своей памяти до 150 измерений, а также рассчитать среднее значение уровня глюкозы в крови за последние 1, 7, 14, 30 или 90 дней.
Освоить последовательность действий при измерении будет под силу любому желающему — в комплектацию прибора входит очень подробная пошаговая инструкция по эксплуатации. При возникновении каких-либо сложностей с использованием глюкометра, можно проконсультироваться по телефону горячей линии Bionime 8(029) 258-54-05, где работают опытные специалисты с медицинским образованием.
Система определения глюкозы в крови Bionime GM100 – Ваша уверенность в завтрашнем дне!
Комплектация: Ланцетное устройство + Глюкометр GM 100 (чехол в комплект НЕ ВХОДИТ)
Особенности:
* Пожизненная гарантия;
*память: 150 измерений;
*прибор откалиброван по плазме крови;
* диапазон измерения 0,6 — 33,3 ммоль/л.
*время ожидания результата: 8 секунд;
* габаритные размеры: высота – 9,5 см, ширина – 4,4 см, толщина – 1,3 см.;
* вес глюкометра: 43 гр.
Купить Система контроля уровня глюкозы в крови Rightest GM 100 с принадлежностями (25)
Цена на Система контроля уровня глюкозы в крови Rightest GM 100 с принадлежностями (25)
Инструкция по применению для Система контроля уровня глюкозы в крови Rightest GM 100 с принадлежностями (25)
Заказать с доставкой Система контроля уровня глюкозы в крови Rightest GM 100 с принадлежностями (25) на дом
9.
View window appearance
Make sure your blood sample covers the whole area of the View Window to get
an accurate test result. Insufficient blood sample will cause inaccurate test
result. Repeat the test with a new test strip.
Insufficient blood sample
Enough blood sample
PRECAUTION
— Check the expiration date printed on the package every time you use a
strip. Do not use expired test strips.
— Use each test strip immediately after removing from the vial.
— Do not reuse test strips.
— Do the test at least 30 minutes after moving into a different location with
significant change in temperature.
— Place the blood drop only on the sample entry of the strip.
— Please don’t drip or inject the blood sample directly by
syringe to the entry port of test strip. Doing this might
contaminate the meter or cause damage and is strongly
not recommended.
Blood glucose test results are shown on the meter as
mg/dL
or
mmol/L
depending on which unit of measurement you have chosen. Consult your
healthcare professional before making any changes to your diabetes
medication program.
If your blood glucose result is unusually high or low, or if you question your
testing results, repeat the test with a new test strip. You can also run a Quality
Control Test with
Control Solutions to check your meter and strip. If
the test result still remains unusually high or low, contact your healthcare
professional immediately.
If you are experiencing symptoms that are not consistent with your blood
glucose test results and you have made sure to follow all instructions of this
manual, contact your healthcare professional immediately.
The
Meter displays results between 10 and 600 mg/dL
( 0.6 and 33.3 mmol/L). If your test result is below 10 mg/dL ( 0.6
mmol/L ), «
» will appear on the screen. Please repeat your test
again by a new strip. If you still get «
» result, you should
immediately contact your healthcare professional.
If your test result is above the high end of the system’s detection
range 600 mg/dL ( 33.3 mmol/L ), «
» will appear on the screen.
Please repeat your test again by a new strip. If you still get «
«
result, you should immediately contact your healthcare
professional.
10.
Recalling Test Result & Average
The
meter is able to store 10 test results with time and date
automatically. If your meter has stored 10 results, which is the maximum
memory of the meter, the newest test result will replace the oldest one.
To recall your test memory, start with the meter without test strip inserted.
1. Press the main button to switch the screen to memory function, you will see
» mem » symbol on the up right corner of the screen. it will show the latest
testing result with time and date. The latest result is with sequence number,
» 1″.
2. Under the memory screen, use main button to review all previous results with
date and time. You will see results from the most recent ( Sequence no, » 1 » )
to the oldest ( Sequence no, » 10 » ) on the down left corner of the screen.
3. The
meter provides you several average test results. You can
view 1-day, 7-day 14-day or 30-day average of test results depending on
which one you’ve chosen in setting mode for better blood monitoring of your
blood glucose.
4. Press the main button until the «AVG» symbol appears on the up left corner of
the screen. The you will see 1-day, 7-day, 14-day or 30-day average of test
results depending on which one you’ve chosen in setting mode.
5. The number shown on the down left corner means how many test results are
calculated.
6. The «
» , «
» results, the control solution results, the non — average test
results and the test result made out of normal temperature range
( <10℃, >40℃ ) are not calculated in the average.
PRECAUTION
— You have to set the time and date to activate the average function.
11.
Quality Control Test
To make sure that your blood glucose monitoring system works properly, you
must perform quality control testing.
1. Entering Control Solution mode
Insert the strip into the strip port on meter. While the blood drop symbol
flashing, press and hold the main button for over 5 seconds. Then you will
see «
» symbol blinking on the screen indicating that you’ve successfully
entered the control solution mode.
2. Control Solution Test
A control solution test ensures that the meter and test strips are functioning
properly together. Once you enter control solution mode, you are ready to
perform a control solution test.
When should perform a quality control test ?
Before doing a blood glucose test with your meter for the first time.
When you open and start using a new test strip vial.
When your meter is dropped or splashed with liquids.
Whenever you think your test result does not consistent with the way you feel.
Whenever you want to check if your system is working properly or not.
Whenever you want to practice testing and check correct procedure.
PRECAUTION
Each time you open a new bottle of
Control solution, write the discard date
on the label. Control solution is good
,
for 3 months after opening the bottle,
or until the expiration date printed on
the label, whichever comes first.
Understanding Control Test Results
Your control solution test results should fall within the control solution range.
That means your
System is working correctly.
Control Solution Range
Example of control solution range printed
79-107 mg/dL
on your test strip vial label.
4.4-5.9 mmol/L
If control solution test results are out of control solution range, your
System may not be working properly. Repeat the quality control test. If your
control solution results outside the range still exist, do not use the
System to test your blood glucose. And contact Bionime authorized distributor
or Bionime Customer Service.
The reason your control solution results are out of the range :
— our control solution has expired or after 3 months since opened.
Y
— Your test strip has expired.
— You leave the cap off the vial of test strips or control solution for a long time.
— You didn’t perform the test proce
dure correctly.
—
Malfunction of the meter.
12.
Performing a Quality Control Test
Use with Control Solution
1. Take one test strip from vial and Re-cap the vial
cap immediately.
2. Insert the test strip with view window, facing up,
into test strip port.
3. While the blood drop symbol flashing, press and hold the main button for
over 5 seconds until the «
» symbol appears.
4. You will see blinking «
» symbol and «
«
symbol on the screen prompting you to apply
control solution.
5. Shake the bottle of control solution well before
opening the cap. Then open the cap and put it
on the table.
6. Drip a drop of control solution on the top of the
cap.
7. Gently touch sample entry of the strip with the
control solution on the top of the cap.
8. When you hear a beep, leave the meter on the
table while waiting for the test result.
The screen will display the countdown.
9. Tightly replace the cap on the control solution
bottle.
10. The control solution result appears. Compare your control test result to the
range printed on the test strip vial label.
PRECAUTION
— Your quality control test result by control solution test will not be
calculated for average reading but still can be recalled. The control
solution test result will be shown with «
» symbol on the screen.
— Before «
» and «
» appears, please don’t touch the control solution
to the sample entry on strip because the meter is still in an internal
check. If you do so, the meter will show «
— Don’t drip the control solution to sample entry of the strip directly. The
reagent on strip might be sucked into the bottle of control
solution and might cause the degeneration of control
solution. Doing this might contaminate the meter via the
test strip port as well.
— Don’t touch the control solution. If you have touched it,
please clean up with water.
Maintenance
Keep your meter and test strip free of dust, water or any other liquid. Store the
meter in the carrying case when not in use. If meter is dropped or damaged,
perform a quality control test with control solution before doing a blood glucose
test.
Cleaning Meter
Clean the outside of the meter with a damp cloth and mild soap/detergent.
Keep the test strip port from getting wet.
13.
Error Message and Trouble Shooting
Er1 — The inserted strip has been used or
damaged. Please use a new test strip from
Exp. Date 2008-01
vial.
Er2 — Meter has malfunctioned. Do the quality
control test or reinstall the battery to see
if the meter works properly. If error screen still appears,
contact Bionime Customer Service.
Er3 — Signal transmission is disrupted, repeat the test.
Battery Error
1. The «
» symbol is blinking when the battery
power is low. Please change battery as soon
as you can. You can still do the test.
2. The «
» and «
» symbols are blinking
when the battery is too low. Meter can not do
the strip test. Please change the battery
immediately.
3. After changing the battery, perform a quality control test.
Temperature Error
In order to get accurate test result,
perform
( 50~104℉ ).
1. When the ambient temperature is 0~9℃ ( 32~48℉) or
41~50℃ (106~122℉) the «
» warning symbol will be
blinking, you still can do the test but the test result is only for
reference because the test result under these ranges of
temperature might not be correct. Repeat the test at an area
with temperature between operating range. ( 10~40℃ or
50~104℉ )
2. When you move from the area with temperature outside the
operating range of test strip to another area with temperature
inside operating range of test strip, please wait for 30 minutes
before you do the test.
3. When the temperature is below 0℃ ( 32℉ ) or over 50℃
OPEN
( 122℉ ), Meter can not do the test and the «
blink in this condition. Please move the meter to environment
with temperature between 10~40℃ ( 50~104℉ ) and repeat
the test after 30 minutes.
Sampling Error
Before «
» appears. Please don’t apply the blood to the entry of
the strip because the meter is still doing internal check. If you do
so, the meter will show «
» and «
strip and insert a new one to do the test again.
Meter Malfunction
If you find the meter can’t be switched on, please follow the steps below for
CLOSE
quick inspection.
1. Open the battery cover, take out the battery.
2. Wait for 5 minutes and reload the new battery.
The meter should be work normally after finishing above steps. If not, please
contact Bionime authorized distributor or Customer Service Center.
Specification
Measurement Technology
Oxidase Electrochemical Sensor
Sample
Capillary
Minimum Sample Volume
1.4 microliter
Measuring Range
Test Time
» and «
«.
Memory Capacity
Power Saving
Operating Temperature
Operating Relative Humidity
Hematocrit
Power Supply
Battery Life
Meter Dimension
Meter Weight
Monitor
Display Area
Meter Storage Conditions
Test Strip Storage Conditions
Limitations
—
Blood Glucose Test strips are designed for using with capillary
whole blood samples. Do not use serum or plasma samples.
— Inaccurate test results may be obtained at high altitude more than about
10,000 feet ( 3048 meters ) above sea level.
— Severe dehydration and excessive water loss may cause inaccurately low
results.
—
Blood Glucose Monitoring has not been validated for use on
neonates.
— The glucose test may be interfered under abnormal concentration of
Uric acid > 9.0 mg/dL ( > 0.54 mmol/L )
Cholesterol > 500 mg/dL ( > 13 mmol/L )
Customer Service
We sincerely like to provide complete, considerate services to our customers.
Please review all the instructions to make sure you are performing the steps
correctly. You are always welcome to contact us by call: 886 4 24951268
( GMT+08:00, 08:30~17:30 ), or by e-mail at info@bionime.com If you have
testing between
10~40℃
any question or advice.
Warranty
Bionime Corporation warrants that your
materials and workmanship for five years from the date of purchase.
This warranty does not apply to the performance of a
altered, misused, tampered with or abused in any way.
This warranty applies only to the original purchaser of the meter.
Please complete and return the enclosed warranty card to Bionime authorized
representative.
Different models have different specifications. Some of the models are not included with
the warranty card.
Parts of Critical Component
Blood Glucose Meter, Test Strip, Control Solution and Lancing Device
Manufacturer: Bionime Corp.
Product complied with In Vitro Diagnostic Medical Device Directive 98/79/EC. ( CE0197 )
» symbol will
EU Rep: BIONIME GmbH; Heinrich Wild Strasse 202, CH-9435 Heerbrugg / Switzerland
Disposable Sterile Lancets
Manufacturer: Vitrex Medical ApS.
Product complied with Medical Device Directive 93/42/EEC. ( CE0459 )
IVD
For in vitro diagnostic use
Use by
«. Please remove the
Method of sterilization using irradiation
BIONIME CORPORATION
whole blood
694, Renhua Road, Dali City,
Taichung County, Taiwan 412
Tel: +886 4 24951268
E-mail: info@bionime.com http://www.bionime.com
10-600 mg/dL ( 0.6-33.3 mmol/L )
8 seconds
10 blood glucose test results with date
and time
Turn off automatically after 2 minutes no
use Press the «
» button for 2 seconds.
10 ~ 40℃ ( 50 ~ 104℉ )
10 — 90%
30 — 55%
one CR2032 battery
About 1000 tests
95.0 mm x 43.8 mm x 13.0 mm
43.0 g with batteries
LCD display
39.0 mm x 38.0 mm
-10 ~ 60℃ ( 14 ~ 140℉ )
4 ~ 30℃ ( 39 ~ 86℉ ),< 90% relative
humidity
Meter will be free from defects in
Meter that has been
LOT
Lot number
Manufacturer
Temperature limitation
Do not reuse
EU Representative:
BIONIME GmbH
Heinrich Wild Strasse 202,
Fax: +886 4 24952568
CH-9435 Heerbrugg
Switzerland
101-1GM100-010
4. Time format 12/24H selection
With the time format blinking, press the main
button to adjust it. Then hold the same button
for 2 seconds to confirm it and move to hours
setting.
5. Hour setting
With the hour blinking, press the main button until the current
hour appears. Then hold the same button for 2 seconds to
confirm it and move to minute setting.
6. Minute setting
With the minute blinking, press the main button
to adjust it. Then hold the same button for 2
seconds to confirm it. Meantime, it will shift to
next digit for setting. Repeat the above action
until the minute setting is completed. Then it will
move to average-day setting.
7. Average-day setting
With the number » 1, 7, 14, 30 » blinking, press
the main button for the days of the average you
would like to read. Then hold the same button
for 2 seconds to confirm it and move to
measurement unit setting.
8. Setting the unit of measurement
With milligrams per deciliter (mg/dL) or
minimole per liter (mmol/L) blinking, press the
9. Ending setting
After confirm the measurement unit, you’ll hear a sound of » beep «. All the
settings are saved and completed and will return to time screen.
1. Year setting
With the year format blinking, press the main button to adjust
it. Then hold the same button for 2 seconds to confirm it.
Meantime, it will shift to next digit for setting. Repeat the above
action until the year setting is completed. Then it will move to
month setting.
2. Month setting
With the month blinking, press the main button until the
current month appears. Then hold the same button for 2
seconds to confirm it and move to day setting.
3. Day setting
With the day blinking, press the main button to adjust it. Then
hold the same button for 2 seconds to confirm it. Meantime, it
will shift to next digit for setting. Repeat the above action until
the day setting is completed. Then it will move to time format
setting.
NOTE
— When you do not do any settings of meter for over 2 minutes, the meter
will leave setting mode and power off automatically.
— Any time you would like to escape from the setting mode, please press
and hold the main button for over 5 seconds. Meantime, all the current
settings will be saved.
main button to switch. Then hold the same button for 2 seconds to confirm it.
PRECAUTION
— Re-cap the test strip the vial immediately after removing a test strip.
— Do not reuse test strips.
— Do not use expired test strips.
— Record the date of opening a new strip vial for the first time. Discard the
vial of strips after 3 month from opening.
— Store the test strips in a cool and dry location. Do not expose to direct
sunlight or heat.
— For detailed information, please refer to the GS100 Test Strip
Package Insert.
Intended Use
Blood Glucose Monitoring System
Instructions for Use
The Blood Glucose Monitoring System is intended for in vitro
diagnostic use ( for self-testing ) only ( outside the body ) and coding is not
required. The testing result is calibrated to be plasma equivalent for test with
fresh capillary whole blood samples from the fingertip, palm or forearm
depends on what kind of lancing device you are using. You may consult your
healthcare professional for instructions on how to use the system correctly. Our
customer support staff is available to assist you as well.
1.
Package of Meter Kit2.
Preface
3 *2 *1
( Different packages have different bundled items. Some of packages might not
include * items.)
The Meter3.
Precautions4.
— Before using the System to test your blood glucose, please read
all the instructions and practice the tests including quality control test.
— Please do the quality control test regularly to make sure the test results are
accurate .
— The GM100 Blood Glucose Meter can only be used with the
GS100 Blood Glucose Test strips. The use of any other brand
strips should not be used under any circumstances. The use of other brands
of strips may produce inaccurate results.
— The Blood Glucose Monitoring System is intended for self-testing. It
should not be used to diagnose diabetes mellitus.
— Blood Glucose Monitoring System has not been validated for use
on neonates. Therefore, it’s not intended for use of neonates.
— This meter can be only tested with capillary whole blood. Please don’t test with
arterial blood.
— Do the test at least 30 minutes after moving into a different location with
significant change in temperature.
— Dispose of used batteries properly.
— Please note the meter kit contains small parts like test strips which could result
in a choking hazard for children.
— Prevent water from entering the meter. Never immerse the meter or hold it
under running water.
— The minimum blood sample size for testing is 1.4µl  )
)
Sample Size Example
1.0 1.4 2.0 3.0µl µl µl µl 4 µl .0
The Test Strip ( GS100 Test Strip )5.
Sample Entry
µl
Apply a drop of blood or control solution
here. The test request is only 1.4 of blood.
Electrode Contacts
Sensing signal output terminals.
Noble Metal Electrodes
Electrochemical sensor
Indication Symbol
Insert strip with indication symbol
up and toward meter.
Battery Installation6.
10. While the blood drop symbol flashing, you are ready to apply the blood
sample.
11. Place the lancing device against the pad of
your fingertip and press the release button.
The best puncture sites are on the middle or
ring fingers. Press the release button.
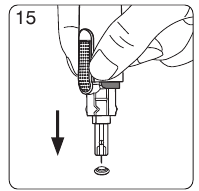
14. Pull off the depth adjustable cap. Without touching the used disposable
lancet, stick the lancet tip into the protective cover.
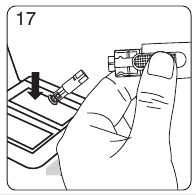
15. Hold the release button in one hand and pull on the plunger in the other
hand will safely eject the used disposable lancet.
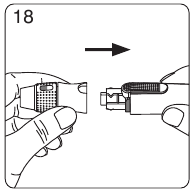
16. Discard the used disposable lancet into an appropriate puncture-proof or
biohazard container.
17. Replace the depth adjustable cap after finishing the test.
12. Touch and hold the drop to the edge of
sample entry until you hear a » beep » and the
view window is totally filled with blood. If the
view window is not totally filled with blood or
the test does not start. Please discard the test
strip and repeat the test with a new test strip.
13. You will see the countdown mode on the
screen. After 8 seconds, the test result
appears.
1
2
The Blood Glucose Monitoring System was manufactured by
supported by Bionime Corporation and its authorized representative. If you
have any questions or concerns, please contact your Bionime authorized
representative or call us by phone number, 886 4 24951268 ( GMT+08:00,
08:30~17:30 ). We will provide best assistance and solutions for you.
Hand Bar
Grip here to insert
test strip into meter.
View Window
This window is yellow before applying
blood sample. It gradually turns red
when filled with blood.
We suggest you use a sample between 1.4~2.5µl. A blood sample size above
4.0µl is too large. A blood sample size below 1.4µl may give an inaccurate test
result. In this case, repeat the test with a new test strip.
GM100 is designed to use with GS100 strip only. Please note that
misuse of other strips might cause unexpected damage or produce
inaccurate test results.
Thank you for selecting the Blood Glucose Monitoring System.
Please read this manual thoroughly before you start testing. It provides all the
information you need to use the product. You will get a correct test result by the
following instruction of this manual. Please only purchase the test strips in
your country, the use of the test strips of different countries is not
suggested and might get deviated test results under such circumstance.
It is quite important for you to monitor blood glucose regularly. A derived
complication can thus be effectively reduced. Through the assistance of
Blood Glucose Monitoring system, which provides considerate
design and accurate results, your diabetes management can become more
reliable and ease-to-use.
Display Window
Show your test result,
messages and relative
information.
Test Strip Port
Insert test strip here until you
hear a click.
Main Button
Press to turn on/off meter.
Switch different function
screen.
Press and hold down until
enter to the setting mode.
(There will be a power-off
period during this process.)
Battery Cover
Slide cover to
change battery.
Meter Serial
Number
Model Number
Plastic Tape
Pull it off to activate meter.
Test Str ips
20
07—
06
1. Meter
2. Test Strips (0/10/25 pcs) *
3. Control Solutions *
4. Instructions for Use
5. Blood Glucose Test Strip
Package Insert *
6. Lancing Device *
7. Disposable Sterile Lancets
(10pcs) *
8. Instruction for the lancing device *
9. Log Book
10. Warranty Card + Emergency
11. CR2032 Battery (Inserted into the
meter)
12. Carrying Case *
7 *
8 *
6 *
4
5 *
9. Insert the strip into the strip port on meter with the indication symbol facing
up.
1110
13
1614 15 17
Setting Up Your Meter-Setting the Date, Time, and Unit ……
7.
PRECAUTION
— Danger of explosion might happen if the battery is incorrectly replaced.
— Please follow the local regulation and discard a used battery properly.
6. Set the time and date when the batteries are replaced. See Setting the Date,
Time and Unit section. Prior test results are still stored in the memory.
Your meter comes with one CR2032, 3volt, battery installed. One
new battery will provide power to perform about 1000 tests under
normal use. Before using it, please pull off the plastic tape and
press the main button to activate the meter. The low battery
symbol » » will keep appearing on your display if your battery
runs low. Please keep spares on hand and replace the battery
soon when a battery symbol appears.
1. Turn the meter over. Press and push battery
cover to open.
2. Install the battery. Be sure to put battery in
correct direction.
3. Slide the battery cover back until it snaps into place.
4. The meter performs a self-test and all symbols on the display
will blink.
5. Press any button to exit the self-test and enter Setting Mode.
5. Choose a depth of penetration by rotating the
top portion of the depth adjustable cap until
the setting depth matches the window.
Settings are based on skin type » » for soft
or thin skin; » » for average skin; » » for
thick or calloused skin.
1. Pull off the depth adjustable cap.
2. Insert a new disposable lancet firmly into lancet carrier.
3. Twist off and set aside the protective cover of the disposable lancet.
4. Replace the depth adjustable cap.
6. Hold the hub in one hand and pull on the plunger in the other hand. The
device will be cocked. Release the plunger, it will automatically move back to
its original position near the hub.
1 2 3 4
5
6
7. Wash your hands with warm
soapy water and dry thoroughly.
8. Take one strip from the vial. Re-
cap the vial cap immediately.
7 8 9
Performing a Blood Test
8.
Hub
Lancet carrier
Plunger
Release button
Depth adjustable cap
You can enter Setting Mode by below two ways.
1. Reload battery
After removing the battery, please press the main button for several times
until no signal on screen, then follow the battery installation steps to load
battery. The meter will do self test. Press the main button to close the test
and enter Setting Mode.
2. With Battery inserted
Press the main button first to turn on the meter. Then press and hold the main
button for 5 seconds (the meter will be turned off during this period, please
keep pressing) until you hear a beep, indicating you have successfully
entered Setting Mode. The display screen will show setting data.
NOTE
— When you keep pressing the main button for 2 seconds, the display on
screen will turn off. Please don’t care it. Keep pressing the main button
till entering setting data.
— Quick press the main button allows you to change setting while hold it
for 2 seconds will confirm the setting. However, if you press and hold
the main button over 5 seconds it will escape from setting mode and
return to time screen.
Turning on /off the Meter
1. Auto Power off
The meter will power off automatically if you don’t operate it over 2 minutes.
2. Manual Power off
If you want to turn off the meter, please keep pressing the main button for 2
seconds.
3. How to turn on the Power
1) Press the main button
2) Insert one piece of test strip
PRECAUTION
Do not touch your blood drop to the sample entry on the strip until you
see the » » appear. The meter is performing an internal test and will
display » » and » » if you apply blood too soon. Then you will waste
a test strip.
12