-
Contents
-
Table of Contents
-
Bookmarks
Quick Links
Version 1.03 | 09/16/2014
User Manual
ShareCenter
+ 2-Bay Cloud Network Storage Enclosure
®
DNS-327L
Related Manuals for D-Link ShareCenter DNS-327L
Summary of Contents for D-Link ShareCenter DNS-327L
-
Page 1: User Manual
Version 1.03 | 09/16/2014 User Manual ShareCenter + 2-Bay Cloud Network Storage Enclosure ® DNS-327L…
-
Page 2: Preface
Preface D-Link reserves the right to revise this publication and to make changes in the content hereof without obligation to notify any per- son or organization of such revisions or changes. Manual Revisions Revision Date Description March 28, 2013 • Initial release for Revision A1 1.01…
-
Page 3: Table Of Contents
System Requirements …………..6 Managing your DNS-327L …………57 Package Contents …………….. 6 D-Link Storage Utility …………..58 Features ……………….. 7 D-Link Storage Utility — For Mac ……….60 Checking the Hardware Requirements ……10 Web UI Login …………….63 Hardware Overview …………..11 Web UI General Layout ………….64 Front Panel …………….11…
-
Page 4
USB Storage Information ……194 Link Speed and LLTD Settings ….156 Printer Information ……… 195 DDNS …………….. 157 System Status …………… 196 Port Forwarding…………. 158 System Info ………….. 196 Application Management ……..161 Home ………………199 D-Link ShareCenter DNS-327L User Manual… -
Page 5
Create a Zip file from the Selected Folder ..239 My Surveillance — Viewing Preset Points ….. 276 Add to Zip …………..240 My Surveillance — Live Video/Playback Settings 277 Unzipping a Zipped File ……..242 My Surveillance — OSD Settings ……278 D-Link ShareCenter DNS-327L User Manual… -
Page 6
Time Machine Setup — Mac OS ……335 Time Machine — Delete a Volume ….339 Technical Specifications ……….403 USB Backups …………341 MTP Backups …………. 342 USB Backups …………. 343 MTP Backup Process……..344 D-Link ShareCenter DNS-327L User Manual… -
Page 7: Product Overview
Google Apps like Google Docs, Google Spreadsheets, and Google Presentations to your NAS. 1 Hard Drive(s) not included. 2 D-Link cannot guarantee full compatibility or proper playback with all codecs. Playback capability depends on the codec support of the UPnP AV media player. D-Link ShareCenter DNS-327L User Manual…
-
Page 8: Before You Begin
• Up to two 3.5” SATA Hard Drive(s) Package Contents • D-Link ShareCenter DNS-327L • CD-ROM with Manual and Software • Quick Installation Guide • 12V DC 3A Output Power Adapter • CAT5e Ethernet Cable D-Link ShareCenter DNS-327L User Manual…
-
Page 9: Features
• CIFS/SMB for Windows and Mac OS X and Linux • Scandisk • NFSv3 Server for Linux and UNIX • Supports advanced format HDD • AFP 3.3 for Mac OS X • AES based volume encryption D-Link ShareCenter DNS-327L User Manual…
-
Page 10
• RAID roaming • Supports mydlink portal • Folder Management • Supports D-Link storage utility/setup wizard • Share folder level permission • OS Support: Windows XP, Vista, 7, 8, and Mac OS X • Supports ISO mount • Two access modes supported: Open (Share) mode and Ac- •… -
Page 11
• Content classification : Classify contents according to media type (photo, video, music) • iPhone®, iPad®, and Android® app support • My Surveillance • Camera auto installation • 4-Channel Motion JPEG, MPEG4 or H.264 recording D-Link ShareCenter DNS-327L User Manual… -
Page 12: Checking The Hardware Requirements
Selecting hard drives: You can use hard drives from any manufacturer and with any capacity with your DNS-327L. The D-Link ShareCenter supports standard 3.5” internal SATA drives. If you are unsure, check with your administrator or hard drive retailer/manufacturer to verify that your hard drives meet this standard *Warning — Any pre-existing data on the drives will be erased during installation.
-
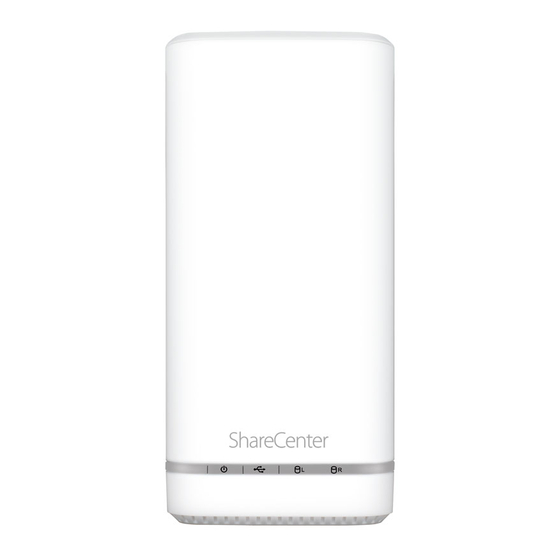
Page 13: Hardware Overview
Press once to activate the USB port, or press and hold the button for more than 5 seconds to unmount the USB device. Left HDD/Right Identifies the left and right-installed hard drives LED Indicators Illuminate depending on activity (see next page for details) D-Link ShareCenter DNS-327L User Manual…
-
Page 14: Led Description
Orange Light — the specified hard drive has a problem No Light — the specified hard drive is inactive White Light — the specified hard drive is functioning correctly Blinking Orange Light — there is read/write activity on the specified hard drive D-Link ShareCenter DNS-327L User Manual…
-
Page 15: Rear Panel
LED is off, check the connection/cable to the device you are connecting to. The LED on the right will light solid for a Gigabit connection and will remain off when connected to a 10/100 Mbps device. D-Link ShareCenter DNS-327L User Manual…
-
Page 16: Bottom Panel
Product Details Information about the product — DNS-327L including serial number, part number, manufacturer number etc. Reset Button Press and hold this button for more than 5 seconds to reset the unit to its factory defaults. D-Link ShareCenter DNS-327L User Manual…
-
Page 17: Getting Started
“Zero Configuration Setup” on page 18 to run the setup wizard which will show you how to install and configure your DNS-327L. Release the top panel by firmly pressing the latch at the back. Once the faceplate is unlatched, remove it to expose the hard drive bays. D-Link ShareCenter DNS-327L User Manual…
-
Page 18
Some hard drives that are thin or oddly shaped may need to be inserted carefully into position. If a drive is not properly set in place, the hard drive LED will not illuminate after powering on the device. D-Link ShareCenter DNS-327L User Manual… -
Page 19
Connect an Ethernet cable to the Ethernet port. This cable should connect the ShareCenter to your local network via a router, switch, or directly to a computer for configuration (cross-over cable required). Connect the power adapter to the power receptor. D-Link ShareCenter DNS-327L User Manual… -
Page 20: Zero Configuration Setup
Use the included Ethernet cable and plug it into the DNS-327L. Plug the other end into an available port on your router. If you wish to use your NAS wirelessly, you will be able to remove the cable from the router after Zero Configuration Setup is complete. D-Link ShareCenter DNS-327L User Manual…
-
Page 21
Section 2 — Getting Started Attach the External Power Adapter Connect the power adapter to the power connector on your NAS, then plug the power adapter into a wall outlet. D-Link ShareCenter DNS-327L User Manual… -
Page 22
Yes, but if you are unsure of what to do click No. The pop- up screen displays the Device Name, mydlink number, Network Name, and Admin Password. If you are unsure of what to do, you can always go back to Advanced Settings. D-Link ShareCenter DNS-327L User Manual… -
Page 23
Click Yes to format, or No to return to the menu. The format process may take some time to complete. The format process depends on the speed of your network connection and client CPU. D-Link ShareCenter DNS-327L User Manual… -
Page 24
Section 2 — Getting Started Once the format process is complete, your mydlink cloud service will show you the RAID status and the Volume Status. It also displays the size of the drive, and available and used space. D-Link ShareCenter DNS-327L User Manual… -
Page 25: Mydlink On The Dns-327L
Accessing the DNS-327L using mydlink provides a different user interface experience than the usual NAS interface. Once connected to the mydlink service, click the Application button to access My Music, My Files, My Photos, and P2P Downloads from the main panel. D-Link ShareCenter DNS-327L User Manual…
-
Page 26: Windows Installation
Note: Windows Firewall may present you with a warning message to unblock the device. Click Unblock to allow your computer access to the NAS. Select the language of your choice and then click the Start button. D-Link ShareCenter DNS-327L User Manual…
-
Page 27
Installing the Hard Drives Follow the instructions to remove the top cover of your ShareCenter. Click Next to continue. Attach the hard drive bracket(s) to the side of the hard drives as indicated. Click Next to continue. D-Link ShareCenter DNS-327L User Manual… -
Page 28
Slide one or two hard drives into an available hard drive bay of your Share- Center. Click Next to continue. With the hard drives installed properly into each bay, close the chassis by re- attaching the top panel into place. Click Next to continue. D-Link ShareCenter DNS-327L User Manual… -
Page 29
Connect the power adapter connector to the power receptor on the back of the ShareCenter. Then, power on the ShareCenter by pressing the power but- ton located on the front panel. Click Next to continue. D-Link ShareCenter DNS-327L User Manual… -
Page 30
IP address table. A warning message will appear prompting you to confirm that the LED on the front of your device is blinking. If so, click Yes to proceed. Click Next to continue. D-Link ShareCenter DNS-327L User Manual… -
Page 31
In this step, you can create a new admin password. It is recommended you set a password, however you may also leave the fields blank. You should make a record of this password for future reference. Click Next to continue. D-Link ShareCenter DNS-327L User Manual… -
Page 32
You may also use DHCP to configure the IP network settings of the ShareCen- ter. In this situation, leave the parameters blank, as your router will automati- cally provide this information. Click Next to continue. D-Link ShareCenter DNS-327L User Manual… -
Page 33
Configure the time settings by manually configuring the Hour, Minute, and Second settings, or click the “Set time from my computer” button to copy your comupter’s time and date settings. Click Next to continue. D-Link ShareCenter DNS-327L User Manual… -
Page 34
Section 3 — Installation The Disk Information window provides the current RAID type. However, if this isn’t already configured, read the instructions under the Note displayed on the screen. Click Next to continue. D-Link ShareCenter DNS-327L User Manual… -
Page 35: Hard Drive Configuration
Please skip to “RAID 1” on page 43 to con- tinue the setup process using this option. Note: You can skip this step if you have set up this system before. D-Link ShareCenter DNS-327L User Manual…
-
Page 36: Standard Raid
NAS. Please refer to “Mapping a Drive” on page 52 for further information on mapping drive volumes. Click Next to continue. After doing this, the wizard automatically maps drives to your configured volumes. Click Next to continue. D-Link ShareCenter DNS-327L User Manual…
-
Page 37
Next, or if you want to change your settings click Prev to go back and change your settings. Read the details carefully before continuing. When you click Next, you are prompted to verify your decision before you can continue. D-Link ShareCenter DNS-327L User Manual… -
Page 38
Section 3 — Installation The wizard software will start the formatting process. After this is complete, click Next to continue. Note: Do not close the wizard or use other applications until the process is complete. D-Link ShareCenter DNS-327L User Manual… -
Page 39: Jbod
Map Drive to Network only shows one drive. Select a drive letter using the drop-down menu. For further information, please refer to “Mapping a Drive” on page 52. Click Next to continue. D-Link ShareCenter DNS-327L User Manual…
-
Page 40
Section 3 — Installation The Volume Configuration Summary displays a detailed summary of your JBOD configuration. Click Next to continue. Click Next, you are prompted to verify your decision before you can contin- ue. Click Yes to continue. D-Link ShareCenter DNS-327L User Manual… -
Page 41
Note: Do not close the wizard or use other applications until the process is complete. To verify your JBOD, login to your NAS, go to Management >> Disk Man- agement >> Hard Drive Configuration. This shows the current status of your drive(s). D-Link ShareCenter DNS-327L User Manual… -
Page 42: Raid 0
Use the drop-down menus to select a drive letter to map each of the vol- umes to. For further information, please refer to “Mapping a Drive” on page 52. Click Next to continue. D-Link ShareCenter DNS-327L User Manual…
-
Page 43: D-Link Sharecenter Dns-327L User Manual
Section 3 — Installation The Volume Configuration Summary, displays the details of the new configuration. Click Next to continue. Verify your configuration selection before continuing. Click Yes to continue D-Link ShareCenter DNS-327L User Manual…
-
Page 44: D-Link Sharecenter Dns-327L User Manual
Note: Do not close the wizard or use other applications until the process is complete. To verify your RAID 0 configuration, log in to your NAS, go to Management>>Disk Management>>Hard Drive Configuration. This shows the current status of your drives. D-Link ShareCenter DNS-327L User Manual…
-
Page 45: Raid 1
“Mapping a Drive” on page 52. Note: If the size of these two drives are different, the excess space on the larger drive will be formatted as a JBOD Volume. Click Next to continue. D-Link ShareCenter DNS-327L User Manual…
-
Page 46
Section 3 — Installation The Volume Configuration Summary, displays the details of the new configu- ration. Click Next to continue. Verify your configuration selection before continuing. Click Yes to continue D-Link ShareCenter DNS-327L User Manual… -
Page 47
Note: Do not close the wizard or use other applications until the process is complete. To verify your RAID 1, login to your NAS, go to Management>>Disk Management>>Hard Drive Configuration. This shows the current status of your drives. D-Link ShareCenter DNS-327L User Manual… -
Page 48
Alternatively, you can install the add-on packages available on the CD or from the D-Link website at a later stage. Refer to “Add-ons” on page 166 for de- tails. Click Next to accept these installations or click Skip to continue. If you wish… -
Page 49
Click Save to save the file to your local hard drive. Once the download has completed, copy the Squeeze Center package from your local hard drive to Volume_1 of the ShareCenter. Click OK in the dialog box to continue the installation. D-Link ShareCenter DNS-327L User Manual… -
Page 50
The following screens display the installed Add-on Packages. To enable an add-on, click the Enable button next to the name of the add-on that you wish to enable. Click Next to continue to the next window. D-Link ShareCenter DNS-327L User Manual… -
Page 51
Yes radio button. If you do not wish to register with mydlink, select the No radio button. Click Next to continue. The wizard will connect to the mydlink servers and configure your cloud ser- vice. D-Link ShareCenter DNS-327L User Manual… -
Page 52
Click Next to continue. The mydlink service will send a confirmation e-mail to the address you speci- fied in the previous step. Click the activation link in the e-mail to activate your mydlink account. D-Link ShareCenter DNS-327L User Manual… -
Page 53
If you did not use the wizard to map the drives, you can manually map or access the created volumes through your computer’s operating system. Detailed instructions for configuration using the web UI are provided in the configuration section of this manual. D-Link ShareCenter DNS-327L User Manual… -
Page 54: Mapping A Drive
The Map Network Drive screen will appear. Choose a letter from the drop down menu to map the new drive to. Click Browse to find the NAS volume you wish to map on your network. D-Link ShareCenter DNS-327L User Manual…
-
Page 55
Windows will automatically detect all devices on your network including your ShareCenter Click on your ShareCenter to see the volumes you created earlier. Then select the volume that you wish to access and click OK. D-Link ShareCenter DNS-327L User Manual… -
Page 56
Section 3 — Installation After selecting your volume, click Finish to proceed. The drive will then appear in your Windows Explorer under Network. This means the drive is active and ready for use. D-Link ShareCenter DNS-327L User Manual… -
Page 57: Alternative Methods For Mapping A Drive
Section 3 — Installation Alternative Methods for Mapping a Drive You can also map a drive using the D-Link Storage Utility. Once the DNS-327L is discovered in the Storage Utility and the LAN configuration settings are complete, finding the drives happens automatically. Select the drive letter and click Connect.
-
Page 58: Mac — Setup Wizard Installation
When the autorun screen appears, double-click the .dmg file. Double-click the SetupWizardDNS icon. Click Start to begin the wizard. Follow the instructions on the screen to finish setting up your DNS-327L. For more details, refer to “Setup Wizard” on page 24. D-Link ShareCenter DNS-327L User Manual…
-
Page 59: Configuration
Configures language, time and date, device, and system settings. Also allows you to control power, notifica- tions, view logs, do firmware upgrades, and manage USB devices. System Status Displays system and hard drive information along with resource monitoring D-Link ShareCenter DNS-327L User Manual…
-
Page 60: D-Link Storage Utility
DHCP assigned IP address, the ShareCenter will be automatically assigned a 169.254.xxx.xxx address. It is recommended that you use the included D-Link Storage Utility software when accessing and configuring the ShareCenter for the first time. If you want to change the IP address before logging in or you are having trouble connecting to the Share- Center IP address, you can use the Storage Utility software included on the product CD to locate the device on your network and make any necessary changes.
-
Page 61
ShareCenter . If your network is using a DHCP server and the computer receives IP settings from DHCP server, the ShareCenterwill automatically be in the same subnet. D-Link ShareCenter DNS-327L User Manual… -
Page 62: D-Link Storage Utility — For Mac
Section 4 — Configuration D-Link Storage Utility — For Mac To get started with the ShareCenter Storage Utility for Mac, insert the sup- plied CD into your CD-ROM drive: Double-click the .dmg file. Double-click the .dmg file to install the program. In the end you should have the D-link Storage Utility for Mac.
-
Page 63
Section 4 — Configuration The D-Link Storage Utility will open. Make sure you are connected to your lo- cal LAN, then click the Refresh button. The D-Link Storage Utility will find the D-Link DNS-327L. Click Configuration to open the web-based configuration utility using your computer’s default web browser. -
Page 64
Name and Password in the fields provided and click Connect. A pop-up window appears notifying you that mapping the drive was a suc- cess. Click OK to continue. Use the Disconnect button in the D-Link Storage Utility to disconnect from the mapped drive(s). -
Page 65: Web Ui Login
Section 4 — Configuration Web UI Login To access the web UI, open the D-Link Storage Utility, select DNS-327L from the Network Storage Device list, then click the Configuration button. The following screen will appear: Select System Administrator and enter the password created during the Setup Wizard.
-
Page 66: Web Ui General Layout
After logging in, the ShareCenter Home tab will appear. You will see the Applications and Management tabs alongside it. By default, My Folder, My Files, My Music, and My Surveillance will appear under the Home tab. You can also add favorite applications to this tab. D-Link ShareCenter DNS-327L User Manual…
-
Page 67: Applications
Files, Amazon S3 icons, Google Drive, and Xunlei Downloads. Click on each icon to see the submenus. Any additional add-ons which you have enabled will also appear here. Disabled add-ons will appear under the “Disabled Add Ons” heading below. D-Link ShareCenter DNS-327L User Manual…
-
Page 68: Management
Section 4 — Configuration Management The Management tab contains the Setup Wizard, Disk Management, Account Management, Network Management, Application Management, System Management, and Status icons. Click on each icon to see the submenus. D-Link ShareCenter DNS-327L User Manual…
-
Page 69: Management
The ShareCenter has a Setup Wizard that allows you to quickly configure some of the basic device settings. Click the Setup Wizard icon to start the Setup Wizard. Click the Run Wizard button to start the setup wizard. Click Next to continue. D-Link ShareCenter DNS-327L User Manual…
-
Page 70
Confirm Password field. Click Next to continue. Set the time zone from the drop-down menu to the appropriate geographi- cal zone closest to your location. Click Next to continue or click Skip to ignore these settings. D-Link ShareCenter DNS-327L User Manual… -
Page 71
This workgroup should be the same name as your current workgroup set- tings. If you haven’t set up a workgroup yet, type a name that best suits the environment or leave the default “workgroup” name. Click Next to continue or click Skip to ignore these settings. D-Link ShareCenter DNS-327L User Manual… -
Page 72
E-mail and Receiver E-mail. If you require a secure e-mail connection, select your Secure Connection type from the drop-down menu. Click the Test E- mail button to test your settings. Click Next to continue or click Skip to ignore these settings. D-Link ShareCenter DNS-327L User Manual… -
Page 73
If you are satisfied with the settings, click the Finish button to save and com- plete the wizard. You can also click the Previous button to go back and check your settings, or click Exit to end the wizard without saving your settings. D-Link ShareCenter DNS-327L User Manual… -
Page 74: Disk Management
Note: You can still rebuild a drive using the RAID 1 functionality however you must initiate the rebuild manually. Manually Rebuild Now: If Auto-Rebuild is disabled then you can use the Manual Rebuild option by clicking this button. D-Link ShareCenter DNS-327L User Manual…
-
Page 75: Hard Drive Configuration Wizard
RAID format. The following is an example of a standard volume configuration: The Hard Drive Configuration page displays the current RAID configuration under ‘Current RAID Type’ . Click Set RAID Type and Re-Format. The Hard Drive Configuration Wizard will begin. Click Next to continue. D-Link ShareCenter DNS-327L User Manual…
-
Page 76
DNS-327L. It shows the array number, vendor, model, serial number, and drive capacity. Click Next to continue. Select the format you want by clicking on the RAID type box (highlighted in blue). Click Next to continue. D-Link ShareCenter DNS-327L User Manual… -
Page 77
Click Enable Auto-Rebuild to automatically rebuild a failed drive if it has been replaced with a new one. Select Disable Auto-Rebuild if you want to start the rebuild process manu- ally after replacing a failed drive. Click Next to continue. D-Link ShareCenter DNS-327L User Manual… -
Page 78
If you chose to use encryption, this screen will appear. Check Auto Mount if you wish the encrypted volume to be automatically mounted. Enter a pass- word and re-enter the same password to verify your settings. Click Next to continue. D-Link ShareCenter DNS-327L User Manual… -
Page 79
Click Yes to continue, or click No to cancel the reformatting. After clicking Yes, your drives will be formatted and partitioned through several stages. Please be patient while this process takes place. Do not turn off your NAS during this process. D-Link ShareCenter DNS-327L User Manual… -
Page 80
You can confirm encryption use on your volumes by going to Management>>Disk Management>>Volume Encryption. You can also select an encrypted volume and click the Save button to save the encryption key on your local hard drive for future reference. D-Link ShareCenter DNS-327L User Manual… -
Page 81: Upgrading From Standard Mode To Raid 1
Insert a second hard drive into the DNS-327L as per the instructions for the initial installation. The existing hard drive should be the volume which you wish to create a mirror of using the RAID 1 format. Replace the top cover and restart the DNS-327L. D-Link ShareCenter DNS-327L User Manual…
-
Page 82
Please backup all data before taking this action. If you select the second option, “Format the new drive as Standard type”, the data on the original disk will remain. Format the new drive as Standard type. D-Link ShareCenter DNS-327L User Manual… -
Page 83
Reconfigure to RAID 1. Click the checkbox to proceed by migrating to RAID 1. Click Next to continue. Select the disk drive you would like to use to reconfigure the drive to RAID 1. Click Next to continue. D-Link ShareCenter DNS-327L User Manual… -
Page 84
A warning message will appear prompting you to confirm whether you want to format your hard drive. Click Yes to continue, or No to exit. If you select re-format, all data will be erased. Please back up all data before continuing. Click Next to continue. D-Link ShareCenter DNS-327L User Manual… -
Page 85
Section 4 — Configuration Please wait while the wizard formats the hard drive. Click Next to continue. Please wait while the system updates the volume information. Click Next to continue. D-Link ShareCenter DNS-327L User Manual… -
Page 86
Section 4 — Configuration When the setup is complete a summary will show the Slot, Vendor, Model, and Serial Number. Click Finish to continue. Once complete, the wizard will return to the main configuration page. D-Link ShareCenter DNS-327L User Manual… -
Page 87: Smart Test
(refer to “Creating a Schedule” on page 86). You can also check the Send Results by E-mail checkbox to send the test results to the e-mail account specified in the E-mail Settings section of the configuration. D-Link ShareCenter DNS-327L User Manual…
-
Page 88: Creating A Schedule
To view the Schedule List, click on the Schedule List arrow. A new table will appear showing details of the new schedule created. To delete a schedule, click on the Trash Can icon next to the schedule that you wish to delete. D-Link ShareCenter DNS-327L User Manual…
-
Page 89: Scan Disk
Select Scan Disk from the side menu under the Disk Management tab. Using the drop-down menu, select the volume that you wish to conduct a scan of. Click Scan Disk to start the scan. D-Link ShareCenter DNS-327L User Manual…
-
Page 90
The DNS-327L will initialize the volume(s) and begin scanning. Please wait while the software scans the volume(s), or click Exit to cancel the scan. When the scan is complete, the table will either display Success or Failure. Click Finish to exit. D-Link ShareCenter DNS-327L User Manual… -
Page 91: Volume Encryption
You will need to re-format the volume in order to enable encryption. Before proceeding with modifying the encryption data, click the volume you wish to modify. It will turn red. Click Modify. D-Link ShareCenter DNS-327L User Manual…
-
Page 92
Encrypted Key File which is saved on the local computer. Click Next to continue. Click the Auto-Mount checkbox to have the system mount the volume automatically. Enter a new password in the New Password and Confirm Password fields. Click Apply to continue. D-Link ShareCenter DNS-327L User Manual… -
Page 93
You can also click Download Encrypted Key File to save the encryption key to your local computer. If you choose to save the encryption key file, a ‘Save File’ dialog will appear in your web browser. Follow the instructions to save the file to your computer. D-Link ShareCenter DNS-327L User Manual… -
Page 94: Account Management
By default, all users have read and write access to all folders, however access rules can be created and edited in the Network Shares menu. Creating a Single User Click Management >> Account Management. Click Users/Groups on the left side and then click Create. The User Setup Wizard will appear. Click Next to continue. D-Link ShareCenter DNS-327L User Manual…
-
Page 95
Select Create A New User Account and then click Next to continue. Enter a User Name and Password for the new user in the fields provided. Re- enter the password in the Confirm Password field. Click Next to continue. D-Link ShareCenter DNS-327L User Manual… -
Page 96
Read/Write — Users will be permitted to read the contents of the vol- ume, and make changes to the contents. Deny Access — Users will be denied access to the volume. Click Next to continue. D-Link ShareCenter DNS-327L User Manual… -
Page 97
Click Next to continue. If you enabled WebDAV in the previous step, select the volumes the user can have WebDAV access to and then select whether to give Read Only or Read/ Write rights. Click Next to continue. D-Link ShareCenter DNS-327L User Manual… -
Page 98
Enter zero to provide unlimited disk space to the user. Click Next to continue. The final step is a summary of the configuration for the new user. Click Finish to accept the changes or click Exit to cancel the changes. D-Link ShareCenter DNS-327L User Manual… -
Page 99: Creating Multiple Users
Enter a password in the Password field and confirm the password in the Confirm Password field Check the Overwrite Duplicate Accounts box to have existing accounts with the same credentials overwritten by the new accounts. Click Next to continue. D-Link ShareCenter DNS-327L User Manual…
-
Page 100
Read Only — Users will only be permitted to read the contents of the volume. Read/Write — Users will be permitted to read the contents of the volume, and make changes to the contents. Deny Access — Users will be denied access to the volume. Click Next to continue. D-Link ShareCenter DNS-327L User Manual… -
Page 101
• FTP — File Transfer Protocol. Click Next to continue. Enter the amount of disk space you wish to assign the user(s on each volume. Type 0 to provide unlimited disk space to the user(s). Click Next to continue. D-Link ShareCenter DNS-327L User Manual… -
Page 102
The final step is a summary of the new accounts made using the setup wizard. Click Finish to accept the changes or click Exit to cancel the changes. The User Settings window will show a list of the users created. D-Link ShareCenter DNS-327L User Manual… -
Page 103: Modify Users
Section 4 — Configuration Modify Users Click the user you wish to modify. The user will be highlighted in red. Click Modify to continue. The User Setup Wizard will appear. Click Next to continue. D-Link ShareCenter DNS-327L User Manual…
-
Page 104
Section 4 — Configuration To change the username or password, enter the new information in the relevant field. Click Next to continue. Change the Network Share Settings if desired. Click Next to continue. D-Link ShareCenter DNS-327L User Manual… -
Page 105
FTP or WebDAV. CIFS and AFP are set by default. Click Next to continue. Enter the re-assigned amount of disk space you wish to assign the user on each volume. Type 0 to provide unlimited disk space to the user. Click Next to continue. D-Link ShareCenter DNS-327L User Manual… -
Page 106
The final step shows a summary of the configuration for the modified user. Click Finish to accept the changes or Exit to cancel the changes. A message will appear stating the user details have been changed success- fully. Click Yes to exit the wizard. D-Link ShareCenter DNS-327L User Manual… -
Page 107: Delete Users
Click the user you wish to delete. The user will be highlighted in red. Click Delete to continue. A message will appear prompting you to confirm deleting the user. Click Yes to confirm. The user is now removed from the list. D-Link ShareCenter DNS-327L User Manual…
-
Page 108: Import Users
Section 4 — Configuration Import Users Click the Import Users button under the Users/Groups tab. The Import Users Wizard will start. Click Next to continue. D-Link ShareCenter DNS-327L User Manual…
-
Page 109
Check the Overwrite Duplicate Accounts box if this is necessary. Click Browse to select the file you want to import. Click Next to continue Assign the desired privileges and access methods by checking the boxes. Click Next to continue. D-Link ShareCenter DNS-327L User Manual… -
Page 110
Click Finish to close the wizard or go back to change the imported file. Click the “i” icon to see details of each user. Each user’s details are provided in a list according to username, group name, read/write privileges, or access control D-Link ShareCenter DNS-327L User Manual… -
Page 111: Creating A Group
Click Account Management >> Users/Groups. Click the blue arrow next to Group Settings and settings window will appear. Click New to create a new Group. The Group Setup Wizard will now start. Click Next to continue. D-Link ShareCenter DNS-327L User Manual…
-
Page 112
Section 4 — Configuration Enter a Group Name. Click Next to continue Select the user(s) you wish to add to the group by clicking the checkbox next to the user name. Click Next to continue. D-Link ShareCenter DNS-327L User Manual… -
Page 113
Select the Network Share Settings (read, read/write, deny access) for the corresponding disk volume for the group. Click Next to continue. Select the Privileges/Access Methods you want to assign to the group. The greyed out selections are assigned by default. Click Next to continue. D-Link ShareCenter DNS-327L User Manual… -
Page 114
Select the appropriate WebDAV settings and click Next to continue. Enter the amount of space you want to assign to the group for each volume. Enter zero to give unlimited disk space to the group. Click Next to continue. D-Link ShareCenter DNS-327L User Manual… -
Page 115
The wizard is now complete. The last step shows a summary of attributes of the group you created. Click Previous to change your settings or Finish to end the wizard. Under Group Settings, a table will display the group you just created. D-Link ShareCenter DNS-327L User Manual… -
Page 116: Modifying A Group
Click the blue arrow next to Group Settings and the Group Settings table will appear. Select the group you want to modify. Your selection will turn red. Click Modify to change the settings for the group. D-Link ShareCenter DNS-327L User Manual…
-
Page 117
Section 4 — Configuration The Group Setup Wizard will now start. Click Next to continue. Select the group members that you wish to make modifications to. Click Next to continue. D-Link ShareCenter DNS-327L User Manual… -
Page 118
Click Next to continue. Select the appropriate privileges you want to assign to the group. The greyed out selections are assigned by default and cannot be modified. Click Next to continue. D-Link ShareCenter DNS-327L User Manual… -
Page 119
Read/ Write privileges for WebDAV Settings. Click Next to continue. Edit the amount of space you want to assign to the group for each volume. Enter zero to give unlimited disk space to the group. Click Next to continue. D-Link ShareCenter DNS-327L User Manual… -
Page 120
Click Yes to change the quota. The wizard is now complete and will display a summary of the modified group settings. Click Previous to change your settings or Finish to end the wizard. Exit will cancel all changes you made. D-Link ShareCenter DNS-327L User Manual… -
Page 121: Deleting A Group
Select the Group you want to delete, your selection will turn red. Click Delete to continue. A warning message will appear asking you to verify if you want to delete the Group. Click Yes to delete the Group or No to cancel your decision. D-Link ShareCenter DNS-327L User Manual…
-
Page 122: Quotas
Click Enable to activate Quota Settings. The status will now display ‘Started’ notifying you that the Quota Settings are enabled. To modify a User’s Quota Settings, click the blue arrow next to User Quota Settings to reveal a table of users. D-Link ShareCenter DNS-327L User Manual…
-
Page 123
Select the User you want to modify. Your selection will turn red. Click Modify to change the user’s settings. The Quota Settings configuration box will display the user account you want to modify. Enter a new quota amount for each volume. Click Apply to confirm your settings. D-Link ShareCenter DNS-327L User Manual… -
Page 124
Section 4 — Configuration The modified quota settings will be displayed in the User Quota Settings table. To modify Group Quota Settings, click the blue drop-down arrow next to Group Quota Settings to view the group quota table. D-Link ShareCenter DNS-327L User Manual… -
Page 125
The Group Quota Settings screen will display the group you want to mod- ify. Enter a new quota amount for each volume for the current group and click Apply. The modified quota settings will be displayed in the Group Quota Settings table. D-Link ShareCenter DNS-327L User Manual… -
Page 126: Network Shares
At the bottom of the table, the user can navigate through pages and also refresh the window by clicking on the Refresh button. Click on the Reset Network Shares button to reset the network access list to the default configuration. D-Link ShareCenter DNS-327L User Manual…
-
Page 127: Add/Modify Network Shares Wizard
3) Configure network access settings. 4) View a summary of the configuration before completing. Click Next to continue. Select the folder that you wish to share from one of the volumes. Click Next to continue. D-Link ShareCenter DNS-327L User Manual…
-
Page 128
Select the appropriate access rights for the share. Options to select from are Read Only, Read/Write, and Deny Access. This procedure can also be used to block certain users from accessing or modifying certain folders. Click Next to continue. D-Link ShareCenter DNS-327L User Manual… -
Page 129
ShareCenter. Click Next to continue. If you selected Specific User/Group in Step 3, then this step allows you to set the access rights for each group configured for the ShareCenter. Click Next to continue. D-Link ShareCenter DNS-327L User Manual… -
Page 130
• CIFS — Common Internet File System. • AFP — Apple Filing Protocol. • FTP — File Transfer Protocol • NFS — Network File System. • WebDAV — Web-based Distributed Authoring and Versioning. Click Next to continue. D-Link ShareCenter DNS-327L User Manual… -
Page 131
• Root Squash — Disables writing to the Root owned directories and files on the system when the user has root access privileges. • Write — Provides write permission to the file system. Click Next to continue. D-Link ShareCenter DNS-327L User Manual… -
Page 132
If you checked WebDAV as an access method, then this step will allow you to set the access parameters. Click Next to continue. Here a summary of the created shares will be displayed. Click Finish to save your settings. D-Link ShareCenter DNS-327L User Manual… -
Page 133: Deleting A Network Share
Section 4 — Configuration Deleting a Network Share Select the Network Share you wish to delete. Your selection will turn red. Click Delete to remove the share. D-Link ShareCenter DNS-327L User Manual…
-
Page 134: Resetting The Network Shares
Section 4 — Configuration Resetting the Network Shares Click the Reset Network Shares button. A warning message will prompt you to confirm your selection. Click Yes to confirm or No to cancel. D-Link ShareCenter DNS-327L User Manual…
-
Page 135: Iso Shares Setup Wizard
New button. The ISO Shares Setup Wizard will start. Click Next to continue. Select the ISO file to mount. Check the box to the left of the .iso file to select it and click Next to continue. D-Link ShareCenter DNS-327L User Manual…
-
Page 136
Click Next to continue. You can assign Read Only or Deny Access privileges to the ISO Mount share here. Click on the appropriate radio button for the privileges you would like to assign. Click Next to continue. D-Link ShareCenter DNS-327L User Manual… -
Page 137
FTP, NFS and WebDAV. CIFS and AFP are set by default. CIFS — Common Internet File System. AFP — Apple Filing Protocol. FTP — File Transfer Protocol NFS — Network File System. Click Next to continue. D-Link ShareCenter DNS-327L User Manual… -
Page 138
A summary of the share will be displayed. Click on the Finish button to accept the change and complete the wizard. Through the D-Link Storage Utility, the ISO Mount Share can now be mapped to your computer as a normal network share. -
Page 139: Creating An Iso Image
Click on the Create ISO Image button at the bottom of the page to start the ISO Image Creation Wizard. The ISO image wizard helps you create an ISO image on your ShareCenter . Read the instructions for the ISO Image Creation Wizard and then click Next to continue. D-Link ShareCenter DNS-327L User Manual…
-
Page 140: Iso Name And File Path Settings
DVD at a later stage. Select the Image Path. Click the Browse button to select the destination folder on your NAS. Click the volume to save it there or click New to create a new folder. D-Link ShareCenter DNS-327L User Manual…
-
Page 141
Section 4 — Configuration Enter a name to identify the ISO file you are writing. Click Next. A warning message appears asking you to confirm your decision. Click Yes to continue or click No to cancel. D-Link ShareCenter DNS-327L User Manual… -
Page 142: Iso Tree Editing
ISO file will be saved. Click Next to continue. The wizard will create the ISO image. Click the Auto Mount checkbox if you want the ISO file to be mounted automatically. Click Finish to close the wizard. D-Link ShareCenter DNS-327L User Manual…
-
Page 143: Verifying The Iso Image
Section 4 — Configuration Verifying the ISO image Open your file explorer, click the Network icon, double-click your ShareCenter NAS. Double-click the volume you saved the ISO to. Your ISO image should be there. D-Link ShareCenter DNS-327L User Manual…
-
Page 144: Admin Password
The Administrator Settings allows you to change the User Name and Pass- word settings. Enter a new Username, type the existing Password, enter a New Password or confirm the New Password Click Save Settings to accept the changes or Don’t Save Settings to cancel changes. D-Link ShareCenter DNS-327L User Manual…
-
Page 145: Mydlink Account
Note: If you have forgotten your password, click the Forget your password? link. If you need to register a new mydlink account, click the Click here to register link. D-Link ShareCenter DNS-327L User Manual…
-
Page 146
Please enter the email and password to register this device to mydlink service. Enter the E-mail address, First Name, Last Name, New Password, and Con- firm Password. Click the Register button to connect to the registration process or click the Don’t Save Settings to exit. D-Link ShareCenter DNS-327L User Manual… -
Page 147
Section 4 — Configuration To register, complete all the details as mentioned above. Remember, the admin password must have at least 5 letters. The DNS-327L saves your data. D-Link ShareCenter DNS-327L User Manual… -
Page 148
— Register mydlink account successfully. Click Yes, to continue. The mydlink Account Settings displays your email address and Internet Connection Status. Click Refresh to remain connected to the ac- count. D-Link ShareCenter DNS-327L User Manual… -
Page 149
Section 4 — Configuration To sign-in to your mydlink account from your DNS-327L, enter the details as highlighted here. Do remember the E-mail address and Current Password. The NAS starts to save the data. D-Link ShareCenter DNS-327L User Manual… -
Page 150
— Your device is now linked to mydlink cloud services. Click Yes to continue. The mydlink Account Settings dis- plays your email address and Internet Connection Status. Click Refresh to remain connected to the account. D-Link ShareCenter DNS-327L User Manual… -
Page 151: Mydlink Account Online
Other options available are: Forget Password (if you forgot your password you are redirected to a site where you can change your password. The other option is to register if you haven’t already reg- istered. Just click Not Registered. D-Link ShareCenter DNS-327L User Manual…
-
Page 152
On the next screen you are directed to your ac- count. It displays your DNS-327L. To confirm your product and account details to mydlink, you are asked to verify access with your password. Enter your password in the field provid- ed and click OK. D-Link ShareCenter DNS-327L User Manual… -
Page 153
Click Settings to find some general information about your DNS-327L. Here you will also get infor- mation on Notifications (email notifications), and More Settings (methods to Remove your Device from the account). D-Link ShareCenter DNS-327L User Manual… -
Page 154: Network Management
Go to Network Management >>LAN Setup. Under the LAN Settings sec- tion, click Setup. The LAN setup wizard gives you the option to configure the IP settings. Click Next to continue. D-Link ShareCenter DNS-327L User Manual…
-
Page 155
You can also choose to Obtain DNS server address automatically or select User the following DNS server address to manually enter DNS server infor- mation. Click Next to continue. A summary of the updated configuration will be displayed. Click Finish to exit the wizard. D-Link ShareCenter DNS-327L User Manual… -
Page 156: Ipv6 Settings
Auto — Requests information specifically from an IPv6-enabled router and automatically configure your settings. DHCP — Requests information from a DHCP server. Static — Allows you to manually enter your own IP configuration. Off — Disables IPv6 functionality. D-Link ShareCenter DNS-327L User Manual…
-
Page 157
64; no more, no less. Enter the Default Gateway, and DNS settings. Click Apply when complete. The IPv6 Settings table will now display the settings in table format. In order for the changes to take effect, you are prompted to re-login. Click OK and log in again. D-Link ShareCenter DNS-327L User Manual… -
Page 158: Link Speed And Lltd Settings
The device supports LLTD (Link Layer Topology Discovery) and LLTD: is used by the Network Map application that is included in Win- dows Vista® and Windows® 7. Select to Enable or Disable LLTD. D-Link ShareCenter DNS-327L User Manual…
-
Page 159: Ddns
DDNS: Enter your DDNS host name. Username or Key: Enter your DDNS username or key. Password of Key: Enter your DDNS password or key. Verify: Re-enter your password or key. Status: Displays your DDNS status. D-Link ShareCenter DNS-327L User Manual…
-
Page 160: Port Forwarding
The DNS-327L will search for a UPnP router. Do not turn off your NAS. A message will notify you that the wizard has found a UPnP router on the network. Note that you have to enable UPnP on your router. D-Link ShareCenter DNS-327L User Manual…
-
Page 161
Section 4 — Configuration Click the blue arrow next to port forwarding to reveal the Port Forwarding options. Click Add. The Port Forwarding wizard will start. Click Next to continue. D-Link ShareCenter DNS-327L User Manual… -
Page 162
Internet via your UPnP-enabled router. Note: You can select more than one port. Click Previous to change the Port Forward Rule or Finish to configure the port forwarding on the UPnP router automatically. D-Link ShareCenter DNS-327L User Manual… -
Page 163: Application Management
Most standard FTP clients like Windows FTP, only support Client Western European code page when transferring files. Language Support has been added for non standard FTP clients that are capable of supporting these character sets. D-Link ShareCenter DNS-327L User Manual…
-
Page 164
21 to some other port as listed in the Port section of the Web UI. Also, make sure to open the cor- responding port on your router and forward that port from your router to the device. D-Link ShareCenter DNS-327L User Manual… -
Page 165: Block Ip List
Select IPv4 or IPv6 and then enter the IP address that you wish to block. Select Permanent if you wish to block the IP address permanently or Tempo- rary if you wish to set a time frame. If you selected permanent, click Apply and continue. D-Link ShareCenter DNS-327L User Manual…
-
Page 166
Section 4 — Configuration If you selected Temporary, then select a time frame and click Apply to con- tinue. The Blocked IP list table will display a list of blocked IP addresses. D-Link ShareCenter DNS-327L User Manual… -
Page 167
The FTP server is stopped by default. Click Start FTP Server to run the pro- cess. After you have clicked the Start button, the Status shows Started. Open your default browser or FTP application and log-in to your FTP server. D-Link ShareCenter DNS-327L User Manual… -
Page 168: Add-Ons
ShareCenter’s Internet connection, you can use this add-on to manage your website’s online content. phpBB: Create your own ShareCenter based customized forum. This add-on uses the Sharecenter to host an online forum which can be accessed by users over the Internet. D-Link ShareCenter DNS-327L User Manual…
-
Page 169
Caution: The ShareCenter ‘s CPU resource usage may become heavy depending on the number of Add-ons you have enabled. For optimal performance you should disable any add-ons not in use. Note: To check the complete list of Add-on application software available consult your local D-Link support page D-Link ShareCenter DNS-327L User Manual… -
Page 170: Installing Add-Ons From The Web Ui
Section 4 — Configuration Installing Add-ons from the Web UI Add-Ons can also be installed using the web-based UI. The Add-Ons menu can be accessed by going to Management>>Application Management>>Add-Ons. D-Link ShareCenter DNS-327L User Manual…
-
Page 171
Once the path of the package you want to install has been located, click Apply to add the package. Under Add-ons, a red message will appear to show that the installation of the package was successful. Click the green arrow button under Start/Stop to enable the add-on. D-Link ShareCenter DNS-327L User Manual… -
Page 172: Afp Service
The ShareCenter supports Network File System (NFS) service. To enable this multi-platform file system on your ShareCenter enable it here. Otherwise disable the option to prevent unnecessary CPU overhead. Click Application Management > NFS Service. Click the Enable radio button to turn NFS service on. Click Save Settings. D-Link ShareCenter DNS-327L User Manual…
-
Page 173: Multimedia Services
After a media library is created, whenever you copy new media files into the Media Share folder, new media files in the folder will be automatically added to the media library. D-Link ShareCenter DNS-327L User Manual…
-
Page 174
Click the Add button to connect Multimedia Shares to a Volume. Select the Volume or folder and click Apply. The maximum shared folders in multimedia shares settings is limited to 10. The wizard initializes the process and compiles the data. D-Link ShareCenter DNS-327L User Manual… -
Page 175
Section 4 — Configuration The ShareCenter will build the library automatically. When the system has finished building the media library, a success message will appear. Click Yes to continue. D-Link ShareCenter DNS-327L User Manual… -
Page 176
Once the media is loaded onto the DNS-327L, one feature to monitor media is through the Information Icon. Move your mouse over this icon to refresh information. When you click the icon an information panel appears giving you information on the media you have on the DNS-327L. D-Link ShareCenter DNS-327L User Manual… -
Page 177
Section 4 — Configuration To test this feature, go to Home => My Photos => Select Upload from my computer. Enter an Album Name in the field provided. Enter a Description. Click Next. D-Link ShareCenter DNS-327L User Manual… -
Page 178
Click Browse to find the images/photos you wish to use. Click Next to continue. When the photos are uploaded, click the Information icon, then click the Refresh button and you can view the Media Library/Database Refreshing Status. D-Link ShareCenter DNS-327L User Manual… -
Page 179
Section 4 — Configuration Another view is to click Refresh and see the system build the database. Refer to page 200 for more details on My Photo. D-Link ShareCenter DNS-327L User Manual… -
Page 180: Upnp Av Server
UPnP AV Server section by clicking on the blue arrow. Click the Enable radio button to enable the UPnP AV server. Click Save Settings to configure the UPnP AV share. Click Refresh to rebuild the media library. D-Link ShareCenter DNS-327L User Manual…
-
Page 181: Itunes Server
Here the user can select the interval between automatically refreshing the iTunes library. After enabling the iTunes server on the ShareCenter, launch iTunes. In your iTunes utility, select the ShareCenter and enter the iTunes server password (if required). D-Link ShareCenter DNS-327L User Manual…
-
Page 182
Section 4 — Configuration Select the ShareCenter. When prompted, enter in the iTunes server password. Click OK. Media stored on the ShareCenter will then be available for use in iTunes. D-Link ShareCenter DNS-327L User Manual… -
Page 183: System Management
This section allows you to add language packs for the DNS-327L’s user interface. Language packs can be downloaded from the D-Link website or the included installation CD. If you disable the language pack, the user interface language will return to English.
-
Page 184: Time And Date
If you wish to synchronize the system time with an online NTP server, enter the address of the server in the field provided, or select an NTP server from the drop-down menu, and click << to populate the field. Click Save Settings. D-Link ShareCenter DNS-327L User Manual…
-
Page 185: Device
Enter your device name here. This name is what the device will appear as on the network. By default, the device name is dlink- xxxxxx, where xxxxxx is the last six digits of the MAC address. Description: Assign a device description to the device. D-Link ShareCenter DNS-327L User Manual…
-
Page 186: System Settings
Here you can configure the system temperature threshold Temperature value to protect the device from overheating. This value can Threshold be set in Fahrenheit or Celsius. The device will automatically shut down when the internal sensor detects the temperature set here. D-Link ShareCenter DNS-327L User Manual…
-
Page 187: Power Management
Under the Schedule On column, select the time that the power should be turned on. Under the Schedule Off column, select the time that the power should be turned off. D-Link ShareCenter DNS-327L User Manual…
-
Page 188: Notifications
Enter the “from” e-mail address to be displayed in email notifications (e.g. alerts@share.com). This field does not require a valid e-mail address. However, if your e-mail client is filtering spam, make sure you allow this address to be received. D-Link ShareCenter DNS-327L User Manual…
-
Page 189
Select STARTTLS or SSL from the drop-down menu if it is required by your SMTP server, or select NONE. Click the Test E-Mail button to send a test alert and confirm that your settings are correct. Test E-Mail: D-Link ShareCenter DNS-327L User Manual… -
Page 190: Sms Settings
Mobile Service Provider. Test SMS button: Click this button to send a test message to your mobile phone to verify the settings are correct and the API URL is functioning with your provider. D-Link ShareCenter DNS-327L User Manual…
-
Page 191: Adding An Sms Service Provider
URL. Click on the Add button to start the wizard. Enter your SMS Provider and the HTTP API. Choose the appropriate type parameter in the drop-down menu for the parsed parameters of the URL on the left. D-Link ShareCenter DNS-327L User Manual…
-
Page 192: Event Settings
Select the information you want e-mailed to the above address or sent over SMS messages to the above mobile number. The items checked will be sent when necessary. Click Save Settings to save the current configuration. D-Link ShareCenter DNS-327L User Manual…
-
Page 193: Logs
Clear Log: Click Clear Log to delete all the existing logs. Backup Log: Click Backup Log to save the existing logs to a text file on your computer. D-Link ShareCenter DNS-327L User Manual…
-
Page 194: Firmware Upgrade
Firmware Upgrade The Firmware Upgrade Page makes it simple to upload new firmware releases to the device. Please check for new firmware on the D-Link support website. If new firmware is available, download the file to your local computer. Current NAS…
-
Page 195: Usb Devices
Stand-Alone or Master mode. If you select Master mode, you will have to enter the IP address(es) of the network UPS slaves to notify them in the event of a power failure. For more details, refer to ”UPS Connectivity” on page 390. D-Link ShareCenter DNS-327L User Manual…
-
Page 196: Usb Storage Information
Click the blue arrow to reveal the USB Storage Information. It displays information on the manufacturer, product name, and size (capac- ity). Click the Unmount button to eject the USB device for safe removal from the USB port. D-Link ShareCenter DNS-327L User Manual…
-
Page 197: Printer Information
Section 4 — Configuration Printer Information Click the blue arrow to reveal Printer Information. It displays information on the manufacturer, product type, and connection details. Click Clear Print Queue(s) to remove all active print jobs. D-Link ShareCenter DNS-327L User Manual…
-
Page 198: System Status
Click the blue arrow from each of the headings to reveal information on each segment. LAN Information, Device Information, and Volume Information. Click System Status >> Hard Drive Info. Click the blue arrow to reveal a table of hard drive information. D-Link ShareCenter DNS-327L User Manual…
-
Page 199
Section 4 — Configuration Click System Status >> Resource Monitor, then click the blue arrow to reveal the resource details. This provides information on the CPU, memory, bandwidth, and processes in action. D-Link ShareCenter DNS-327L User Manual… -
Page 200
Use the red Stop button to stop the service. Use the green Play button to start the service. D-Link ShareCenter DNS-327L User Manual… -
Page 201: Home
The Home tab is the center for all files on your ShareCenter. Home is divided into one main subfolder called My Folder. Under My Folder reside four main apps; My Photos, My Files, My Music, and My Surveillance. Let’s take a closer look at all four apps independently. D-Link ShareCenter DNS-327L User Manual…
-
Page 202: My Photos
On the right-hand side of My Photos there are 4 main icons. The icons turn blue when you roll your mouse over them. The first icon is “Upload from my computer” The second icon is “Upload from NAS” The third icon is “Edit” D-Link ShareCenter DNS-327L User Manual…
-
Page 203: Creating An Album
The Photo Album Wizard will assist you with uploading photos from your computer to the ShareCenter. The first step is to create an Album. In the Album Name field, enter your desired name and then enter a description in the Description field. Click Next to continue. D-Link ShareCenter DNS-327L User Manual…
-
Page 204
If you wish to add more than one photo, repeat the process or hold the Shift key to select a range of photos, or the Control button to select several individual photos. Click the Open button to add them to the Album. D-Link ShareCenter DNS-327L User Manual… -
Page 205
Section 4 — Configuration The Photo Album Wizard is now populated with the photos you have selected. Click Next to upload the photos. ShareCenter automatically updates the photos to the NAS. D-Link ShareCenter DNS-327L User Manual… -
Page 206
Section 4 — Configuration The Photo Album now features your Album. D-Link ShareCenter DNS-327L User Manual… -
Page 207: Editing Photos In An Album
Set the current photo as the Photo Album cover. Move the current photo to a different location Delete the current photo from the Photo Album Share the current photo to Picasa Share the current photo to Flickr Share the current photo to Facebook D-Link ShareCenter DNS-327L User Manual…
-
Page 208: Select A Photo As A Cover Image
Click the Set Cover icon. You are asked to verify your instruction. Click Yes to continue, No to exit. The NAS will configure the changes. The configuration is updated and saved. Click Yes, to continue. D-Link ShareCenter DNS-327L User Manual…
-
Page 209: Select A Photo To Move
Select the photo and click Move. The Select Album window opens. Select the Album you wish to transfer the photo to. Click the checkbox. The photo will be transferred to the new album. D-Link ShareCenter DNS-327L User Manual…
-
Page 210: Delete A Photo
Section 4 — Configuration Delete a Photo Click My Photos>>Photo Albums>>Photo Album you wish to select the photo from. Select the photo and click Delete. The system automatically deletes the file without verification. D-Link ShareCenter DNS-327L User Manual…
-
Page 211: Share A Photo To Picasa
Google will request you log-in to your Google account. You are unable to use the Picasa feature if you do not have a Google account. Enter your Email Address and Password, and click Sign In to proceed. D-Link ShareCenter DNS-327L User Manual…
-
Page 212
Picasa Web Albums and another window will pop-up to confirm its success. Note: You will have to enable Photos (Picasa Web Albums) on your Google account in order to use this feature. D-Link ShareCenter DNS-327L User Manual… -
Page 213: Share A Photo To Facebook
Select the photo you wish to share on Facebook. A green check-mark highlights your selection and click Share to Facebook. A pop-up window appears directing you to log-in to Facebook. Enter your details and log-in. D-Link ShareCenter DNS-327L User Manual…
-
Page 214
Section 4 — Configuration Facebook will request you to access and get their D-Link ShareCenter App. Click Go to App to proceed. The D-Link ShareCenter App also requests permission to post images on your behalf. Click Allow to continue. D-Link ShareCenter DNS-327L User Manual… -
Page 215
Share. Alternatively, enter the new album name and click the Share button. When you click the Share button your photos will be uploaded to your Facebook account and another window will pop-up to confirm its success. Click Yes to continue. D-Link ShareCenter DNS-327L User Manual… -
Page 216: Share A Photo To Flickr
Select the photo you wish to share on Flickr. A green check-mark highlights your selection and click Share to Flickr. A pop-up window will appear directing you to log-in to Yahoo Flickr. Enter your details and click Sign-in. D-Link ShareCenter DNS-327L User Manual…
-
Page 217
Section 4 — Configuration The D-Link ShareCenter asks to link to the Flickr account. Click OK, I’LL AUTHORIZE IT, to proceed. Use your DNS-327L to access and upload files to Flickr. D-Link ShareCenter DNS-327L User Manual… -
Page 218: Deleting An Album
Select an album, a green checkmark will indicate the selection, click the Delete icon. A warning message will ask you to verify your choice. Click Yes, to continue or No to exit. The Album is now deleted from the Photo Albums menu. D-Link ShareCenter DNS-327L User Manual…
-
Page 219: Refreshing The Album Database
Before the screen is refreshed, you are prompted to verify your decision to refresh the database. Click Yes, to continue. The DNS-327L will refresh the system and return to the My Photos page when the refresh is complete. D-Link ShareCenter DNS-327L User Manual…
-
Page 220: Managing Photos
My Photos contains all of your photos on the DNS-327L. Click My Photos from the Home panel to manage all photos. The Management Panel in the upper right-hand corner will have the following options available: Upload from my computer, Upload from NAS, Edit, Slideshow, and Cooliris. D-Link ShareCenter DNS-327L User Manual…
-
Page 221: Slideshow Toolbar
Section 4 — Configuration Slideshow Toolbar Clicking on the Slideshow icon will open a slideshow in a new window or tab in your browser. There will also be a slideshow toolbar at the bottom of the page. D-Link ShareCenter DNS-327L User Manual…
-
Page 222
EXIF: View detailed information about the image (File Name, Size, Image Date, Resolution, Camera, Camera Model, ISO, Exposure Time, & Aperture). Rotation buttons: These rotate the image at 90 degree angles. Gallery Navigation: This provides a pop-up display of all the images in the gallery. D-Link ShareCenter DNS-327L User Manual… -
Page 223: Viewing Images Using Cooliris
Click the arrows on each side of the Cooliris window to scroll between images. Click here to activate Facebook in Cooliris. Click here to activate Twitter in Cooliris. Click here to activate Full Screen mode. Click here to slide between photos. D-Link ShareCenter DNS-327L User Manual…
-
Page 224
Click on each photo to view separately. The photo is enlarged. On the right-hand side of each image are the social network links. Click here to close Single-Image view. Click here to enlarge into Full-screen mode. D-Link ShareCenter DNS-327L User Manual… -
Page 225
Section 4 — Configuration Click the Facebook link to connect your images to your Facebook account. Click the Twitter link to connect your images to your Twitter account. D-Link ShareCenter DNS-327L User Manual… -
Page 226: Stream A Slideshow To Your Airplay Device
When you click the Airplay icon, the ShareCenter will connect to a shared Apple device on the network to display your slideshow, a message will pop-up after connecting successfully. Press Yes to continue. Now you can enjoy your slideshow on your Airplay connected device using your DNS-327L. D-Link ShareCenter DNS-327L User Manual…
-
Page 227: Photo Gallery
Section 4 — Configuration Photo Gallery Click Photo Gallery to view the images in your gallery. Near the top right-hand corner there are three main icons. Click here to view By Calendar. Click here to Refresh the page. D-Link ShareCenter DNS-327L User Manual…
-
Page 228
Section 4 — Configuration Click the All Photos icon to view all your photos in your Photo Gallery. Click the By Calendar icon to view your Photo Gallery by date. Click the Refresh icon to refresh the database. D-Link ShareCenter DNS-327L User Manual… -
Page 229: My Files
My Folder window under Home. My Files provides access to all your files on the NAS. Click My Files. The My Files window provides a list of all the Volumes created on the NAS. Click on any Volume you created to see a directory listing of the files. D-Link ShareCenter DNS-327L User Manual…
-
Page 230: My Files — Icons
Click this button to Upload files to the NAS. Click the icons near the right-hand side of the panel to access the My Files features. Click this button to Return to the previous screen. D-Link ShareCenter DNS-327L User Manual…
-
Page 231: Upload
Locate the path of the file you want to upload and click Open. Click Upload to start the uploading process. Then click Exit to close the upload window. The file updates to the NAS and is displayed on the directory table. D-Link ShareCenter DNS-327L User Manual…
-
Page 232: Download
(highlighted in red) and click the Download button. Depending on your browser download settings, the browser may automatically download the file to your predetermined save location. Alternatively, click the Save File button and OK to continue. D-Link ShareCenter DNS-327L User Manual…
-
Page 233: Copy
Go to Applications>>My Files. Browse any of the folders on the left pane, right click any of the files in the right pane. Select Copy from the menu. Under Copy, select a destination folder or create a new folder. D-Link ShareCenter DNS-327L User Manual…
-
Page 234
Enter a name for the new Folder. Click OK. Select the newly created folder and click Apply. To verify that the file did copy to the destination, browse to the folder in question. D-Link ShareCenter DNS-327L User Manual… -
Page 235: Move
Go to Applications>>My Files. Browse any of the folders on the left pane, right click any of the files in the right pane. Select Move. Under Move, select a destination folder or create a new folder. D-Link ShareCenter DNS-327L User Manual…
-
Page 236
To create a new folder, click the New folder at the bottom of the volume you wish to create the new folder in. Enter a name for the new Folder. Click OK. Browse to where you moved the file. D-Link ShareCenter DNS-327L User Manual… -
Page 237: Delete
Go to Applications>>My Files. Browse any of the folders on the left pane, right click any of the files in the right pane. Select Delete. A verification message appears asking for you to verify your selection. Click OK to confirm. The file no longer exists in the folder. D-Link ShareCenter DNS-327L User Manual…
-
Page 238: Rename
Section 4 — Configuration Rename Go to Applications>>My Files. Browse any of the folders on the left pane, right click any of the files in the right pane. Select Rename. The Rename window displays the original name. D-Link ShareCenter DNS-327L User Manual…
-
Page 239
Section 4 — Configuration Enter a new name for the file. Click Apply. The Renamed file will now appear in its original location. D-Link ShareCenter DNS-327L User Manual… -
Page 240: Properties
Under Privileges, you are allowed to change the ownership settings. The Owner, User Group, and Other users have Read, Write, and Execute settings. Click Apply once you have made the changes for them to take effect. D-Link ShareCenter DNS-327L User Manual…
-
Page 241: Create A Zip File From The Selected Folder
Go to Applications>>My Files. Browse any of the folders on the left pane, right click any of the files in the right pane. Select “Create (file name).zip. ” The wizard will create a zipped file in the same folder. D-Link ShareCenter DNS-327L User Manual…
-
Page 242: Add To Zip
Add to zip allows you to add to an existing zipped file. In our example, we use the existing file “bold.zip”. Locate the file that you wish to add to the zip file. Right click the file and click Add to Zip from the menu. D-Link ShareCenter DNS-327L User Manual…
-
Page 243
Click the checkbox and click Apply. The wizard will add the new file to the zipped file. Your existing Zip file will have increased in size due to the addition of the new file(s). D-Link ShareCenter DNS-327L User Manual… -
Page 244: Unzipping A Zipped File
Select Unzip. The wizard will unzip the zipped file. A new folder is created for the unzipped file. The new folder will have the same name as the zipped file. D-Link ShareCenter DNS-327L User Manual…
-
Page 245: Unzipping A Tar File
An unzipped TAR file works when your workstation is Linux-based. The unzipping process works similar to unzipping a normal file. To unzip a tar file on the NAS, select the file you want to untar (lighlighted in red) and right-click. From the drop-down list click Untar. D-Link ShareCenter DNS-327L User Manual…
-
Page 246: Opening A File
Section 4 — Configuration Opening a File Select the file you want to open, right-click and select Open from the drop- down menu. The file will be opened in a new browser window. D-Link ShareCenter DNS-327L User Manual…
-
Page 247: Previewing A File
Select the file you want to preview. Right-click and select Preview from the drop-down menu. The file opens in a new gallery-like window. Use the left/right slider to view the image or re-size the image from the corner points. D-Link ShareCenter DNS-327L User Manual…
-
Page 248: Share To Facebook
Facebook from the drop-down menu. The browser will open a new window and redirect you to log-in with your Facebook account to automatically upload files to Facebook. Follow the same steps to share to Picasa and Flickr D-Link ShareCenter DNS-327L User Manual…
-
Page 249: My Music
Section 4 — Configuration My Music My Music allows users to add music to the DNS-327L. Using this application, users can view, edit and play music straight from the NAS, and access music files over the network. D-Link ShareCenter DNS-327L User Manual…
-
Page 250
Section 4 — Configuration Click My Music to view the My Music features. D-Link ShareCenter DNS-327L User Manual… -
Page 251: My Music — The Interface
Section 4 — Configuration My Music — The Interface Click here to play back music to a Local Device or to an AirPlay enabled Apple Device. The Music Player plays tracks directly off the DNS-327L. D-Link ShareCenter DNS-327L User Manual…
-
Page 252: My Music — Categories
Click Albums to sort audio tracks on the DNS-327L by album. Click Artists to sort audio tracks on the DNS-327L by artist. Click Genres to audio tracks on the DNS-327L by genre. Click Playlists to view all playlists and create new playlists on the DNS-327L. D-Link ShareCenter DNS-327L User Manual…
-
Page 253: My Music — Music On Your Dns-327L
Access your DNS-327L from your network. Click the NAS volume directly. Copy music directly from your local drive to any of the volumes on the DNS-327L. The NAS can only play back files in MP3 format, you should ensure that all audio files are in this format. D-Link ShareCenter DNS-327L User Manual…
-
Page 254
View your All Tracks window and click the Refresh button. The playlist will be populated with all audio tracks found on the volumes of the NAS. Click Artists to sort the tracks by artist. Click Albums to sort the tracks by album. D-Link ShareCenter DNS-327L User Manual… -
Page 255: My Music — Playback Music On An Apple Device
The ShareCenter will connect to the device over the network. A message will pop-up after connecting successfully. Click Yes to continue. Your music will now play through your Airplay-enabled device. D-Link ShareCenter DNS-327L User Manual…
-
Page 256: My Music — The Player
My Music — The Player The following buttons are displayed on the music player: Album Art (if available) Album Track Name Composer Seek Bar Skip Backward Stop Shuffle Repeat Play/Pause Skip Forward Volume Control Additional track information D-Link ShareCenter DNS-327L User Manual…
-
Page 257: My Music — Create A Playlist
Click the Plus icon at the top right-hand corner. The Create a New Playlist menu will appear. Enter a name under Playlist Name and click the songs you wish to add to the playlist. Click Apply to add them to the list. D-Link ShareCenter DNS-327L User Manual…
-
Page 258
Edit ( )icon to delete songs from the playlist. Click Add ( Once you are in Edit mode, click the track you want to delete and click the Delete ( ) icon. D-Link ShareCenter DNS-327L User Manual… -
Page 259: My Surveillance
Section 4 — Configuration My Surveillance The My Surveillance app works with D-Link Cloud-enabled cameras. It manages your IP cameras from the NAS and allows all streaming video to be saved to the NAS. My Surveillance can connect up to 4 cameras. Click the My Surveillance icon under the My Folder window in the Home tab.
-
Page 260
Click Save File to accept the SurveillanceCenterRealInstall.msi file. Note: My Surveillance supports the following web browsers: Internet Explorer 8 or higher Mozilla Firefox 4 or higher Apple Safari 4 or higher (Windows) Google Chrome 13 or higher D-Link ShareCenter DNS-327L User Manual… -
Page 261
Section 4 — Configuration Once the file is downloaded, double-click or right-click, select Open and install the program from your browser’s Downloads window. The Surveillance Center Real Install setup wizard will begin. Click Next to continue. D-Link ShareCenter DNS-327L User Manual… -
Page 262
Section 4 — Configuration Select an Installation Folder location. Click Next to continue. Confirm that the Installation is complete. Click Next to continue. D-Link ShareCenter DNS-327L User Manual… -
Page 263
IP address, model number, and bit rate speed Click Close to continue. To view the Surveillance utility in a browser, open your web browser. When you log in, you will see the My Surveillance icon under the Home>>My Folder screen. D-Link ShareCenter DNS-327L User Manual… -
Page 264
The add-on pops up at the top of the browser. Click the pop up and click Install This Add-on for All Users on This Computer. The Global Digital, D-Link Corporation add-on warning message pops up. Click Yes to confirm the installation. -
Page 265
Auto Install Camera instructions to configure cameras for later use. If you wish to disable auto-install click the Disable Autoinstall button. Click Exit to continue. Please Note: The Autoinstall Camera function will not work if you modify the password on the IP cameras. D-Link ShareCenter DNS-327L User Manual… -
Page 266
Click Yes to continue. The browser will now display the Live View. However, if you do not have any cameras connected, the live view window will have no video stream to show. Close the browser tab to exit. D-Link ShareCenter DNS-327L User Manual… -
Page 267: My Surveillance
The My Surveillance interface is based on the surveillance and camera features. Normal operation is also dependant upon the camera’s functionality. The interface features navigation tabs in the left-hand column which can be used to access the various functions of the My Surveillance app. D-Link ShareCenter DNS-327L User Manual…
-
Page 268: My Surveillance — Live View
My Surveillance Camera Name & IP Address Camera View E-map, Snapshot, Mute and Volume Slider Pan-Tilt-Zoom Control Zoom Patrol Mode for PTZ Stop/Start Manual Digital Zoom Camera details D-Link ShareCenter DNS-327L User Manual…
-
Page 269: My Surveillance — Live View
View a live video stream of any camera in full screen mode, press escape to return to the user inter- Full Screen face. Camera Name and IP Ad- These icons show the status of each camera and allows you to double-click to toggle the status of dress each camera. D-Link ShareCenter DNS-327L User Manual…
-
Page 270: My Surveillance — Single Camera Live Video Mode
) to enter Single Camera Mode. The live video for the selected camera will expand to cover the full live viewing area. Click the 2×2 button ( ) to return to Split Camera Mode. Click on the camera you wish to view in the Camera Name and IP Address window. D-Link ShareCenter DNS-327L User Manual…
-
Page 271: My Surveillance — Full Screen Live Video Mode
Click the Full Screen button ( ) to enter Full Screen Camera Mode. The viewing angle expands to cover the entire screen. Click the 2×2 button ( )to return to Split Camera Mode. This full-screen mode can be used in 2×2 mode and 1×1 mode. D-Link ShareCenter DNS-327L User Manual…
-
Page 272: My Surveillance — Digital Zoom Video Mode
You can also click directly on the part of the main image you want to focus on. Use the mouse wheel to control the level of zoom. D-Link ShareCenter DNS-327L User Manual…
-
Page 273: My Surveillance — E-Map View
Note: you must have installed E-map JPEG files in order to use this feature. Click the E-map Upload button to upload images into the database. When you click this button you will be directed to the E-map Upload window. D-Link ShareCenter DNS-327L User Manual…
-
Page 274: My Surveillance — Snapshot View
You can copy this image to the clipboard by clicking the Copy to Clipboard button, or you can save the image to disk by clicking the Save Image button. Click the Close button to exit this mode. D-Link ShareCenter DNS-327L User Manual…
-
Page 275: My Surveillance — Motion Detection Camera Mode
If the camera is configured to record when motion is detected, the camera icon on the E-map will change to red when an alarm is sounded or motion is detected, as shown below. When motion is detected or an alarm is triggered, click on the red camera icon on the E-map to play the recorded event. D-Link ShareCenter DNS-327L User Manual…
-
Page 276: My Surveillance — Configuring Patrol Settings
D-Link PTZ cameras: . Click the Patrol icon ( The Patrol Setup window will pop up. Please check your local D-Link support site for an updated list of camera models which support the Patrol function. D-Link ShareCenter DNS-327L User Manual…
-
Page 277: My Surveillance — Configuring Patrol Preset Points
Add Preset Point to create a new Preset Point. This brings up the PTZ Preset Point box. Enter a Preset Name and click OK. To edit the presets click the Preset Point icon and select whichever preset you wish to delete. D-Link ShareCenter DNS-327L User Manual…
-
Page 278: My Surveillance — Viewing Preset Points
Section 4 — Configuration My Surveillance — Viewing Preset Points Click the Go to Preset Point icon ( ). This icon directs the camera to the designated points. D-Link ShareCenter DNS-327L User Manual…
-
Page 279: My Surveillance — Live Video/Playback Settings
You can then choose where to save the captured image. Automatically save the image file to — Use the Path button to select a folder to automatically save each snapshot to. You can also select the Preferred Image Format from the drop-down menu. D-Link ShareCenter DNS-327L User Manual…
-
Page 280: My Surveillance — Osd Settings
If you have made changes and want to revert back to the default settings, click the Default button at the bottom. Click Apply to save the current configuration. Click OK when you are done to save your settings. D-Link ShareCenter DNS-327L User Manual…
-
Page 281: My Surveillance — Playback
Section 4 — Configuration My Surveillance — Playback In this section, you can play back previously recorded videos. D-Link ShareCenter DNS-327L User Manual…
-
Page 282: My Surveillance — Playback
The bottom lets you view cameras with the actual size View a live video stream of any camera in full scream mode and press Escape to return to the user Full Screen interface. Open Recording Click this button to open an existing recording. D-Link ShareCenter DNS-327L User Manual…
-
Page 283: My Surveillance — Recording Information
Use the two checkboxes at the bottom of the window to toggle whether to Show Events and Motion Detection on the graph. D-Link ShareCenter DNS-327L User Manual…
-
Page 284
Click the Play button at the bottom of the window to play the selected recording on the main playback screen. Note: You can backup or play up to 4 selected recordings at the same time. D-Link ShareCenter DNS-327L User Manual… -
Page 285: My Surveillance — Setup
Section 4 — Configuration My Surveillance — Setup Note: See descriptions later in this Manual. D-Link ShareCenter DNS-327L User Manual…
-
Page 286: My Surveillance — Setup — Camera Setup
Once you click Setup, Camera Setup is the first screen to configure. On the left side are the sub-menus while on the right are the configurable options. Camera Setup is divided into four sections. Wizard, Camera List, Camera Search, and Auto Install. Let’s take a look at Wizard first. D-Link ShareCenter DNS-327L User Manual…
-
Page 287
DHCP on your router to detect your camera. You may attempt to skip this process using the Skip button. However, once you do this, you will be unable to detect your camera. D-Link ShareCenter DNS-327L User Manual… -
Page 288
The next screen appears blank if the camera wizard was unable to find your camera. If you have set up your camera properly, the camera wizard should have detected your camera. The camera then appears in the Search box. D-Link ShareCenter DNS-327L User Manual… -
Page 289
IP camera. However, if you have, the Device Information window is automatically populated with your device information. Click the Test Camera button to view streaming video from the connected camera. D-Link ShareCenter DNS-327L User Manual… -
Page 290
Check Keep the File within, and enter a number of days to keep recordings for. Click the Estimate Required Space button to see how much space you would require to keep video for this period of time. Click Finish to complete the Wizard. D-Link ShareCenter DNS-327L User Manual… -
Page 291
Select the desired Video Format (dependent on your camera). Finally, confirm if the Vendor and Model are correct for your chosen camera. Click Modify to confirm the changes. You can also click Test Camera to view the live feed from the camera. D-Link ShareCenter DNS-327L User Manual… -
Page 292
Select a camera from the camera list, click the Trash button. A confirmation message will pop up. Click Yes to remove the camera from the list. A message will pop up to confirm the changes. Click Yes to exit. D-Link ShareCenter DNS-327L User Manual… -
Page 293: My Surveillance -Search And Add Camera
Section 4 — Configuration My Surveillance -Search and Add Camera Click the Search button to search all available cameras on the LAN. Select one camera and click Add To to add the camera to the list (Camera2) D-Link ShareCenter DNS-327L User Manual…
-
Page 294
Section 4 — Configuration Click the Test Camera button to view streaming video from the connected camera. Click Modify to add the camera to the camera list then Click Save Settings to continue. D-Link ShareCenter DNS-327L User Manual… -
Page 295
Section 4 — Configuration A message pops up to confirm the changes. Click Yes to exit. Under Auto Install, click Enable Auto Install to detect other IP cameras next time you access the Live Video Page. D-Link ShareCenter DNS-327L User Manual… -
Page 296: My Surveillance -Setup — Audio And Video
Audio and Video configures all your audio and video settings on each camera. Let’s take a look at a single camera configuration. Click Audio and Video. Here you can view all camera audio and video settings. Click on the device to see the configuration options. D-Link ShareCenter DNS-327L User Manual…
-
Page 297
Bitrate: This is the number of kilobits (Kbps) per second the video recording will contain. A higher bitrate means a larger output file. Audio Settings: Click the checkbox to enable audio. Click Save Settings to continue. D-Link ShareCenter DNS-327L User Manual… -
Page 298: My Surveillance — Setup — Recording Setup
Section 4 — Configuration My Surveillance — Setup — Recording Setup The Recording Setup configuration tool displays options for each camera. The settings including Quota Setting, Event Record, and Recording mode. D-Link ShareCenter DNS-327L User Manual…
-
Page 299
Section 4 — Configuration Double-click the camera to expand the configuration options. D-Link ShareCenter DNS-327L User Manual… -
Page 300
• Event Record will wait for event on the camera to be triggered before it begins recording Record Mode Manual Record — requires you to manually click a record button to begin recording. D-Link ShareCenter DNS-327L User Manual… -
Page 301
ShareCenter. Here is an example of a camera’s motion detection configuration page. Note: The appearance and/or functions of this page may vary depending on the camera model you are using. D-Link ShareCenter DNS-327L User Manual… -
Page 302
Check the boxes of the cameras you wish to copy recording settings to, and click Save to continue. Click Yes to continue. Select your Recording Mode. Record by Schedule Click the Always Record (blue) box to set normal recording mode. D-Link ShareCenter DNS-327L User Manual… -
Page 303
The selected frames turn to blue to indicate the recording duration. Click Save Settings to finish Motion Detection Record Click the Motion Detection Record (red) box to set recording only when motion is detected by the camera. D-Link ShareCenter DNS-327L User Manual… -
Page 304
Click or click and drag your mouse over the time frame(s) you want to set for motion detection recording. The selected frames turn to blue to indicate the recording duration. Click Save Settings to finish To delete recording schedule frames, click the light blue Delete box. D-Link ShareCenter DNS-327L User Manual… -
Page 305
Click or click and drag your mouse over the time frame you want to delete. The selected frames will return to light blue to indicate no recording schedule. You can also check Select All to select all frames. Click Save Settings to finish D-Link ShareCenter DNS-327L User Manual… -
Page 306: My Surveillance -Setup — Event Setup
My Surveillance -Setup — Event Setup The Event Setup configuration tool displays options for each camera. The basic settings relate to how you want event notifications to be sent. Click Advanced to configure accounts for Email and SMS notifications. D-Link ShareCenter DNS-327L User Manual…
-
Page 307
Use the checkboxes to select whether you would like each event type notification to be sent by E-mail, SMS, or Web Page. You can select more than one notification method for each event type. Click Save Settings to finish. D-Link ShareCenter DNS-327L User Manual… -
Page 308
“SMS Settings” on page 188 of this manual. Click Save Settings when done and click Exit. Note: Make sure your SMS service provider supplies you with the correct information, otherwise this feature will not work properly D-Link ShareCenter DNS-327L User Manual… -
Page 309: My Surveillance — Setup — E-Map Upload
The E-map Upload configuration panel allows you to import a schematic illustration of the area/office space you want to monitor using your IP cameras. The E-map, in JPEG, BMP, GIF and PNG format, is uploaded to the DNS-327L and configured to work with the camera(s) installed. D-Link ShareCenter DNS-327L User Manual…
-
Page 310
Section 4 — Configuration Click the Browse button to find the E-map you want to use. Select the E-map and click Upload D-Link ShareCenter DNS-327L User Manual… -
Page 311
Click and drag a camera from the camera list on the left of the image. When you have placed the camera in the correct location, double-click the icon to change the orientation of the camera. D-Link ShareCenter DNS-327L User Manual… -
Page 312: My Surveillance — Setup — Backup
Section 4 — Configuration My Surveillance — Setup — Backup The Backup Setup page allows you to configure the ShareCenter NAS to backup and restore the IP Camera recordings. D-Link ShareCenter DNS-327L User Manual…
-
Page 313
If you do not have a folder, click the + sign to create a new folder. Type a new folder name then click OK to continue. Select the path, on the NAS, where you want the backup to reside. D-Link ShareCenter DNS-327L User Manual… -
Page 314
Section 4 — Configuration You should have the Folder name and the Destination configured. Configure a Start Date/Time and a Stop Date/Time. D-Link ShareCenter DNS-327L User Manual… -
Page 315
The archive table at the bottom will populate as you collect data. A message will pop up to confirm the configuration. Click Yes to continue and the DNS-327L starts to backup the IP camera recordings. D-Link ShareCenter DNS-327L User Manual… -
Page 316
From here you can check which archives to include in the playback list on the playback screen by adding or removing a check from the Playback List column. If you want to delete the archive, click the trash can icon for the folder you want to delete. D-Link ShareCenter DNS-327L User Manual… -
Page 317: My Surveillance — Setup — Server Port
This page allows you to modify the ports that the Live Video Server, Playback Server, and Config Server operate on. You may wish to do this if you have port restrictions on your local network. To change the port numbers, use the provided fields and click Save Settings. D-Link ShareCenter DNS-327L User Manual…
-
Page 318: My Surveillance — Status
Section 4 — Configuration My Surveillance — Status D-Link ShareCenter DNS-327L User Manual…
-
Page 319: My Surveillance — Status
Surveillance Center software. You can filter the events shown in the log by checking the checkbox for Type, Camera or Date. You also have the option to back up the log to a text file and clear the log. D-Link ShareCenter DNS-327L User Manual…
-
Page 320
To backup your files, click the Backup Log button. Select the location that you wish to save the log file to, and click Save. A notification will appear to confirm that the log file has been successfully saved. Click Yes to continue. D-Link ShareCenter DNS-327L User Manual… -
Page 321
To clear your the, click the Clear Log button. You will be prompted to verify that you want to clear the log. Click Yes to continue. Now you can see that your previous log disappears. D-Link ShareCenter DNS-327L User Manual… -
Page 322: My Favorite Applications
My Favorite Applications The My Favorite Applications section allows users to add applications to the Home section so users can easily access these applications. Follow these easy steps to set up favorite applications on the Home screen. D-Link ShareCenter DNS-327L User Manual…
-
Page 323: Adding Applications
Click the Add/Remove button to add Applications. Check the box under each application you wish to add to the Home screen. Click Apply to continue. A shortcut will be created on the Home screen. Click the shortcut to access the application. D-Link ShareCenter DNS-327L User Manual…
-
Page 324: Applications
Enter the user name for the server here. Password: Enter the password for the server here. Type: Select either File or Folder from the drop-down list de- pending on whether you wish to download a file or a folder. D-Link ShareCenter DNS-327L User Manual…
-
Page 325
Cur- List: rent download statistics, such as % completed and download speed, are displayed for each event. A refresh button is also provided to produce updated listings at any time. D-Link ShareCenter DNS-327L User Manual… -
Page 326: Remote Backups
Remote Backup jobs in the Remote Backup list. You must select the remote backup job first and then click the Modify button. Delete: To remove a Remote Backup job, select the job in the list and then click the Delete button. D-Link ShareCenter DNS-327L User Manual…
-
Page 327: Create Wizard
NAS or Linux file system. Remote To Local: sets the backup source as the remote NAS or Linux file system and the target destination for the backup files as the local NAS. Click Next to continue. D-Link ShareCenter DNS-327L User Manual…
-
Page 328
The subsequent backups in the incre- mental series contain new files and folders plus the links to the first incremental backup. D-Link ShareCenter DNS-327L User Manual… -
Page 329
Click on the Finish button if you are satisfied with all the settings Finished of the backup job created. Otherwise click on the Previous button to go back and make changes. Alternatively click on Exit to end the configuration without adding a remote backup job. D-Link ShareCenter DNS-327L User Manual… -
Page 330
Navigation buttons: Use these buttons to move up and down in the list when there are multiple jobs configured. Refresh Button: Click this button during a backup or recovery process to monitor the progress by updating the progress completed bar. D-Link ShareCenter DNS-327L User Manual… -
Page 331: Local Backups
This option is only available for LAN Backups. User name: Enter the user name here. Password: Enter the password here. Select File or Folder, depending on what you want to Type: download or backup. D-Link ShareCenter DNS-327L User Manual…
-
Page 332
Incremental Backup will have the ShareCenter compare identical file names at the source and destination. Files will only be overwritten if the source file is more recent. Click Save Settings to save the current configuration. D-Link ShareCenter DNS-327L User Manual… -
Page 333: Time Machine
Starts the setup wizard to add a new NAS folder as a Time Machine destination. Delete: Deletes a NAS folder setup as a Time Machine destination. Remove all Delete all the NAS folders in the list configured as Time Network Machine destinations. Shares: D-Link ShareCenter DNS-327L User Manual…
-
Page 334: Time Machine Setup Wizard
If you have enabled the Time Machine functionality on the Sharecenter, you can add new backup destinations by clicking on the New button. This will start the Time Machine Setup Wizard. Click New to start the wizard. The wizard will explain the steps involved. Click Next to continue. D-Link ShareCenter DNS-327L User Manual…
-
Page 335
Section 4 — Configuration Use the checkboxes to select the volume you want to use for Time Machine and click Next. A summary displays your backup options. Click Finish. D-Link ShareCenter DNS-327L User Manual… -
Page 336
Section 4 — Configuration The wizard returns to the Time Machine table. It displays the volumes you just selected for the backup process. The volumes are also viewable in the Finder. D-Link ShareCenter DNS-327L User Manual… -
Page 337: Time Machine Setup — Mac Os
Section 4 — Configuration Time Machine Setup — Mac OS You can also browse the volume in Finder. Go to System Preferences, click Time Machine. D-Link ShareCenter DNS-327L User Manual…
-
Page 338
Section 4 — Configuration In Time Machine, click Select Backup Disk. View the DNS-327L Volumes. D-Link ShareCenter DNS-327L User Manual… -
Page 339
Select the volume you want to use for the backup and click Use Disk. Log in to the server. Enter the Name and a Password that you configured for the volume you are using, and click Connect. D-Link ShareCenter DNS-327L User Manual… -
Page 340
The Time Machine backup process is now complete. View your settings once you have set your disk. To deactivate Time Machine, move the slider to OFF. This, however, doesn’t delete the Volumes from the DNS-327L settings. D-Link ShareCenter DNS-327L User Manual… -
Page 341: Time Machine — Delete A Volume
To delete a volume under Time Machine Settings, select the volume you want to delete — it will turn red. Click the Delete button. A warning message prompts you to verify if you want to delete the Volume. Click Yes. D-Link ShareCenter DNS-327L User Manual…
-
Page 342
To Remove all network shares, click the Remove All Network Shares button. A warning message appears asking you to confirm your selection. Click Yes to continue. The Time Machine wizard shows an empty Time Machine Settings window. D-Link ShareCenter DNS-327L User Manual… -
Page 343: Usb Backups
MTP (Media Transfer Protocol) Backups basically backup digital media content from an MTP compatible USB device such as a digital camera, MP3 player, or smartphone to your ShareCenter. USB Backups allows you to backup data from a USB storage device to the ShareCenter or from the ShareCenter to a USB storage device. D-Link ShareCenter DNS-327L User Manual…
-
Page 344: Mtp Backups
Click Browse to select a folder on your ShareCenter for the backup data to be saved to. Status Displays the current MTP backup status. Click on the Save Settings button to save the MTP Backups settings. D-Link ShareCenter DNS-327L User Manual…
-
Page 345: Usb Backups
Select Copy to create a new folder in the destination folder. Select Synchronize to overwrite all the files in the existing USB folder named USBDisk1_1. Status: Displays the current USB backup status. Click on the Save Settings button to save the USB Backups settings. D-Link ShareCenter DNS-327L User Manual…
-
Page 346: Mtp Backup Process
MTP backups settings and will copy all the media files from the MTP USB device to this folder. At this time the USB LED remains white until the device is disconnected. D-Link ShareCenter DNS-327L User Manual…
-
Page 347: D-Link Sharecenter Dns-327L User Manual
When the backup is complete, the flashing white LED will become solid white. Click and hold the USB button at the front for at least 5 seconds to unmount the USB device for safe removal. D-Link ShareCenter DNS-327L User Manual…
-
Page 348: P2P Downloads
The DNS-327L is able to act as a P2P download manager, enabling you to download files directly to the Sharecenter’s storage without the need for a computer. In this section you can view the status of current downloads, and configure the P2P download management settings. Go to Applications, and click on P2P Downloads. D-Link ShareCenter DNS-327L User Manual…
-
Page 349
Section 4 — Configuration When you open P2P Downloads there are two sections, P2P Downloads and Settings. D-Link ShareCenter DNS-327L User Manual… -
Page 350
Add Torrents from File: Browse for a torrent file you have downloaded onto your PC. Click Choose File, select the file you wish to upload, and click Add Torrent. D-Link ShareCenter DNS-327L User Manual… -
Page 351
The Top, Up, Down and Bottom buttons allow you to Top, Up, Down, Bottom: move the selected P2P download in the task list. The downloads at the top of the list have a higher priority. D-Link ShareCenter DNS-327L User Manual… -
Page 352
The user can also navigate to other pages when more than one page exist. The Refresh button allows the user to refresh the P2P task list Refresh: so it displays the most updated statistics. D-Link ShareCenter DNS-327L User Manual… -
Page 353: Settings
Here the user can choose to Enable or Disable encryption. Bandwidth Here, you can manually configure the maximum download Control: and upload rates. Enter the value -1 to set the respective field to unlimited. Click Save Settings to save the current configuration. D-Link ShareCenter DNS-327L User Manual…
-
Page 354: Amazon S3
With Amazon S3 support, it is possible to upload the data from your DNS-327L to Amazon S3, or download the data from Amazon S3 to your DNS-327L. D-Link ShareCenter DNS-327L User Manual…
-
Page 355: Creating An Aws Account
Before you can use this function on your Sharecenter, you must register an AWS account. To do this, open your web browser and type the following link for the Amazon Web Services: http://www.aws.amazon.com/s3. Then, click on the link at the top named “Sign Up Now”. Follow the instructions to create your AWS account. D-Link ShareCenter DNS-327L User Manual…
-
Page 356
Click Next to continue. Job Name Settings Enter a 16 character name to identify the name of the backup or the restore job. Click Next to continue. D-Link ShareCenter DNS-327L User Manual… -
Page 357
Click Next to continue. Server Type Type: Select Upload or Download from the drop-down menu. Backup Type: Use the drop-down menu and select Overwrite Existing Files, Full Backup or Incremen- tal Backup. Click Next to continue. D-Link ShareCenter DNS-327L User Manual… -
Page 358
Once (at a predetermined time and day), or Scheduled (a predetermined time on a daily basis). If you wish to run the backup immediately, select the Yes radio button. Otherwise, select Click Next to continue D-Link ShareCenter DNS-327L User Manual… -
Page 359
This field of the jobs controls whether the job will execute or not. If the button shows a green triangle, clicking it enables the job to function. If the button shows the red square, clicking it disables the job from executing. D-Link ShareCenter DNS-327L User Manual… -
Page 360: Google Drive
Google Drive account). If the drop-down list is blank, create an account using the icons next to it. The green + button is used to create the Linked Account. The red x is used to delete a Linked Account. D-Link ShareCenter DNS-327L User Manual…
-
Page 361
Use you Gmail credentials to sign-in (highlighted in red) or create an account (highlighted in pink). It’s better to use Google Chrome Browser to do this. Create your Google account by entering the required infor- mation. D-Link ShareCenter DNS-327L User Manual… -
Page 362
(Use the Ctl/C buttons to copy). Under Step 2. enter the email address you just created (or previously had) and paste (Use the Ctl/P button to paste)the key into the key field provided. Click Apply. D-Link ShareCenter DNS-327L User Manual… -
Page 363
Under Sync Folder, click the Browse folder to locate the directory you want to use. Under Step 1, Select Sync Folder, select the folder you want to use. You can use the drop-down, click folder menu to select a folder. Click Next to continue. D-Link ShareCenter DNS-327L User Manual… -
Page 364
Under Step 2 Sync Folder Access Rights, select the user access rights. Choose between, All Accounts or Specific User/Group. Under Step 3 Assign Access Rights, select the access rights. Choose between, Read Only, Read/Write, or Deny Access. D-Link ShareCenter DNS-327L User Manual… -
Page 365
Section 4 — Configuration Under Step 4 Summary, it highlights the steps completed. Click Finish to exit, Previous to go back or Exit to make no changes. The Sync Folder is now populated with the folder you selected. D-Link ShareCenter DNS-327L User Manual… -
Page 366
Google Drive to NAS means data on Google Drive will be downloaded and synced to the DNS-327L. Next, select the schedule of your syn by either clicking Sync Now or choose an option from the drop-down menu (Manu- ally, Hourly, Daily, Weekly, Monthly) D-Link ShareCenter DNS-327L User Manual… -
Page 367
Select Weekly, then select the Time: hour, minutes, and Day of week from the drop-down menu, and click Apply. For the Month option: Select Monthly, then select the Time: hour, minutes, and Day of month from the drop-down menu, and click Apply. D-Link ShareCenter DNS-327L User Manual… -
Page 368
Section 4 — Configuration To view the data you synced login to your Google account. You can do this through Gmail as well. Once in Gmail, select the Apps menu from the top-right side and select Drive. D-Link ShareCenter DNS-327L User Manual… -
Page 369
Section 4 — Configuration Once in the Google Drive website, go to My Folders file and check to see if the data you synced over is there. D-Link ShareCenter DNS-327L User Manual… -
Page 370: Mydlink
The mydlink cloud service is offered to DNS-327L users. Connect to the mydlink service from any location and using any operating system. If you are not connecting to the service directly from the DNS-327L, open your browser and type in www.mydlink.com. Sign into your account on the home page. D-Link ShareCenter DNS-327L User Manual…
-
Page 371: Mydlink Verification
If this is your first time accessing your mydlink account, you may need to verify your account. An automated email will be sent to your registered email address. Check your e-mail box and click the weblink to activate mydlink account. D-Link ShareCenter DNS-327L User Manual…
-
Page 372
Section 4 — Configuration Your mydlink account will be verified and your profile information will be shown. D-Link ShareCenter DNS-327L User Manual… -
Page 373: Mydlink Java Runtime Environment
Section 4 — Configuration mydlink Java Runtime Environment Once you log into your account, you will need to install the Java Runtime environment. The screen provides directions in order for you to download D-Link ShareCenter DNS-327L User Manual…
-
Page 374
Section 4 — Configuration The Java Runtime environment takes a few steps. Follow the instructions: D-Link ShareCenter DNS-327L User Manual… -
Page 375
Section 4 — Configuration After the Java Runtime environment has been installed, run the mydlink application and enter your device password. D-Link ShareCenter DNS-327L User Manual… -
Page 376
Section 4 — Configuration Once you are connected you can view your existing storage on the cloud and the DNS-327L. You can also upload, download files using your browser, create new folders, rename folders and delete folders. D-Link ShareCenter DNS-327L User Manual… -
Page 377
Section 4 — Configuration Click Volume 1 to see its contents. Here you can create a New Folder, Upload and Download files, Delete and Rename files. D-Link ShareCenter DNS-327L User Manual… -
Page 378: Creating A New Folder
To rename a file or folder, click the checkbox next to the file/folder you wish to rename. Click the Rename button. A confirmation window will appear for you to rename the file. Enter a new name and click Rename. D-Link ShareCenter DNS-327L User Manual…
-
Page 379: Mydlink Settings Details
Under General Information you can view the properties of your NAS. On display is the Device Name, mydlink Number, Model Name, MAC address (which is associated with your account and NAS), and Activation time and date. Also viewable is the router you are using and file settings. D-Link ShareCenter DNS-327L User Manual…
-
Page 380: Sharecenter Nas Status
• Check to make sure that the LED on your ShareCenter NAS is lit solid blue. If you still cannot access your ShareCenter, reset your device and run the DNS-327L Setup Wizard again from the CD-ROM included in your package. D-Link ShareCenter DNS-327L User Manual…
-
Page 381: Deleting A Mydlink Device
Select the device you wish to delete. A warning message appears for you to verify your deletion. Enter your admin password to delete the device. Click Delete Device to proceed. An acknowledgement message appears to confirm the deletion. D-Link ShareCenter DNS-327L User Manual…
-
Page 382: Deleting A Mydlink Account
Under Profile Information, click the Delete Account link at the bottom. A warning message appears to ask you if you want to delete the account. Select No, keep it to do nothing or click Yes, delete it to delete the account. D-Link ShareCenter DNS-327L User Manual…
-
Page 383
In order to delete the mydlink account you need to enter your password details. Enter your details and then click Confirm Delete. Click Cancel to revert back and keep your account. A confirmation will appear when the account has been deleted. D-Link ShareCenter DNS-327L User Manual… -
Page 384: The Mydlink Access Nas App
Access your files anytime, anywhere with your mydlink-enabled ShareCenter NAS and the mydlink Access-NAS app. Stream your stored photos, documents, music, and movies directly to your iOS or Android devices using your mobile data connection or Wi-Fi. D-Link ShareCenter DNS-327L User Manual…
-
Page 385: The Mydlink Access Nas App — Features
• Supports “Open in” option to open your files with different apps • Supports AirPlay for playback of your media on other devices • Supports AirPrint to print out your documents • Monitor disk usage and status D-Link ShareCenter DNS-327L User Manual…
-
Page 386
• Back up photos and images to your ShareCenter • Search your ShareCenter or Android device for files • Rename and delete files • Open files in different apps • Monitor disk usage and status D-Link ShareCenter DNS-327L User Manual… -
Page 387: The Mydlink Access Nas App — Compatibility
• More coming soon! Note: If you are using a DNS-325 or DNS-345, please use the mydlink Cloud app. To download the mydlink Access-NAS app, simply search for “mydlink access-NAS” on the iTunes App Store or Google Play™. D-Link ShareCenter DNS-327L User Manual…
-
Page 388: Knowledge Base
Although performance is improved, the lack of any RAID or mirroring means that if one drive fails, all data on the volume will be lost. JBOD JBOD allows you to create a large virtual disk drive by concatenating two or more smaller drives together. It offers no redundancy and limited data protection. D-Link ShareCenter DNS-327L User Manual…
-
Page 389
A RAID 1 array can only be as large as it’s smallest member disk. Because the data is stored on multiple disks, RAID 1 provides fault tolerance and protection, in addition to performance advantages. D-Link ShareCenter DNS-327L User Manual… -
Page 390: Raid Options
Section 5 — Knowledge Base RAID Options Here is a list of the RAID options available on the ShareCenter DNS-327L. Standard RAID — creates a single volume for one drive or more drives. JBOD — allows you to create a large virtual disk drive by concatenating two or more smaller drives together.
-
Page 391
RAID 1 set fails. In fact, as long as any single member of the set remains functional, you will continue to operate normally, with complete access to your data. D-Link ShareCenter DNS-327L User Manual… -
Page 392: Ups Connectivity
The DNS-327L supports USB UPS, giving users the ability to share the UPS on their local network and protect from an abnormal shutdown due to a power failure. Follow these instructions to connect a UPS to the USB port on the back of the ShareCenter. Standalone and Network Master Mode: Log into the DNS-327L. D-Link ShareCenter DNS-327L User Manual…
-
Page 393
Select Standalone to use the UPS only on the DNS-327L, or select Master to share the UPS with the network UPS slaves. The UPS Status screen shows the mode, manufacturer, product type, battery charge meter, and status. D-Link ShareCenter DNS-327L User Manual… -
Page 394
Enter the IP address of the other UPS slave on the network. Click the + button to add more IP addresses. Make sure the DNS-327L and the UPS slaves are on the same physical network. Click OK to continue. D-Link ShareCenter DNS-327L User Manual… -
Page 395
Once you have entered an IP address, the system will check its database for IP address records. The UPS Settings table will display the IP address(es) you added. Your DNS-327L is now setup as the network master to notify the network slaves about critical power status. D-Link ShareCenter DNS-327L User Manual… -
Page 396: Deleting A Ups Slave
Deleting a UPS Slave Under Management>>System Management>>USB Devices>>UPS Setting, select the IP address. Your selection will turn red. Click Delete. The DNS-327L will process your request. The IP address will no longer be listed in the table. D-Link ShareCenter DNS-327L User Manual…
-
Page 397: Usb Print Server
Note: Only the print function is supported. The device does not support the copy and scan functions of multi-function printers. To add a printer, connect your printer via USB cable to the USB port on the back of the Sharecenter: The printer should appear in the USB Devices menu of the System Management tab. D-Link ShareCenter DNS-327L User Manual…
-
Page 398
Select the printer driver from the installed Manufacturer list or use the Have Disk button to browse for the printer driver file if you have them on your local hard disk or a CD-ROM. Click OK to continue. D-Link ShareCenter DNS-327L User Manual… -
Page 399
Browse to locate the file. Once you have selected the proper driver as shown in the browse list then click OK to install the printer. The printer is now installed and the printer queue will appear. D-Link ShareCenter DNS-327L User Manual… -
Page 400: Setting Up A Printer Using Mac Os 10.8
Settings. Download the printer manufacturer’s drivers, or install them from the CD that came with your printer. You must ensure that you use the correct Mac OS 10.8 drivers. Install these drivers on your Mac. D-Link ShareCenter DNS-327L User Manual…
-
Page 401
Section 5 — Knowledge Base Go to System Preferences>>Print & Scan. Under Print & Scan, click the plus sign. D-Link ShareCenter DNS-327L User Manual… -
Page 402
Under Add Printer, click the IP tab to add the shared printer which is connected to the NAS. Enter the IP address of the printer and the Queue configuration. Note: Under the Queue section, enter “lp”, (where “lp” stands for Line Printer). D-Link ShareCenter DNS-327L User Manual… -
Page 403
Section 5 — Knowledge Base Under Location, choose Select Printer Software. Select your specific printer. (If you cannot find a driver for your printer, please download the driver from the manufacturer’s web site and install it.) D-Link ShareCenter DNS-327L User Manual… -
Page 404
Section 5 — Knowledge Base The IP printer now appears under Print & Scan. The IP address is clearly visible in the configuration settings. D-Link ShareCenter DNS-327L User Manual… -
Page 405: Technical Specifications
ISO Mount Management Device Interfaces Download Management 10/100/1000 gigabit Ethernet port HTTP/FTP Schedule Download 1 USB 3.0 host port Peer to Peer (P2P) client LEDs Backup Management Power Schedule Backup from PC to NAS (D-Link ShareCenter D-Link ShareCenter DNS-327L User Manual…
-
Page 406
Consumption: Web-based management utility Normal Mode: 28.8 W System Setup Wizard (Win / Mac) Sleep Mode: 11.4 W D-Link Storage Utility (Win / Mac) Temperature E-Mail Notifications Operating: 0 to 40 ˚C (32 to 104 ˚F) SMS Notifications Storage: -20 to 70 ˚C (-4 to 158 ˚F) -
Page 407
Section 6 — Technical Specifications FTP Server: Unicode Korean Turkish Croatian Cyrillic (Kyrgyz Republic) Czech Danish Dutch English Finnish French German Greek Hungarian Italian Norwegian Polish Portuguese Romanian Russian Simplified Chinese Slovenian Spanish Swedish Traditional Chinese Turkish Korean Hebrew D-Link ShareCenter DNS-327L User Manual…
По итогам голосования iXBT Brand 2014 четвертое место в категории сетевых накопителей заняла компания D-Link. Этот производитель давно занимается тематикой домашних сетевых накопителей, но редко балует нас новинками в данном сегменте. Его решения имеют заметно более привлекательную стоимость по сравнению с лидерами рынка. Они могут быть интересны тем пользователям, которым требуется базовый набор сервисов сетевого накопителя и несколько популярных дополнительных функций, работающих «из коробки».
Актуальный ассортимент продуктов этого класса на локальном рынке у компании невелик и включает в себя наиболее востребованные модели на два и четыре отсека в настольном формате. В этом материале мы познакомимся с ShareCenter DNS-327L для двух винчестеров, который отличается от других решений в линейке наличием порта USB версии 3.0, увеличенным объемом оперативной памяти и цветом корпуса. Компания позиционирует модель для домашних пользователей и SOHO. Кроме того, в ней есть поддержка фирменных облачных технологий D-Link и портала mydlink, позволяющая с минимальными усилиями обеспечить удаленный доступ к устройству через интернет. Интересно, что в эту экосистему также входят IP-камеры, роутеры и другое оборудование компании. Отметим, что продукт присутствует на рынке уже пару лет, но продолжает оставаться актуальным, а также обеспечивается технической поддержкой, включая выход обновлений встроенного программного обеспечения.
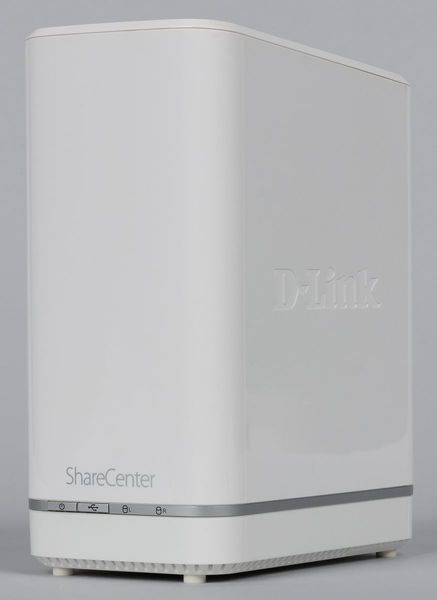
Наиболее привлекательной характеристикой модели является относительно невысокая стоимость. Так что будет интересно посмотреть, насколько устройство соответствует младшим продуктам более популярных в этой категории производителей с точки зрения функций и производительности.
Комплект поставки и внешний вид
Сетевой накопитель поставляется в картонной коробке средних размеров. Ручки для более удобной транспортировки у нее, к сожалению, нет. Но сама коробка совсем не тяжелая и весит около 1,3 кг.

Цветовое оформление традиционное для D-Link. Приводятся фотографии устройства, ключевые особенности, системные требования, возможности встроенной прошивки и другая информация. Есть также схематичное описание процесса запуска в работу.
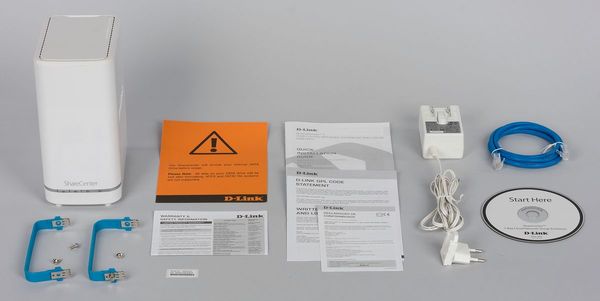
В комплекте идет блок питания «розеточного» формата (12 В 3 А), сетевой патч-корд, специальные ручки для установки жестких дисков, краткая инструкция по началу работы на нескольких языках, включая русский, компакт-диск с программным обеспечением и немного дополнительных листовок.
Похвалим производителя за то, что блок питания и его кабель в этой модели белые и согласуются с цветом корпуса устройства. Жаль, что на этом компания остановилась и не стала комплектовать накопитель и белым сетевым кабелем. Кстати, последний уникально короткий — менее метра, и, на наш взгляд, во многих случаях придется использовать другой.
Также несколько странно выглядит сегодня комплектация оптическим компакт-диском, который, судя по описаниям, требуется для инсталляции устройства.
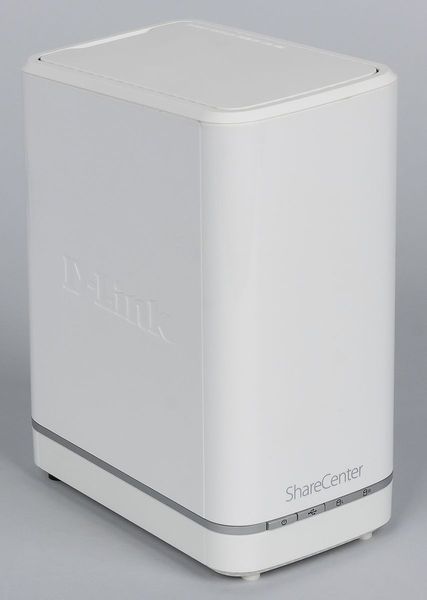
Внешние элементы корпуса, имеющего вертикальную компоновку, изготовлены из белого пластика. Дно и верхняя крышка матовые, а большинство остальных поверхностей глянцевые.
Габаритные размеры составляют 90×145×198 мм. Отметим, что верхняя часть скошенная, что вносит некоторое разнообразие в традиционные формы.
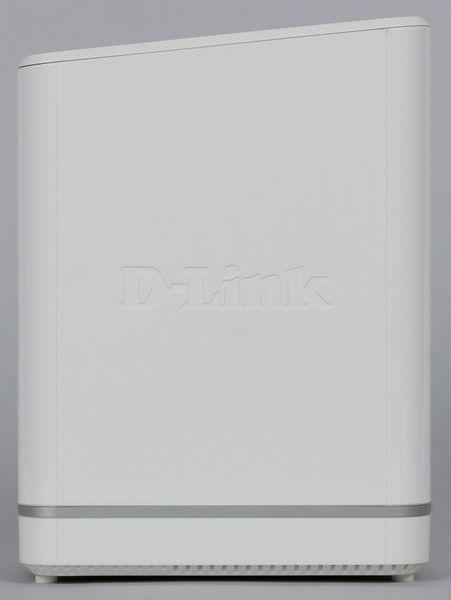
Еще один элемент дизайна — тонкая серая полоска в нижней части корпуса. На ней спереди находятся две кнопки (питание и отключение USB-накопителя), а ниже — четыре многоцветных индикатора (питание, статус USB, состояние и активность жестких дисков).
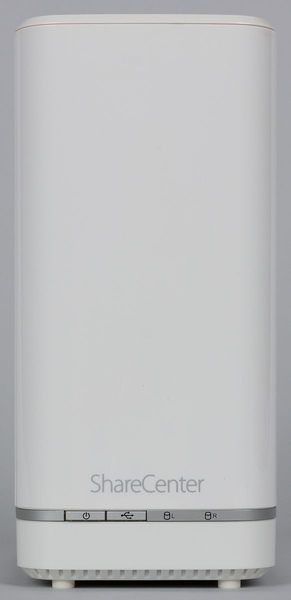

Опирается модель на четыре резиновые ножки. На дне также можно найти решетку вентиляции основной печатной платы, скрытую кнопку сброса и информационную наклейку.
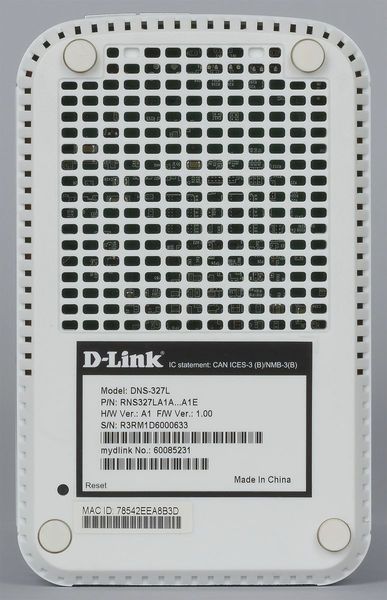
Для установки дисков пользователю нужно будет снять верхнюю крышку. Для этого используется крупная кнопка на задней панели. Ниже находится еще одна наклейка с данными для входа в интерфейс управления и параметрами блока питания, решетка вентилятора системы охлаждения, отверстие кенсингтонского замка, вход блока питания, гигабитный сетевой порт с индикаторами и порт USB 3.0. Отметим, что доступные снаружи элементы разъемов черные, что несколько портит внешний вид. Кроме того, порт USB установлен слишком близко к сетевому порту, что не очень удобно.
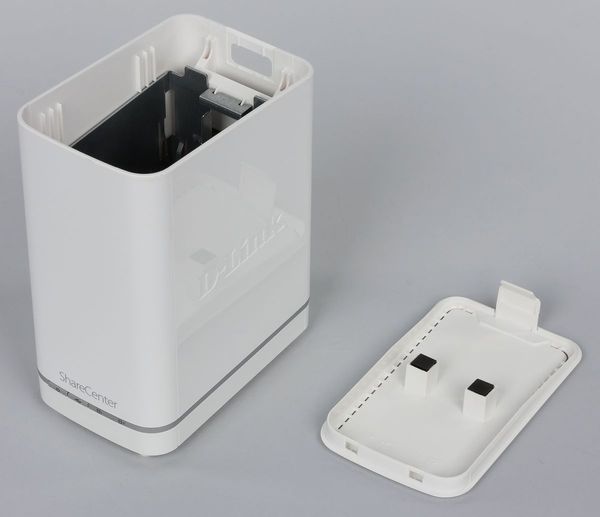
С точки зрения домашнего пользователя, «вертикальный» формат корпуса стоит записать в плюсы, поскольку так устройство занимает меньше места на столе. Также сюда можно отнести эффективную и тихую систему охлаждения с возможностью полного выключения вентилятора. Минусом является наличие только одного порта USB, расположенного на задней панели. Для внешнего вида это может быть и хорошо, но оперативно подключать к нему устройства неудобно.
Конструкция и аппаратные характеристики
Внутренняя конструкция устройства достаточно простая — отсек для установки дисков (в вертикальной ориентации) представляет собой металлическую раму. Под ней установлена единственная печатная плата устройства.
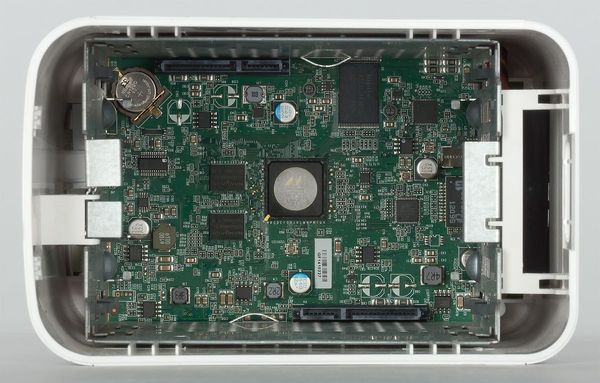
На ней можно увидеть процессор накопителя — Marvell 88F6707 линейки Armada 370 (архитектура ARM, тактовая частота 1,2 ГГц) и все остальные аппаратные компоненты: две микросхемы оперативной памяти DDR3 общим объемом 512 МБ, флэш-чип на 128 МБ, контроллер USB 3.0 D720202 и вспомогательный сетевой чип Marvell 88E1318. Как мы видим, с точки зрения платформы данная модель относится к начальному уровню. Отметим, что на процессоре нет никакого радиатора, а разъемы SATA установлены прямо на плате. В минусы продукта можно записать и наличие только одного порта USB. Размеры устройства вполне позволяют установить еще один-два порта, тем более что в процессоре есть контроллер USB 2.0.
Для охлаждения начинки используется вентилятор Sunon MB50101V2-0000-G99 линейки MagLev. Он работает на выдув, имеет формат 50×50×10 мм и подключается трехпроводным кабелем. Скорость вращения регулируется автоматически, причем есть даже вариант полного выключения, если температура дисков не вызывает опасений. В этом случае с тихими дисками модель практически незаметна. В нашем тестировании мы использовали WD Red на 1 ТБ, и вентилятор практически никогда не включался. Однако даже низкая скорость его вращения создает невысокий, но заметный для тихой домашней обстановки шум. Так что если планируется работа с дисками большой емкости, при высокой внешней температуре или в стесненных условиях, желательно не ставить накопитель в спальне.
Тестирование устройства проводилось с версией программного обеспечения 1.04 от 07/17/2015.
Сборка и настройка накопителя
Для начала работы с устройством потребуется установить в него жесткие диски. Список совместимости приводится на сайте. В нем можно найти актуальные модели объемом до 6 ТБ включительно. Отметим, что речь идет только о 3,5″ винчестерах. Штатно установить устройства формата 2,5″ невозможно.
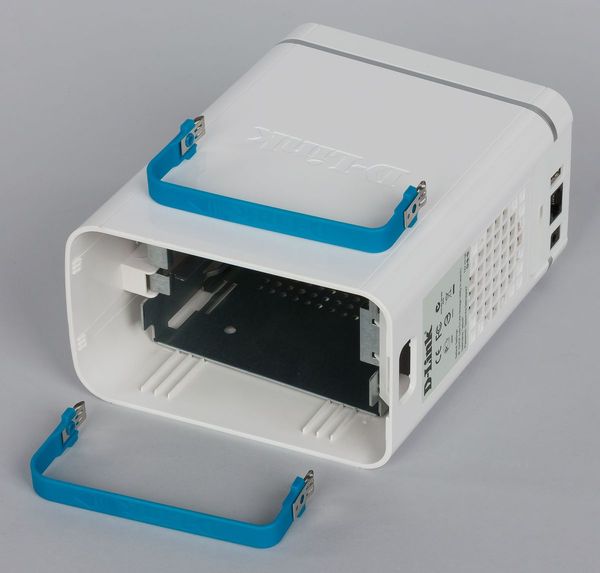
На самом деле и с традиционным форматом не все так просто, как хотелось бы. Дело в том, что ручки-рамки повторяют форму верхней части корпуса и имеют боковые элементы разной длины, что требует определенной внимательности при выборе ориентации при креплении их на винчестеры. В итоге указатель «Front» на ручках может еще больше запутать пользователя.
Далее подключаем сеть и питание, включаем устройство. Загружается накопитель достаточно быстро. Теперь можно использовать несколько вариантов для настройки основных параметров.
Например, найти IP-адрес устройства в журнале роутера и обратиться к его веб-интерфейсу (поддерживается и работа по https, а вот номера портов изменить не получится). По умолчанию, пароль администратора здесь пустой. Предусмотрен «Мастер установки», в котором вы меняете пароль администратора, выбираете часовой пояс, настраиваете сетевые адреса, устанавливаете имя накопителя. Дополнительно можно указать настройки почтового сервера для работы системы уведомлений. Отметим, что дисковый массив автоматически не создается. Также для настройки можно воспользоваться комплектной утилитой или сервисом mydlink.
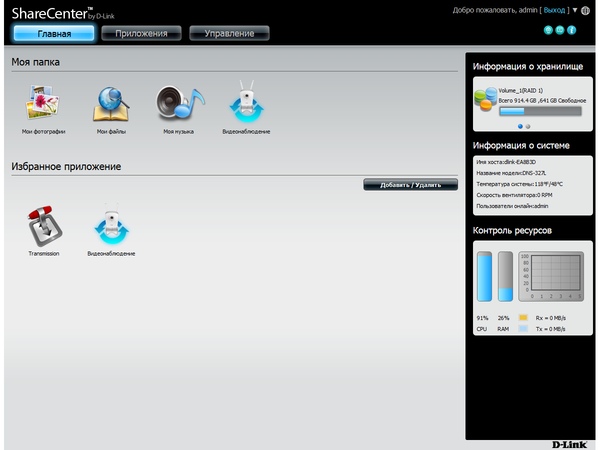
Веб-интерфейс имеет расширенный относительно традиционного формата дизайн. В верхнем правом углу есть элементы для перезагрузки и выключения устройства, а также для изменения языка интерфейса. В правой части страниц представлена информация о дисковых томах, системе и потреблении ресурсов процессора и оперативной памяти. Можно вывести здесь и журнал событий. А при открытии страниц с настройками, этот блок переключается на встроенную справочную систему.
В интерфейсе мы видим три основных раздела — «Главная», «Приложения» и «Управление». Основные системные параметры находятся в последнем пункте. Посмотрим на них внимательнее.
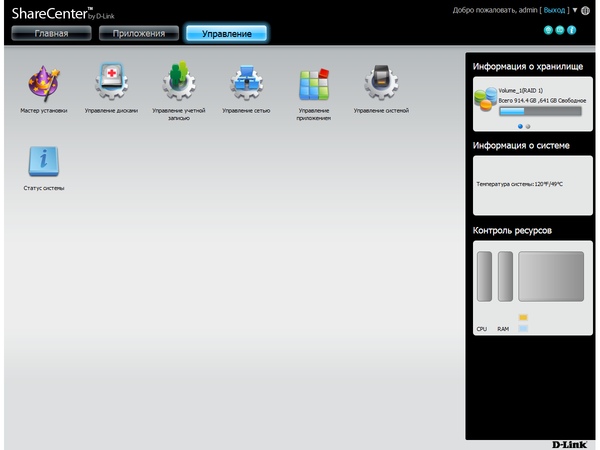
После выбора этого пункта на странице показываются семь значков. Про «Мастер установки» мы уже говорили выше. «Управление дисками» позволяет выбрать конфигурацию дисковых томов. Устройство поддерживает четыре варианта — два отдельных раздела и массивы JBOD, RAID0 и RAID1.
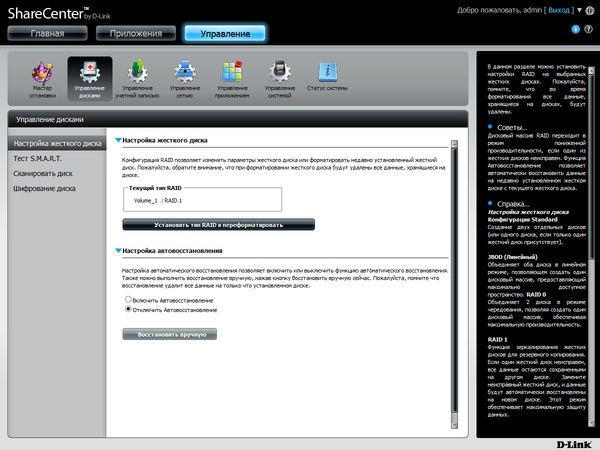
Напомним, что дополнительный уровень защиты от отказа одного диска обеспечивается только последним. Для него же предусмотрена и функция восстановления. В случае использования в массивах 0 и 1 дисков разного объема, из остатков можно сделать второй том формата JBOD.
При изменении конфигурации томов вся информация теряется. Для раздела данных используется файловая система EXT4. В документации описан вариант миграции с одного диска на зеркало с сохранением данных. На этом же этапе можно активировать шифрование тома.
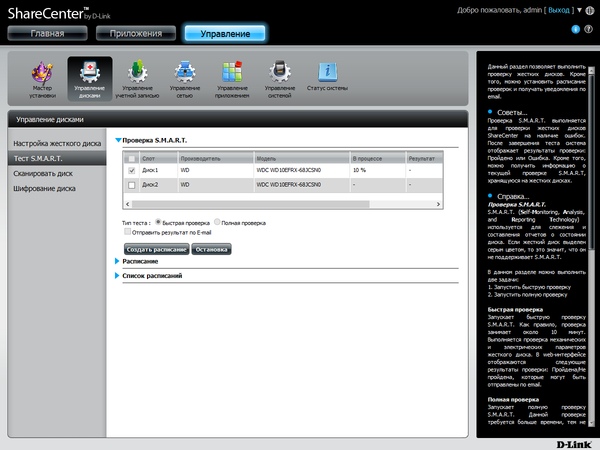
Из дополнительных операций предусмотрено сканирование файловых систем томов, а также тесты дисков по технологии SMART (в том числе и по расписанию).
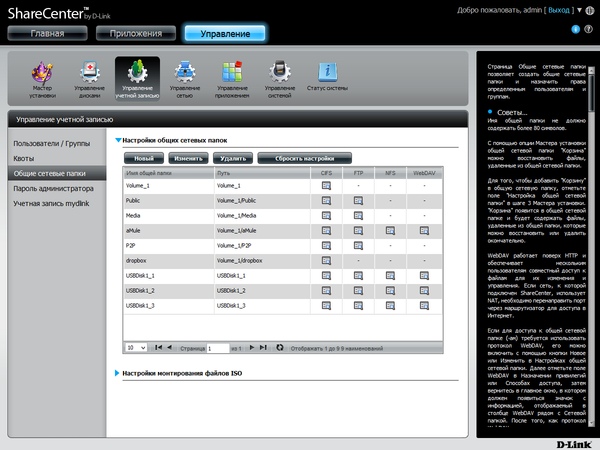
На томах пользователь может создавать нужные ему общие папки (общие ресурсы). Правда, этот процесс несколько отличается от привычных нам по другим сетевым накопителям. Для начала надо воспользоваться встроенным проводником и создать папки в файловой структуре устройства. Далее нужно будет выбрать эти папки и разрешить их публикацию по сети. Для каждой предусмотрено несколько опций, включая активацию корзины для удаленных файлов и выбор протоколов доступа.
Предусмотрено монтирование ISO-образов оптических дисков в качестве общих папок, а также их создание из папок прямо через веб-интерфейс накопителя.
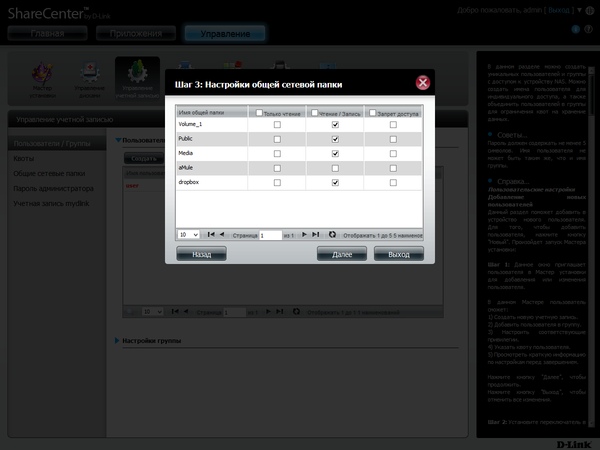
Традиционно для контроля доступа используются аккаунты пользователей и группы. Также система поддерживает для них установку квот дискового пространства. Есть и возможность создания сразу нескольких аккаунтов, а также импорт данных из текстового файла.
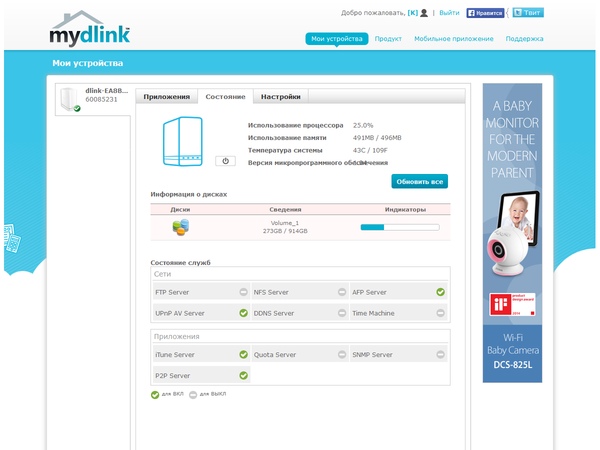
Кроме того, в разделе «Управление учетной записью» разместили пункты для изменения пароля администратора и подключение накопителя к учетной записи mydlink (или создание новой) для работы с одноименным порталом. Через него можно будет проверить статус устройства, а также получить доступ к некоторым его настройкам и сервисам.
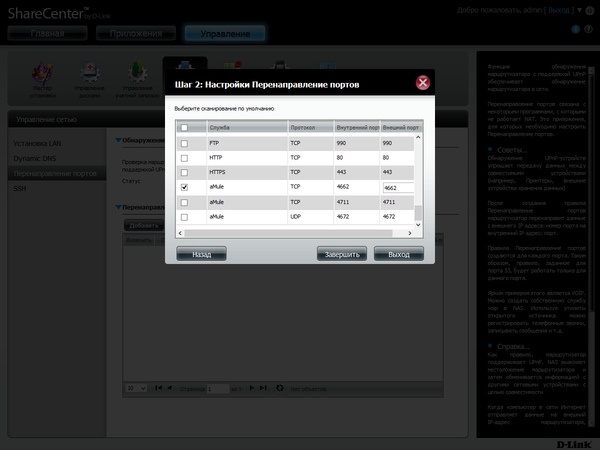
Сетевые параметры накопителя включают в себя установку IP-адресов (включая IPv6), настройку клиента динамического DNS (четыре сервиса, включая фирменные D-Link), трансляцию портов для встроенных служб через UPnP-совместимый маршрутизатор и включение протокола SSH.
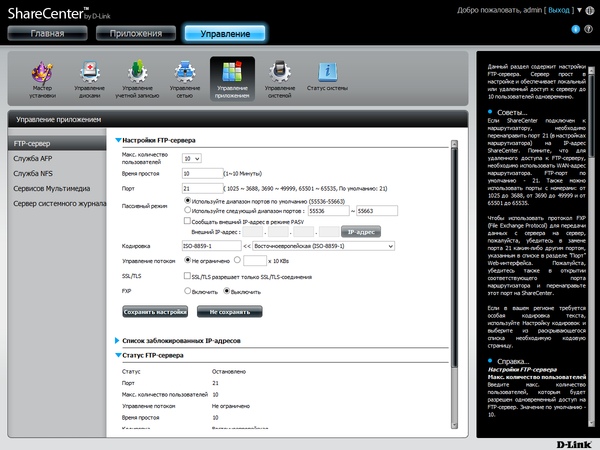
В разделе «Управление приложением», название которого немного путает, находятся параметры некоторых сетевых протоколов. Для сервера FTP можно ограничить число клиентов и скорость, выбрать номер порта и кодировку (юникод присутствует), включить шифрование и FXP, выбрать порты для пассивного режима, поставить фильтр для блокировки клиентов по IP-адресам. У AFP и NFS предусмотрена только опция включения протоколов. Заметим, что реализация AFP поддерживает и работу с программой резервного копирования Time Machine.
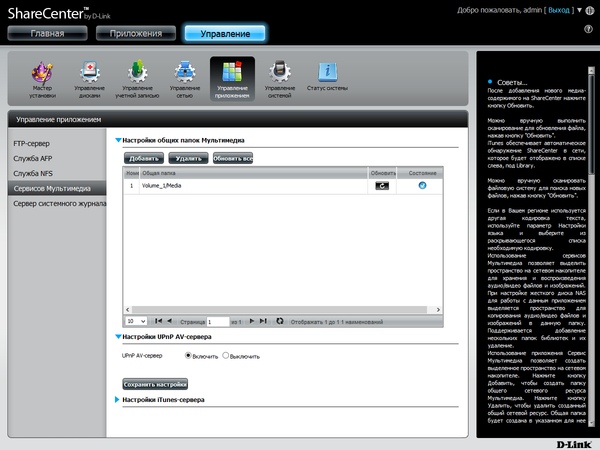
Встроенная система индексации мультимедиа файлов позволяет выбрать только определенные папки. Кроме сервера DLNA, накопитель может быть использован и для сетевой библиотеки iTunes. Правда, в этом случае предусмотрена работа только с одной папкой, но она может быть корневой для всего устройства.

Несколько неожиданно для данного класса увидеть реализацию сервера Syslog, позволяющего сохранять в едином месте журналы событий с разных устройств локальной сети.
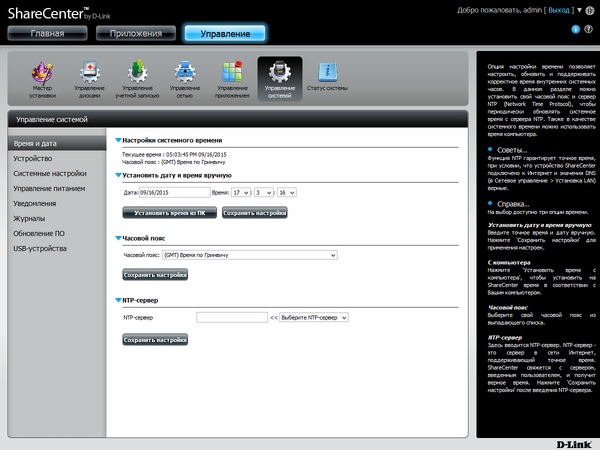
В разделе «Управление системой» мы видим знакомые пункты по настройке часов, установке сетевого имени, работе с конфигурацией и обновления прошивки (только из файла).
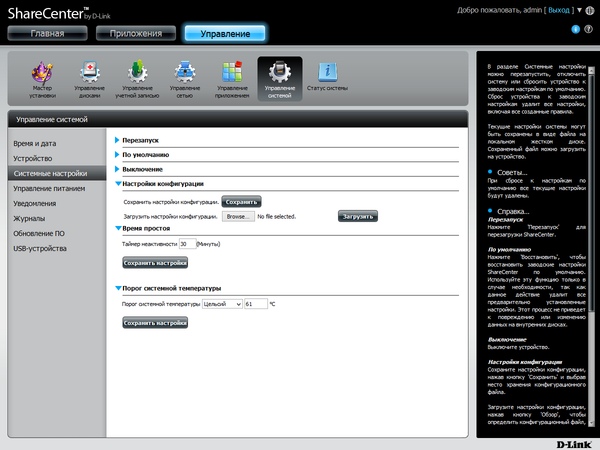
Здесь же есть кнопки для перезагрузки и выключения устройства. Среди параметров управления питанием есть включение спящего режима дисков, настройка расписания работы, автоматическое включение питания, пункт принудительного выключения накопителя в случае превышения заданного порога температуры, настройка режима работы вентилятора.
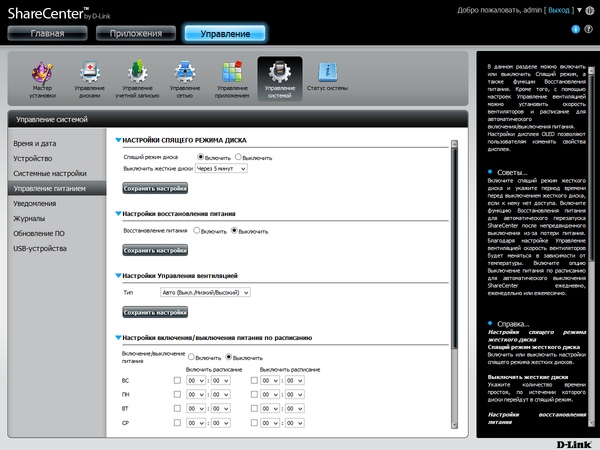
Накопитель ведет журнал событий простейшего формата без поиска и фильтров. Предусмотрена отправка информации на сервер Syslog, а также администратору по электронной почте или SMS (через внешний платный сервис).
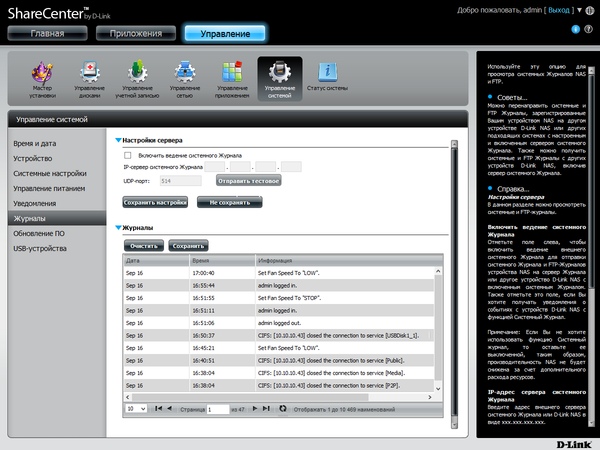
Накопитель поддерживает подключение некоторых типов USB-устройств, включая ИБП (можно работать и с сетевыми моделями), накопители и принтеры (работает только печать). На внешних дисках можно использовать несколько разделов и популярные файловые системы, включая FAT32, NTFS и EXT4.
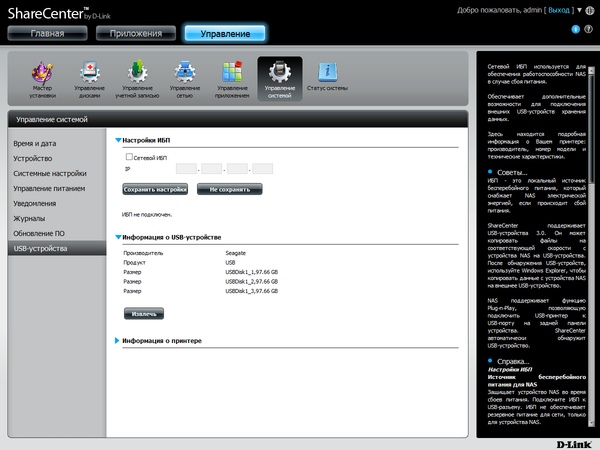
Для безопасного отключения предусмотрен соответствующий пункт в веб-интерфейсе, а можно использовать и кнопку на корпусе. Все тома представляются по сети общими папками с доступом без ограничений. В настройках можно только отключить поддержку протокола FTP для них. Попытка использовать USB-хабы (в том числе и с дополнительным питанием) для увеличения числа подключаемых устройств не увенчалась успехом. Стабильной такую конфигурацию мы назвать не можем. Кроме того, вероятно есть ограничение на максимальное число внешних томов — более трех нам увидеть не удалось.
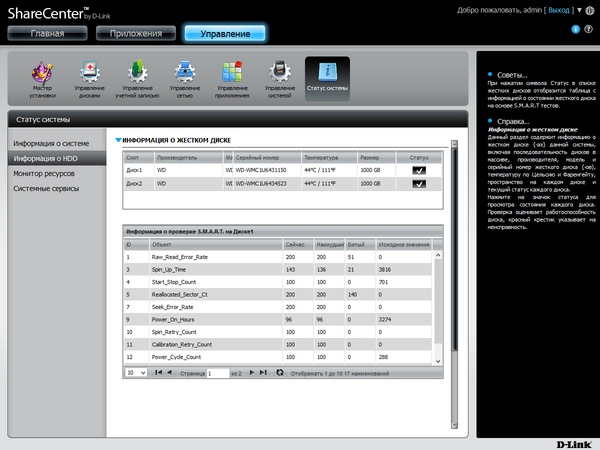
Последняя группа страниц в разделе «Управление» позволяет получить информацию о работе устройства. В частности здесь представлены сетевые адреса, температура системы и дисков, занятость дискового пространства на томах, данные о винчестерах, графики загрузки процессора, оперативной памяти и сети, список процессов. В отдельной таблице есть список текущих установленных сетевых сервисов с возможностью их оперативного запуска и остановки.
Возможности устройства
В разделе «Главная» веб-интерфейса сетевого накопителя собраны ссылки на сервисы доступа к файлам и другие приложения. При этом есть группа «Моя папка» с фиксированными составом и «Избранное приложение», где пользователь может самостоятельно указать нужные модули или ссылки на страницы настроек.
В частности, по умолчанию в первой группе находятся «Мои фотографии», «Мои файлы», «Моя музыка» и «Видеонаблюдение». Первые три пункта представляют собой менеджеры файлов с дополнительными функциями.
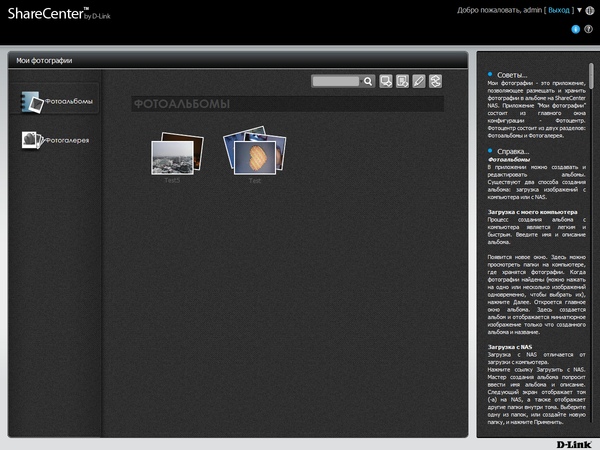
«Мои фотографии» позволяет как просматривать уже записанные на устройство файлы изображений, которые были ранее проиндексированы, так и создавать собственные альбомы и загружать в них фотографии с компьютера или самого сетевого накопителя. Во втором случае поддерживаются режим слайдшоу, некоторые операции редактирования файлов, отправка изображения на устройство AirPlay, публикации в социальных сетях. Не очень удобно то, что данные фотографии сохраняются в скрытой системой папке и недоступны для других сервисов.
«Моя музыка» использует информацию из тегов файлов для сортировки по исполнителям, альбомам и жанрам. В этот модуль встроен и аудиоплеер, позволяющий прослушивать композиции в формате MP3 прямо из браузера.
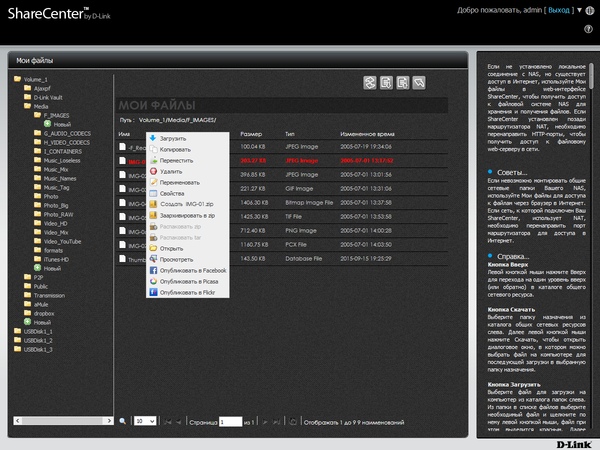
Третий вариант — «Мои файлы» — уже не имеет дополнительных функций связанных с форматами мультимедиа, но предоставляет возможности управления файлами любых типов, включая загрузку и скачивание, копирование и перемещение, удаление и работу с архивами.
Раздел «Приложения» собирает в себе все дополнительные сервисы, включая как штатные для прошивки, так и устанавливаемые пользователем из каталога «Центра дополнений». На момент подготовки статьи в последнем присутствовало тринадцать программ, а также была указана ссылка на официальный форум (на английском языке), где можно найти разработанные энтузиастами модули. Заметим, что в сети можно найти и другие каталоги программ, общее число которых исчисляется десятками.
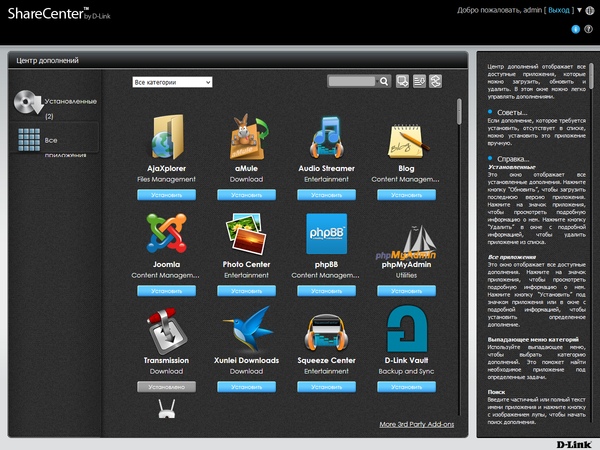
Из интересных программ отметим системы загрузки файлов aMule, Transmission и Xunlei, системы управления контентом Joomla, phpBB и WordPress, программу трансляции аудиопотоков Audio Streamer (на базе проекта Icecast), менеджер файлов AjaXplorer, управление фотоальбомами Photo Center (используется проект Gallery), программу обслуживания базы данных phpMyAdmin, медиасервер Squeeze.
Модуль D-Link Vault позволяет реализовать резервное копирование выбранных папок в облачное хранилище ElephantDrive. Он поддерживает хранение удаленных файлов, контроль версий файлов, фильтры по типу файлов, непрерывный режим работы и расписание.
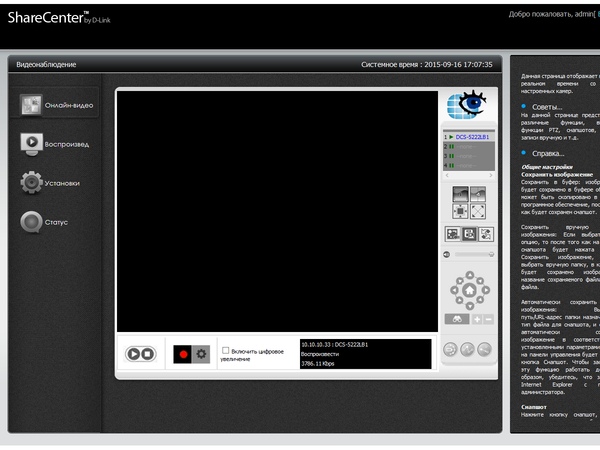
Учитывая, что данный производитель поставляет и IP-видеокамеры, неудивительно, что мы встретили в его сетевом накопителе сервис видеонаблюдения My Surveillance. Программа поддерживает до четырех камер. В списке официально поддерживаемых есть около сорока моделей D-Link (в том числе высокого разрешения, с записью звука и с PTZ). Про поддержку других производителей ничего не сказано.
Система позволяет просматривать через браузер живую картинку и записи. При этом требуется установка фирменного плагина, так что в список совместимых операционных систем, вероятно, входит только Windows.
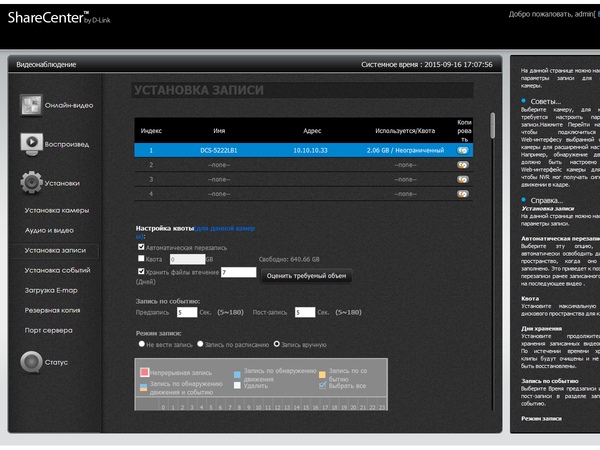
В настройках камер указывается качество, видеокодек, режим записи, параметры детектора движения, ограничения по времени хранения или занимаемому объему. Также есть настройки уведомлений по электронной почте или SMS (через внешний сервер), собственный журнал событий, создание резервных копий видеозаписей и выбор сетевых портов сервиса.
Заметим, что при активной одновременной работе нескольких дополнительных программ интерфейс устройства может стать не самым отзывчивым. Что касается скорости загрузки из сетей p2p, то там удавалось увидеть цифры до 6 МБ/с, что достаточно неплохо.

Что касается штатных программ в прошивке, то и здесь можно найти интересные функции. В частности, это сервис автономной загрузки файлов по протоколам HTTP/FTP/BitTorrent, резервное копирование в Amazon S3, синхронизация с облачными хранилищами Dropbox и Google Drive (связь со службой Google у нас не получилось настроить) и программы для резервного копирования.
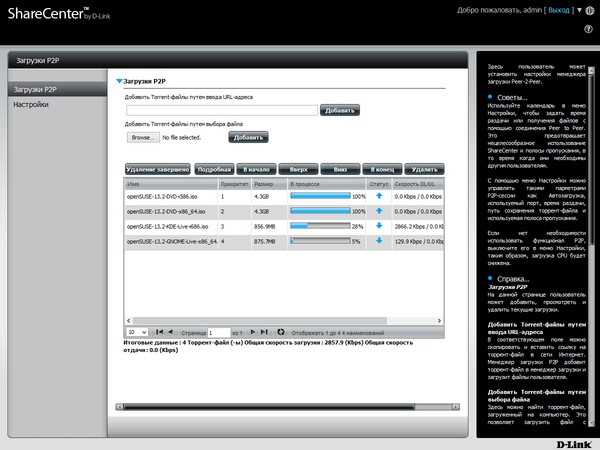
Поддерживается создание нескольких заданий для локального (из одной внутренней папки в другую), сетевого (вероятно с протоколом rsync) бекапа. Также мы нашли поддержку в этом модуле сетевых ресурсов SMB, однако только в качестве источника, но не пункта назначения, что несколько странно.
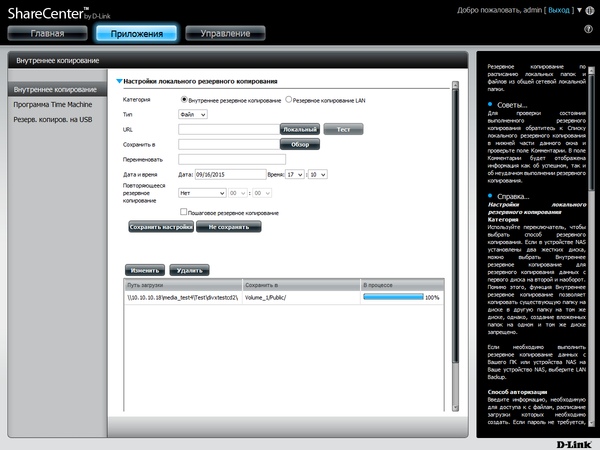
Кроме того, специальные функции есть для USB-устройств. Во-первых, можно включить автоматическое копирование данных при подключении с MTP-накопителей в выбранную папку NAS. Во-вторых, есть функция копирования или синхронизации заданных папок на USB-диске и сетевом накопителе при длительном нажатии кнопки на фронтальной панели устройства. Но и здесь есть некоторые недоработки, в частности нет сообщений в журнале.
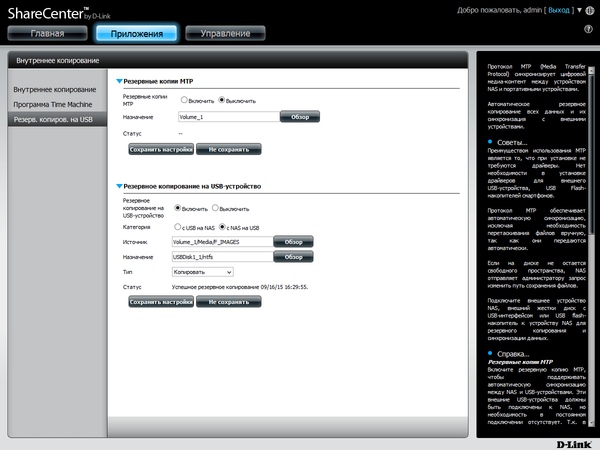
При наличии доступа к консоли и использованию популярной аппаратной платформы, опытные пользователи смогут добавить в систему и другие собственные приложения.
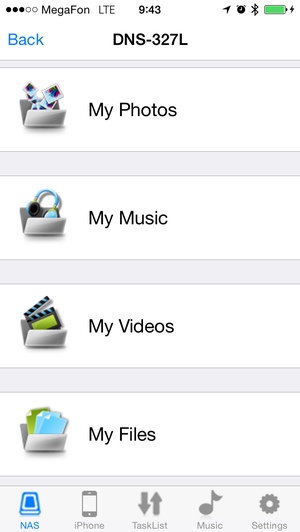
Для доступа к накопителю с мобильных устройств можно использовать стандартные протоколы и универсальные программы. В некоторых случаях может быть более удобным воспользоваться фирменной утилитой mydlink Access NAS App для Android и iOS, которая работает через облачный сервис и не требует настройки роутера.

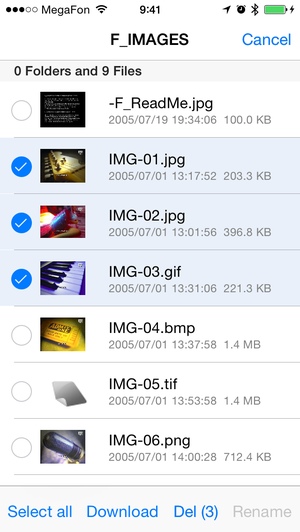
Через нее можно получить доступ к файлам, скачивать и загружать их, делать резервные копии фотографий, просматривать изображения в режиме слайдшоу, прослушивать музыку, а также проигрывать видео.
Тестирование
Для проверки скорости работы устройства в основном сценарии работы использовалась утилита Intel NASPT с нашими стандартными шаблонами. В накопитель устанавливались два жестких диска WD Red WD10EFRX объемом 1 ТБ. Были проверены три конфигурации — один винчестер, а также массивы RAID0 и RAID1 из двух винчестеров. Настройки устройства включали в себя создание нужного тома, общей папки и пользователя с полным доступом к ней. Результаты приводятся на следующем графике.
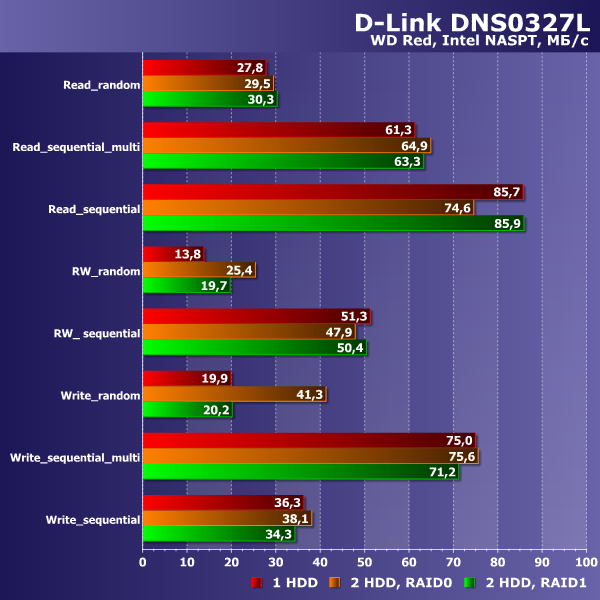
Как мы видим, максимальная скорость чтения, в зависимости от конфигурации дисков, составляет 75-86 МБ/с и достигается при однопоточном чтении. При этом попытка одновременной работы с большим числом файлов снижает показатели до 61-65 МБ/с. На потоковых операциях записи ситуация иная — максимальная скорость 71-76 МБ/с отмечается при одновременной записи нескольких файлов, а работа с одним потоком осуществляется на скоростях 34-38 МБ/с. На наш взгляд, для традиционных задач домашней сети средних размеров этого будет вполне достаточно, включая работу с документами, резервное копирование, просмотр HD-видео. Вот только запись в один поток хотелось бы видеть более производительную.
Для тестирования работы подключенных через USB 3.0 накопителей мы использовали SSD с соответствующим адаптером. Проверялись сценарии чтения и записи большого файла по сети, а также резервное копирование и восстановление с внутреннего массива RAID1. На внешнем диске использовались файловые системы NTFS, FAT32 и EXT4.
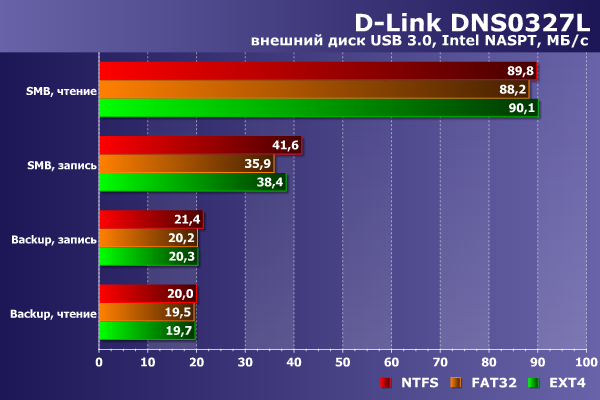
Прежде всего отметим, что существенного влияния выбранной файловой системы на результаты здесь нет. Чтение с USB 3.0 устройства по сети осуществляется на скоростях около 90 МБ/с, что даже выше, чем с внутренних винчестеров. Запись на них также немного быстрее — 36-42 МБ/с. К сожалению, в задачах резервного копирования показатели заметно скромнее — всего около 20 МБ/с.
Проверка энергопотребления сетевого накопителя осуществлялась с теми же дисками WD Red объемом 1 ТБ, что и исследование производительности. Дисковый том использовал конфигурацию RAID1. Как и с другими устройствами, в этот раз были протестированы три сценария — сон (диски выключены), бездействие (диски включены, активности нет) и работе (случайное чтение и запись). Приводятся усредненные за десять минут показатели.
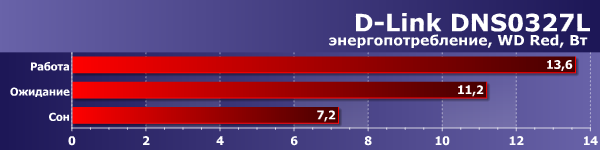
Полученные результаты аналогичны другим моделям с близкой аппаратной платформой — максимальное потребление устройства не превышает 14 Вт.
Температурный режим в данном случае оценить непросто, поскольку модель оборудована активной системой охлаждения с вентилятором с переменной скоростью вращения и не имеет возможности автоматического снятия показаний в динамике. С другой стороны, пользователю важен именно конечный результат. На следующем графике приводятся отмеченные нами в разных режимах максимальные значения со страницы статуса накопителя.
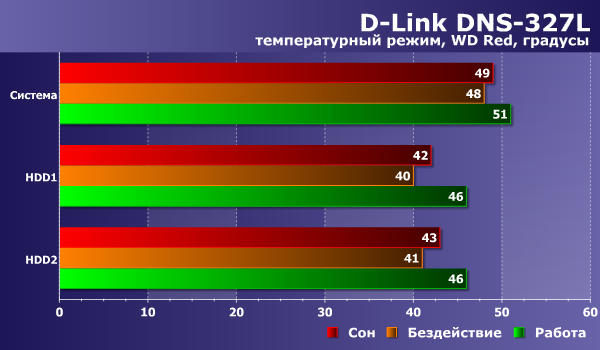
Учитывая платформу и конструкцию устройства, мы ожидали хороших результатов. Проверка подтвердила, что сетевой накопитель обеспечивает винчестерам вполне комфортный режим и их температура не превышает 50 градусов. При этом с нашими дисками вентилятор практически не включался и модель работала очень тихо.
Выводы
Сетевой накопитель D-Link DNS-327L не является новинкой, однако широко представлен в магазинах и имеет относительно невысокую стоимость. Он может предложить домашнему пользователю не только решение задач хранения и сетевого доступа к файлам, но и набор популярных дополнительных функций, включая медиасервисы, загрузку файлов, облачный и мобильный доступ, а также видеонаблюдение.
Устройство имеет достаточно привлекательный и практичный для данного класса корпус. Единственное существенное замечание к конструкции — конфигурация и расположение портов USB. При этом накопитель оборудован активной системой охлаждения, но при использовании определенных моделей винчестеров и комфортном размещении устройства вентилятор будет выключен, что обеспечивает минимальный уровень шума.
Использование платформы ARM начального уровня не позволяет говорить о высокой производительности накопителя, однако для домашнего пользователя и нескольких клиентов ее будет вполне достаточно.
Прошивка произвела неплохое впечатление дизайном оболочки и набором возможностей. Однако некоторые из модулей, в частности резервного копирования, реализованы несколько странно. В официальном каталоге дополнительных программ можно найти еще несколько интересных решений. Также допускается установка сторонних модулей из готовых пакетов и есть доступ к консоли устройства. Отметим наличие в интернете большого числа ресурсов с информацией по данному семейству сетевых накопителей.
| Средняя цена D-Link DNS-327L по данным Яндекс.Маркет |
| T-10516670 |
| Предложения D-Link DNS-327L по данным Яндекс.Маркет |
| L-10516670-10 |
Благодарим компанию WD и агентство 2L
за предоставленные для тестирования жесткие диски
Благодарим компанию Intel за предоставленное для проведения тестирования оборудование
Благодарим компанию D-Link за предоставленный для проведения тестирования коммутатор
Описание
Сетевой дисковый накопитель DNS-327L с 2 отсеками для жестких дисков является удобным решением для организации совместного доступа и осуществления резервного копирования важных данных, в том числе и путем создания персонального «облака». Благодаря высокопроизводительному дисковому накопителю DNS-327L все Ваши данные будут сохранены и надежны защищены.
Удаленный совместный доступ
Сетевой дисковый накопитель DNS-327L оснащен файловым Web-сервером, позволяющим загружать документы, фотографии и другие мультимедийные файлы независимо от Вашего местонахождения. После настройки накопителя воспользуйтесь удобным пользовательским Web-интерфейсом для просмотра списка доступных файлов.
Также можно использовать приложение mydlink Access — NAS для подключения к устройству и воспроизведения музыки, просмотра видео и фотографий непосредственно на мобильном устройстве. С помощью сервиса mydlink можно легко получить удаленный доступ к медиаконтенту, не прибегая к сложным настройкам параметров сети.
Простая установка и настройка
Установка дисков в DNS-327L не представляет сложности – просто снимите верхнюю панель и вставьте жесткие диски SATA емкостью до 6 ТБ в отсеки. Удобный USB-порт на задней панели накопителя можно использовать для подключения USB-принтера, источника бесперебойного питания (ИБП) или внешнего USB-накопителя с целью выполнения резервного копирования одним нажатием.
При совместном использовании DNS-327L и маршрутизатора D-Link Cloud можно применить технологию Zero Configuration, которая существенно упрощает настройку DNS-327L. Просто выберите необходимый тип RAID, а механизм Zero Configuration выполнит все остальное.
Встроенный медиасервер для передачи потокового цифрового медиаконтента
Создавайте резервные копии цифровых медиафайлов для надежного хранения на дисковом накопителе и воспользуйтесь преимуществами встроенного медиасервера UPnP AV, получившего сертификат DLNA®. Благодаря использованию DNS-327L можно осуществлять передачу потокового цифрового медиаконтента на совместимые медиаплейеры, такие как PlayStation® 3, Microsoft Xbox 360™, или непосредственно на Smart TV. Также передачу потокового видео, фотографий, музыки можно выполнить удаленно через мобильные устройства.
Высокая производительность и универсальность
Дисковый накопитель DNS-327L поддерживает работу жестких дисков в различных конфигурациях (Standard, JBOD, RAID 0, RAID 1), позволяющих выбрать наиболее подходящую из них в зависимости от требований пользователя. В режиме Standard создается до двух отдельных жестких дисков. JBOD объединяет диски в один том. RAID 0 объединяет диски в массив с чередованием данных для обеспечения максимальной производительности с использованием соединения Gigabit Ethernet. В RAID 1 содержимое одного жесткого диска дублируется на другой, что обеспечивает максимальную надежность. Если один диск выйдет из строя, другой продолжит функционировать отдельно до тех пор, пока не будет произведена замена вышедшего из строя диска. После этого данные будут автоматически скопированы на новый диск, позволяя накопителю вернуться к полноценному уровню защиты, сохранив файлы в целостности.
Характеристики
Стандарты
• IEEE 802.3
• IEEE 802.3ab
• IEEE 802.3u
• TCP/IP
• CIFS/SMB (макс. количество одновременных соединений 64)
• NFS
• AFP
• DHCP-клиент
• DDNS
• NTP
• FTP через SSL/TLS, FXP (макс. количество одновременных соединений 10)
• HTTP/HTTPS
• LLTD
• PnP-X
• UPnP AV
• USB 3.0
• Bonjour
• WebDAV
• SSH
Поддерживаемые типы жестких дисков
• Внутренние 3,5-дюймовые SATA I/II жесткие диски емкостью до 6 ТБ1
Порты
• Порт 10/100/1000 Gigabit Ethernet
• Порт USB 3.0
• Питание
Индикаторы
• Питание
• USB
• LAN (на порту LAN)
• HDD 1
• HDD 2
Управление дисками
• Несколько конфигураций жестких дисков
— RAID 0
— RAID 1
— JBOD
— Standard
• Миграция RAID (Standart —> RAID 1)
• Формат файловой системы: EXT4
• Сканирование диска
• S.M.A.R.T.
• Поддержка расширенного формата дисков (Advanced Format)
• Режим «горячей» замены
• Шифрование данных AES
Управление учетными записями
• Управление учетными записями пользователей (макс. 256 пользователей)
• Управление учетными записями групп пользователей (макс. 32 группы)
• Управление квотами пользователей/групп
• Управление сетевым доступом (макс. 128 общих сетевых папок)
• Управление монтированием образов дисков
• Доступ с портала mydlink и мобильного приложения Mydlink Access NAS (Android, iOS)
Управление загрузками
• Расписание загрузок по HTTP/FTP
• Загрузки Peer to peer (P2P)
Управление резервным копированием
• Расписание резервного копирования с ПК на NAS (D-Link ShareCenter Sync)
• Расписание локального резервного копирования
• Расписание удаленного резервного копирования
• Поддержка функции Apple Time Machine
• Резервное копирование USB
• Облачное резервное копирование (Amazon S3, Google Drive, Dropbox)
Управление устройством
• Поддержка браузеров:
— Internet Explorer 8 или выше
— Mozilla Firefox 4 или выше
— Apple Safari 4 или выше
• Мастер установки системы (Win / Mac)
• Утилита D-Link Storage (Win / Mac)
• Уведомления по e-mail
• SMS-уведомления
• Журнал системный/FTP
• Syslog сервер
• Функциональные возможности принт-сервера
• Отображение используемых системных ресурсов
Управление питанием
• Режим экономии электроэнергии
• Автоматическое восстановление питания
• Выключение/включение питания по расписанию
• Управление скоростью вентилятора
• D-Link Green Ethernet
• Поддержка подключения к ИБП (через USB)
Поддержка мультимедиа
• Сервер UPnP AV (DLNA)
• Сервер iTunes
• Приложения «Мои фотографии», «Моя музыка», «Мои файлы»
• Приложение «Видеонаблюдение»
— До 4 каналов просмотра видео в режиме реального времени
— До 4 каналов записи (MJPEG, MPEG4 или H.264)
— До 4 каналов воспроизведения
— Синхронная запись аудио и видео
— Автоматическая перезапись старых записей
— Поддержка записи по расписанию, вручную, по движению
— Поддержка E-maps
— Резервное копирование видео
• Пакеты дополнений (Add-ons)
Размеры
90 x 144,3 x 195,3 мм
Вес
640 г
Питание
Внешний источник питания 12 В постоянного тока / 3 А
Потребляемая мощность
• Обычный режим: 28,8 Вт
• Спящий режим: 11,4 Вт
Температура
• Рабочая: от 0 до 40 C
• Хранения: от -20 до 70 C
Влажность
от 5% до 90% (без конденсата)
Сертификаты
• CE
• FCC
• IC
• DLNA
1Максимальная емкость дисков может меняться по мере развития технологий разработки HDD.
Списки совместимости жестких дисков
Сертификаты
Заказ
DNS-327L Облачный сетевой накопитель с 2 отсеками для жестких дисков, 1 портом 10/100/1000Base-T и 1 портом USB 3.0
Изображения
DNS-327L/Ax
Вид спереди
Вид сзади
Вид справа
Загрузки
Смотрите также
-
Version 1.02 | 03/03/2014
User Manual
ShareCenter  + 2-Bay Cloud Network Storage Enclosure
®
DNS-327L
-
Preface
D-Link reserves the right to revise this publication and to make changes in the content hereof without obligation to notify
any person or organization of such revisions or changes.
Manual Revisions
Revision                Date                                        Description
1.0             March 28, 2013         • Initial release for Revision A1
1.01         November 07, 2013         • Content revision and correction
1.02            March 03, 2014         • mydlink updates, multimedia, Google Drive
Trademarks
D-Link and the D-Link logo are trademarks or registered trademarks of D-Link Corporation or its subsidiaries in the United
States or other countries. All other company or product names mentioned herein are trademarks or registered trademarks
of their respective companies.
Copyright © 2014 by D-Link Systems, Inc.
All rights reserved. This publication may not be reproduced, in whole or in part, without prior expressed written permission
from D-Link Systems, Inc.
-
Table of Contents
Table of Contents
Preface.................................................................................2  RAID 1 .................................................................................43
Manual Revisions ..........................................................................2  Mapping a Drive .........................................................................52
Trademarks .....................................................................................2  Alternative Methods for Mapping a Drive .................55
Product.Overview...............................................................5  Mac.-.Setup.Wizard.Installation.......................................56
Before you Begin ...........................................................................6
System Requirements .................................................................6  Configuration....................................................................57
Package Contents .........................................................................6  Managing your DNS-327L .......................................................57
Features ............................................................................................7  D-Link Storage Utility ................................................................58
Checking the Hardware Requirements ..............................10      D-Link Storage Utility - For Mac ............................................60
Hardware Overview ...................................................................11  Web UI Login ................................................................................63
Front Panel ............................................................................11  Web UI General Layout .....................................................64
LED Description ..............................................................12  Home ..................................................................................64
Rear Panel ..............................................................................13  Applications .....................................................................65
Bottom Panel ........................................................................14  Management ...................................................................66
Management ........................................................................67
Getting.Started.................................................................15   Setup Wizard (Web UI) .................................................67
Hardware Setup ..........................................................................15  Disk Management .........................................................72
Zero Configuration Setup ........................................................18  Hard Drive Configuration ......................................72
mydlink on the DNS-327L ................................................23         Hard Drive Configuration Wizard .................73
Upgrading from Standard Mode to RAID 1 79
Windows.Installation........................................................24           SMART Test .................................................................85
Setup Wizard ................................................................................24  Creating a Schedule ..........................................86
Hard Drive Configuration .................................................33    Scan Disk .....................................................................87
Standard RAID .................................................................34  Volume Encryption ..................................................89
JBOD ...................................................................................37  Account Management .................................................92
RAID 0 .................................................................................40
D-Link ShareCenter DNS-327L User Manual                                                                                                         i
-
Страница 1
V ersion 1.0 | 06/17/2013 DNS-327L U ser Manual Shar eC ent er™ 2-Bay Netw ork A ttached St orage Cloud St orage[…]
-
Страница 2
i D-Link DNS -327L User Manual T able of Con tents T able of C onten ts Product Overview …………………………………………………….. 1 Befor e you Begin ………………………………………………………………… 2 Syst em Requirements ……………………………………………………….. 2 P ack age C[…]
-
Страница 3
ii D-Link DNS -327L User Manual T able of Con tents Modifying a Group …………………………………… 169 Deleting a Group ……………………………………… 174 Quotas …………………………………………………………….. 175 Network Shares ……………………………………………… 180 Add/Modif[…]
-
Страница 4
iii D-Link DNS -327L User Manual T able of Con tents Share a Phot o on Flickr ………………………………… 269 Deleting an Album ……………………………………….. 272 Refreshing the Album Database ………………… 274 Managing Photos …………………………………………. 275 Slideshow T oolbar ………….[…]
-
Страница 5
iv D-Link DNS -327L User Manual T able of Con tents Recording Setup ………………………………………. 365 Recording Setup Componen ts ………………. 367 Even t Setup ……………………………………………………. 374 Even t Setup Components ………………………. 375 E-Map Upload …………………………[…]
-
Страница 6
1 D-Link DNS -327L User Manual Sec tion 1 — Pr oduc t Over view The D-Link ShareCen ter™ DNS-327L is a 2-Bay Cloud Storage . When used with int ernal SA T A drives 1 , it allows y ou to share documents, les , and digital media such as music, phot os, and video with everyone in your home or oce network. Remotely accessing les thr ough the[…]
-
Страница 7
2 D-Link DNS -327L User Manual Sec tion 1 — Pr oduc t Over view • Check box con tents • Check system r equirements • Ensure that y ou have the har dware y ou need for your Shar eCent er™ device Befor e y ou Begin S y stem Requir ements F or best results , the following minimum r equirements ar e recommended on an y system used to c ongur[…]
-
Страница 8
3 D-Link DNS -327L User Manual Sec tion 1 — Pr oduc t Over view F eatures The ShareC enter ™ DNS-327L is an easy-to-install data storage platform used f or remote acc ess through a local network or from the Internet. This ShareCenter ™ supports up to 2 SA T A hard drives and includes the product featur es listed below: • Equipped one 10/100/1[…]
-
Страница 9
4 D-Link DNS -327L User Manual Sec tion 1 — Pr oduc t Over view • Folder Management • Share F older Level P ermission • Suppor ts ISO mount • ISO creat or • R emote F ile Sharing • My Files ( W eb File Server) • W ebDA V • FTP Ser ver • Mobile device accesss (m ydlink Ac cess NAS) • User/Group Management • User/Group assig nme[…]
-
Страница 10
5 D-Link DNS -327L User Manual Sec tion 1 — Pr oduc t Over view • M edia Streaming • UPnP A V Ser ver • Suppor ts PS3 / XBO X 360 • Suppor ts UPnP A V > 4GB • Complies with DLNA HNv1.5 • Suppor ts Logit ech Squeeze Center • Suppor t Sonos Digital Music System via Samba • iT unes Ser ver • Audio Streamer (Icestation) • M y Mus[…]
-
Страница 11
6 D-Link DNS -327L User Manual Sec tion 1 — Pr oduc t Over view • M y Sur veillance • Camera Auto Installation • 4- Channel Motion JPEG, MPEG4 or H.264 R ecording • Audio & Video r ecording in S ynchronization • Auto Rec ycling Recor ding • 4-channel Live Video • 4- channel Synchronous Playback • Recording T ype : Record b y Sch[…]
-
Страница 12
7 D-Link DNS -327L User Manual Sec tion 1 — Pr oduc t Over view Check ing the Hardw ar e Requiremen ts T o use your DNS-327L, you will need at least one har d drive. If you plan t o use RAID 1, which protects your data against a hard drive failure , you will need two har d drives. This section will help you: • Selec t the hard drives • Determin[…]
-
Страница 13
8 D-Link DNS -327L User Manual Sec tion 1 — Pr oduc t Over view Har dwar e O v er view F r ont P anel LED Indicators P ower Button Left HDD/ Right HDD C OMPONENT DESCRIPTION T op Panel This panel unlatches simply b y pressing the lever at the back. Unlatch and lift up to insert or remove y our hard drive(s). F ront P anel The casing of the entir e […]
-
Страница 14
9 D-Link DNS -327L User Manual Sec tion 1 — Pr oduc t Over view P ower LED: White Light — the devic e is on Blinking Orange — the device is booting or restarting No Light — the device is o LED Description USB LED: White Light — the USB St orage is connected Blinking Orange — transferring data, a USB device is being installed or unmounted Orange […]
-
Страница 15
10 D-Link DNS -327L User Manual Sec tion 1 — Pr oduc t Over view Rear P anel ( C onnections) C OMPONENT DESCRIPTION Cooling F an The cooling fan is used to c ool the hard drives and f eatures speed contr ol. When the unit is rst pow ered on, the fans rotate a t a low speed and later rota te at a high speed when the temperatur e rises above 49 °[…]
-
Страница 16
11 D-Link DNS -327L User Manual Sec tion 1 — Pr oduc t Over view Bottom P anel C OMPONENT DESCRIPTION Pr oduct D etails Information about the product — DNS-327L Serial Number , P ar t Number , Manufac turer Number . Reset Button Pr ess and hold this button for mor e than 5 seconds to reset the unit to factory defaults. Reset Button Pr oduct D etail[…]
-
Страница 17
12 D-Link DNS -327L User Manual Sec tion 2 — Getting Star ted This User Guide will help y ou get your DNS-327L set up in just a few st eps. T o install the NAS on your local network , ref er to the steps below , or sk ip to page 23 to run the Setup Wizard which will show y ou how to install and c ongure your devic e. Getting Star ted Har dwar e […]
-
Страница 18
13 D-Link DNS -327L User Manual Sec tion 2 — Getting Star ted Step 3 — A ttach the hard drive brackets to the sides of your har d drives with the included screws . Ensure the brackets ar e aligned so that when the hard drive is inser ted, the arro w on the bracket points to the fron t of the NAS . Step 4 — Inser t up to two 3.5” SA T A hard drive[…]
-
Страница 19
14 D-Link DNS -327L User Manual Sec tion 2 — Getting Star ted Step 5 — Re -attach the top panel. Ensur e the latch is inserted inside the panel. Step 6 — C onnec t an Ethernet cable to the Ethernet por t. This cable should c onnec t the ShareC enter ™ to your local network via a router , switch, or directly to a computer f or conguration (cr o[…]
-
Страница 20
15 D-Link DNS -327L User Manual Sec tion 2 — Getting Star ted Z ero C ongura tion Setup If you hav e a mydlink — enabled Cloud Router , you can take advantage of Z ero C onguration. Zer o Conguration aut omatically congures y our NAS’ s settings for you , and adds the device to your m ydlink acc ount automatically . This allo ws you t[…]
-
Страница 21
16 D-Link DNS -327L User Manual Sec tion 2 — Getting Star ted Check Y our m ydlink A ccoun t Open a web br owser and log in to y our mydlink ac count. The my dlink page will check for new devices and displa y a New Devices! notication in the bottom-left corner . Click on the New Devices! notication to continue .[…]
-
Страница 22
17 D-Link DNS -327L User Manual Sec tion 2 — Getting Star ted The Conrming New Device windo w displays the Devic e Name , m ydlink Number , Netw ork Name (SSID) , and Admin P assword . The window c ontains the question, Do you want to add this new devic e to your my dlink account? If you wan t to add it immediately , click Ye s . If you are unsu[…]
-
Страница 23
18 D-Link DNS -327L User Manual Sec tion 2 — Getting Star ted After the DNS-327L is regist ered, y ou will be able to access inf ormation about your NAS fr om mydlink. The mydlink portal provides y ou with the ability to view these details from an y location. F rom this web page , you can view all Physical Disk Info , and congure the RAID . Plea[…]
-
Страница 24
19 D-Link DNS -327L User Manual Sec tion 2 — Getting Star ted If you hav e decided to format y our NAS using mydlink, select the R AID type from the drop- down list and the click F ormat . A pop-up message appears ask ing you to conrm your choic e to format the har d drive using my dlink. Click Ye s to format or click No to return to the menu .[…]
-
Страница 25
20 D-Link DNS -327L User Manual Sec tion 2 — Getting Star ted The f ormat process takes a while to nish. The f ormat process depends on the speed of y our network connection and client CPU.[…]
-
Страница 26
21 D-Link DNS -327L User Manual Sec tion 2 — Getting Star ted Once the f ormat process is complet e, m ydlink will show y ou the RAID Status and the V olume Status . I t also displays the size of the drive av ailable and percentage used .[…]
-
Страница 27
22 D-Link DNS -327L User Manual Sec tion 2 — Getting Star ted The DNS-327L provides a di erent UI experience than the usual NAS inter face once you ar e connected to mydlink. Click the Applica tion button to access My Music , My F iles , My Photos , and P2P Downloads fr om the main screen. Redirect to NAS Applications on m ydlink[…]
-
Страница 28
23 D-Link DNS -327L User Manual Sec tion 3 — Installation Setup W izard Step 1 — Download the Setup Wizard from http://ww w .mydlink.com/suppor t. Click on the Storage tab t o locate the DNS-327L. Double — click the autorun.exe le to run the Setup Wizar d. Step 2 — Select the Language you pref er and click ST ART . Note: Windows Security Aler t […]
-
Страница 29
24 D-Link DNS -327L User Manual Sec tion 3 — Installation Step 3 — P roceed with the setup instructions to r emove the top c over of your DNS-327L . Click NEXT to continue . Install the Hard Drives Step 4 — A ttach the hard drives bracket(s) t o the back of the hard drive(s) as instructed. Click NEXT to continue .[…]
-
Страница 30
25 D-Link DNS -327L User Manual Sec tion 3 — Installation Step 5 — Slide one or two har d drives into an a vailable hard drive ba y of your device . Click NEXT to continue .[…]
-
Страница 31
26 D-Link DNS -327L User Manual Sec tion 3 — Installation Step 6 — W ith the hard drive(s) installed pr operly into each bay , close the chassis by re-attaching the top panel. Click NEXT to continue . Step 7 — C onnec t an Ethernet cable to your DNS-327L and connect the other end to a switch or r outer (Local LAN). Click NEXT to continue . C onnec […]
-
Страница 32
27 D-Link DNS -327L User Manual Sec tion 3 — Installation Step 8 — C onnec t the power adapt er to the power port on the back of the device . Then po wer on by pr essing the power button on the front panel . Click NEXT to continue . Step 9 — With the pow er on, you can select the device from the list. Make sure the IP address of y our DNS-327L matc[…]
-
Страница 33
28 D-Link DNS -327L User Manual Sec tion 3 — Installation Step 10 — A warning message will appear pr ompting you to make sure the pow er LED is blinking on the selec ted device. If the LED on your DNS-327L is blinking, conrm by clicking on Ye s . Click NEXT to continue .[…]
-
Страница 34
29 D-Link DNS -327L User Manual Sec tion 3 — Installation Step 11 — Ent er the administrator passwor d. F or the rst installation on this NAS, the Username should be admin and the P assw ord should be blank. Click NEXT to continue . Step 12 — Cr eate a new passwor d for the admin username . Click NEXT to continue . Admin P assword[…]
-
Страница 35
30 D-Link DNS -327L User Manual Sec tion 3 — Installation Networking Setup Step 13 — Y ou may select either Static IP or DHCP Client to congure the IP network settings of your DNS-327L. If you select Static IP , you must enter the r equired information. Click NEXT to continue . Y ou may also select DHCP Client t o congure th e IP network sett[…]
-
Страница 36
31 D-Link DNS -327L User Manual Sec tion 3 — Installation Step 14 — If you wan t your DNS-327L to be par t of a W indows W orkgroup netw ork , you can enter a name f or your W orkgroup . This works best when y ou use the same workgr oup name as in your current w orkgroup settings. If you ha ven ’t setup a workgroup y et, you can lea ve the defaul[…]
-
Страница 37
32 D-Link DNS -327L User Manual Sec tion 3 — Installation Step 16 — T he Disk Information window show s the Current RAID Ty p e . Y ou have the option of making conguration changes. A ccess to the advanced disk settings is described in the instructions on the screen under the Note . Click NEX T to proc eed to Step 17 and learn about your RAID op[…]
-
Страница 38
33 D-Link DNS -327L User Manual Sec tion 3 — Installation Step 17 — Y ou may Selec t RAID T ype JBOD and review the description provided . Click NEXT and sk ip ahead to Step 23 t o proceed using the JBOD conguration. Step 17 — Y ou may S elect R AID T ype RAID 0 and review the description provided . Clic k NEXT and sk ip ahead to St ep 29 to pro[…]
-
Страница 39
34 D-Link DNS -327L User Manual Sec tion 3 — Installation Step 17 — Y ou may S elect R AID T ype RAID 1 (recommended) and review the description pro vided. When you select RAID 1 , the Auto-Rebuild Setting button appears. Y ou can click this button to enable Aut o -Rebuild . This would become necessary in the event of RAID failure . Click NEXT and […]
-
Страница 40
35 D-Link DNS -327L User Manual Sec tion 3 — Installation Step 18 — With RAID type Standar d selec ted, click NEXT to continue or click SKIP to bypass RAID congur ation. Step 19 — Map Drive to Network. This step allows y ou to assign a letter to each drive on y our NAS. Refer to Mapping a Drive on page 61 f or more details . Click NEXT to contin[…]
-
Страница 41
36 D-Link DNS -327L User Manual Sec tion 3 — Installation The Setup Wizar d automatically creat es mapped drives. Depending on which version of Window s you are curren tly using, the drives ma y appear on your comput er as indicated in the screen shot belo w . Click NEXT to continue .[…]
-
Страница 42
37 D-Link DNS -327L User Manual Sec tion 3 — Installation Step 20 — Review the detailed V olume Configur ation Summar y , including the drive letter(s) that will be mapped t o your computer . If necessar y , you can click PREV to go back and r econgure . Step 21 — When y ou click NEXT , you will see a warning that the data on your drive(s) will […]
-
Страница 43
38 D-Link DNS -327L User Manual Sec tion 3 — Installation Step 22 — During the formatting pr ocess, the Setup Wizard displa ys a progr ess bar . When f ormatting has completed, y ou will see a message that says , F ormat succ essful! Click NEXT to continue. Skip ahead to Step 41 .[…]
-
Страница 44
39 D-Link DNS -327L User Manual Sec tion 3 — Installation Step 23 — W ith RAID type JBOD selec ted, click NEXT t o continue or click SKIP to bypass RAID congur ation. Step 24 — W ith JBOD two drives ar e combined into one V olume, creating a lar ge vir tual disk drive. When mapping the drive, only one drive letter is needed . Assign a letter t o[…]
-
Страница 45
40 D-Link DNS -327L User Manual Sec tion 3 — Installation Step 25 — Review the detailed V olume Configur ation Summary , including the drive letter that will be mapped t o your computer . If necessar y , you can click PREV to go back and recongur e. Step 26 — When y ou click NEXT , you will see a warning that the data on your drive will be er as[…]
-
Страница 46
41 D-Link DNS -327L User Manual Sec tion 3 — Installation Step 27 — During the formatting pr ocess, the Setup Wizard displa ys a progr ess bar . When f ormatting has completed, y ou will see a message that says , F ormat succ essful! Click NEXT to continue.[…]
-
Страница 47
42 D-Link DNS -327L User Manual Sec tion 3 — Installation Step 28 — T o verify your JBOD , login to y our NAS and go to Management > Disk Management > Hard Drive C ongur ation . This page show s the current status of your driv e. Skip ahead to Step 41 .[…]
-
Страница 48
43 D-Link DNS -327L User Manual Sec tion 3 — Installation Step 29 — W ith RAID type R AID 0 selec ted, click NEXT to continue or click SKIP to bypass RAID congur ation. Step 30 — W ith RAID 0 , data striping spreads blocks of data ov er both drives, cr eating a striped set. The Map Drive to Network screen will show elds f or two drives. Assig[…]
-
Страница 49
44 D-Link DNS -327L User Manual Sec tion 3 — Installation Step 31- Review the detailed V olume Configur ation Summar y , including the drive letter(s) that will be mapped t o your computer . If necessar y , you can click PREV to go back and r econgure . Step 32 — When y ou click NEXT , you will see a warning that the data on your drive will be e[…]
-
Страница 50
45 D-Link DNS -327L User Manual Sec tion 3 — Installation Step 33 — During the formatting pr ocess, the Setup Wizard displa ys a progr ess bar . When f ormatting has completed, y ou will see a message that says , F ormat succ essful! Click NEXT to continue.[…]
-
Страница 51
46 D-Link DNS -327L User Manual Sec tion 3 — Installation Step 34 — T o verify RAID 0 , log in to your NAS, go to Management > Disk Management > Har d Drive C onguration . T his page shows the curr ent status of your drives . Skip ahead to Step 41 .[…]
-
Страница 52
47 D-Link DNS -327L User Manual Sec tion 3 — Installation Step 35 — W ith RAID t ype RAID 1 selec ted (this is recommended), click NEXT to continue or click SKIP to b ypass RAID conguration. Step 36 — W ith RAID 1, the drives are mirror ed for r edundanc y . The Map Drive to Network screen will sho w elds for two drives . Assign a letter to e[…]
-
Страница 53
48 D-Link DNS -327L User Manual Sec tion 3 — Installation Step 37 — Review the detailed V olume Configur ation Summary , including the drive letter(s) that will be mapped t o your computer . If necessar y , you can click PREV to go back and r econgure . Step 38 — When y ou click NEXT , you will see a warning that the data on your drive will be e[…]
-
Страница 54
49 D-Link DNS -327L User Manual Sec tion 3 — Installation Step 39 — During the formatting pr ocess, the Setup Wizard displa ys a progr ess bar . When f ormatting has completed, y ou will see a message that says , F ormat succ essful! Click NEXT to continue.[…]
-
Страница 55
50 D-Link DNS -327L User Manual Sec tion 3 — Installation Step 40 — T o verify your RAID 1 , login to your NAS, go to Management > Disk Management > Hard Driv e Congur ation . This page show s the current status of your driv es.[…]
-
Страница 56
51 D-Link DNS -327L User Manual Sec tion 3 — Installation Step 41 — Selecting Add- on Pack ages. AjaXplorer , Blog, Photo C enter , Joomla, T ransmission, A udio Streamer , aMule, phpBB , and phpMyAdmin ar e checked by default. Refer t o page 219 for a description of each. Note: Additional add-on applications are av ailable on the D-Link Suppor t s[…]
-
Страница 57
52 D-Link DNS -327L User Manual Sec tion 3 — Installation Step 43 — Opting t o download the Squeeze Cent er automatically opens your default br owser to do wnload the application. Click S ave to sav e the le to your local har d drive. Download prog ress will be shown as a perc entage with seconds remaining .[…]
-
Страница 58
53 D-Link DNS -327L User Manual Sec tion 3 — Installation Step 44 — C opy the Squeeze Cent er pack age from your local har d drive to V olume_1 of the DNS-327L . When the download is c omplete, under L o cation y ou will see a link to Downloads .[…]
-
Страница 59
54 D-Link DNS -327L User Manual Sec tion 3 — Installation Step 45 — During the add-on installation process, the Setup Wizar d displays a pr ogress bar . Step 46 — When nished , you will see a message that sa ys, A dd- on packages installation c ompleted. Click NEXT to c ontinue.[…]
-
Страница 60
55 D-Link DNS -327L User Manual Sec tion 3 — Installation Step 47 — The ne x t two screens display the installed A dd-on Packages. Click Enable to enable the Add-on P ack ages. (Refer t o page 220 for more inf ormation about Add-ons.) Click NEXT to continue to the ne x t window . Click NEXT to continue .[…]
-
Страница 61
56 D-Link DNS -327L User Manual Sec tion 3 — Installation C onnec ting to m ydlink Step 48 — Y ou may use the free m ydlink ser vice, which allo ws you to remot ely access les fr om your NAS through the m ydlink portal. Read the registra tion instruc tions. Go to www .my dlink .com f or more information. Click NEXT to con tinue. (If you selected[…]
-
Страница 62
57 D-Link DNS -327L User Manual Sec tion 3 — Installation Step 49 — The Setup Wizard c onnects you to the my dlink ser vers and congures y our my dlink ser vice. Click NEXT to continue . Step 50 — If the wizard is unable to c onnect you to the my dlink ser vers, y ou will see the following message , advising you t o check your network congur […]
-
Страница 63
58 D-Link DNS -327L User Manual Sec tion 3 — Installation Step 51 — The next screen allows y ou add your NAS to y our my dlink account. If you clicked Y es, I already hav e a m ydlink ac count , ent er your E-mail addr ess and password . Click NEXT to continue . Step 52 — Y ou can creat e a new account by selecting , No , I need to sign up for a ne[…]
-
Страница 64
59 D-Link DNS -327L User Manual Sec tion 3 — Installation Step 53 — A message appears asking you to V erify your e -mail . It explains that you ha ve been sent a v erication email Y ou need to open it and click on the activation link in order to nish activating your acc ount. Click OK to continue .[…]
-
Страница 65
60 D-Link DNS -327L User Manual Sec tion 3 — Installation Step 55 — Setup is Complete! Y our device is now installed and ready to use . Click FINISH to exit the wizard . W izard C omplete If you mapped your drive(s) using the wizar d, y ou will see the drive letter(s) on this scr een. If you did not use the wizard to map the driv es, you can manual[…]
-
Страница 66
61 D-Link DNS -327L User Manual Sec tion 3 — Installation Mapping a Drive Map a V olume on y our DNS-327L using Windo ws® Explorer in Windows® 7. Step 1 — P ress the Window s key and the letter E on your keyboar d at the same time. Y ou will see a list of y our Hard Drives , D evices with Remov able Storage , and Network L oc ations . (If you hav[…]
-
Страница 67
62 D-Link DNS -327L User Manual Sec tion 3 — Installation Step 3 — Window s will automatically d etect all devices on your network including your DNS-327L. Step 4 — Click on DLINK DNS-327L to see the f olders representing the volumes y ou created during har d drive installation. Then select the folder that y ou wish to acc ess and click OK .[…]
-
Страница 68
63 D-Link DNS -327L User Manual Sec tion 3 — Installation Step 5 — T he path to the folder will be sho wn in the F older eld of the Map Network Drive screen. Click F inish to proceed . Step 6 — The v olumes will then be listed in Windows® Explor er below Computer , directly above Network . This indicates the drive is active and ready f or use.[…]
-
Страница 69
64 D-Link DNS -327L User Manual Sec tion 3 — Installation Alterna tive Methods of Mapping a Drive Y ou can also map a drive using the D-Link Storage Utility . Once the DNS-327L is detected on the network , and the LAN settings have been congured , volumes av ailable for mapping will be visible under the V olume Name . T o map the dr ive , selec […]
-
Страница 70
65 D-Link DNS -327L User Manual Sec tion 3 — Installation Mac I nstallation Setup W izard Download the Mac Setup Wizard for the DNS-327L fr om http://ww w .my dlink.com/suppor t. Click on the Storage tab t o locate the DNS-327L. Step 2 — Double — click the SetupWizardDNS-327L ic on. Step 1 — Once do wnload has completed , double — click the Setup W[…]
-
Страница 71
66 D-Link DNS -327L User Manual Sec tion 3 — Installation Step 3 — Click ST ART to begin the Setup Wizard . Keep in mind that as you pr oceed, y ou will be able to click PREV any time y ou need to go back and make changes. Step 4 — F ollow the instruc tions to remo ve the top c over of y our DNS-327L and click NEXT .[…]
-
Страница 72
67 D-Link DNS -327L User Manual Sec tion 3 — Installation Step 5 — A ttach the Hard Drive Br acket(s) as instruc ted and click NEXT . Step 6 — Install one or two hard drive(s) as sho wn and click NEXT .[…]
-
Страница 73
68 D-Link DNS -327L User Manual Sec tion 3 — Installation Step 7 — Close the chassis by r e -attaching the top cov er to the device and click NEXT . Step 8 — C onnec t the Ethernet cable to your DNS-327L, and connect the other end to a switch or r outer and click NEXT .[…]
-
Страница 74
69 D-Link DNS -327L User Manual Sec tion 3 — Installation Step 9 — C onnect the power adapter connector to the po wer por t on the back of the NAS. P ower on the DNS-327L by pr essing the power button on the fron t panel and click NEXT . Step 10 — W ith the power on, y ou can select the device from the list. Make sure the IP address of y our DNS-32[…]
-
Страница 75
70 D-Link DNS -327L User Manual Sec tion 3 — Installation Step 11 — A warning message will appear pr ompting you to make sure the pow er LED is blinking on the selec ted device. If the LED on your DNS-327L is blinking, conrm by clicking on Ye s . O ther wise click No and check your set up again. Step 12 — Ent er the administrator passwor d. F or[…]
-
Страница 76
71 D-Link DNS -327L User Manual Sec tion 3 — Installation Step 13 — If you ent ered an incorrect passwor d from a previous installation, a warning message prompts y ou to tr y again or leave the passwor d blank . Click OK to continue . Step 14 — Cr eate a new passwor d and verify that passw ord by lling in the C onrm Passw ord eld. Click N[…]
-
Страница 77
72 D-Link DNS -327L User Manual Sec tion 3 — Installation Step 15 — T o congure the Device IP , selec t either DHCP Client or Static IP . When DHCP Client is selected, the r outer automatically congures the devic e IP . Click NEXT to continue . Step 16 — When Static IP is selected, y ou must manually congure the device . Enter the requir e[…]
-
Страница 78
73 D-Link DNS -327L User Manual Sec tion 3 — Installation Step 17 — If you w ant your DNS-327L to be part of a W orkgroup network, you can enter a name f or your W ork group . This works best when you use the same w orkgroup name as in y our current workgr oup settings. If you hav en ’t setup a w orkgroup y et, you can leav e the default name, wo[…]
-
Страница 79
74 D-Link DNS -327L User Manual Sec tion 3 — Installation Step 19 — T he Disk I nformation windo w shows the Curr ent RAID Ty p e . Y ou have the option of making conguration changes. A ccess to the advanced disk settings is described in the instructions on the screen under the Note . Click NEX T to proc eed to Step 20 and learn about your RAID […]
-
Страница 80
75 D-Link DNS -327L User Manual Sec tion 3 — Installation Step 21 — Review the detailed V olume Congur ation Summary . I f necessar y , you can click PREV to go back and recongur e. Step 22 — When y ou click NEXT to pr oceed with formatting , you will see a warning that the data on y our drive(s) will be erased. Click Ye s to continue , or No[…]
-
Страница 81
76 D-Link DNS -327L User Manual Sec tion 3 — Installation Step 23 — During the formatting pr ocess, the Setup Wizard displa ys a progr ess bar . The rst st ep is Initializing , and the next step is formatting . Step 24 — When t he formatting pr ocess is nearly complete , the progr ess bar will display 100%.[…]
-
Страница 82
77 D-Link DNS -327L User Manual Sec tion 3 — Installation Step 25 — When f ormatting has completed , you will see a message that say s, F ormat succ essful! Click NEXT to continue. Step 26 — A vailable A dd- on pack ages are listed . Make sure the check box es are checked b y the ones you wish to install . Refer to page 219 for a description of eac[…]
-
Страница 83
78 D-Link DNS -327L User Manual Sec tion 3 — Installation Step 27- Click NEXT to install the selected add-on pack ages. Step 28 — During the add-on installation process, the Setup Wizar d displays a pr ogress bar .[…]
-
Страница 84
79 D-Link DNS -327L User Manual Sec tion 3 — Installation Step 29 — When installa tion is complete, y ou will see a message that says , Add- on packages installation c ompleted . Click NEXT . Step 30 — T his screen displays all the packages installed. Click Enable to enable the add-on pack ages. Depending on how many packages you initially installe[…]
-
Страница 85
80 D-Link DNS -327L User Manual Sec tion 3 — Installation Step 31 — If you installed mor e than seven add-ons, you will see the second screen. Click NEXT to c ontinue. Step 32 — Y ou may use the free m ydlink ser vice, which allo ws you to remot ely access les fr om your NAS through the m ydlink portal. Read the registra tion instruc tions. Go t[…]
-
Страница 86
81 D-Link DNS -327L User Manual Sec tion 3 — Installation Step 33 — The S etup Wizard c onnec ts you to the m ydlink servers and congures y our my dlink ser vice. Step 34 — If you ar e unable to connect to the my dlink registra tion site , a warning message noties you of an unsuccessful c onnec tion. Click OK to continue . Check your network […]
-
Страница 87
82 D-Link DNS -327L User Manual Sec tion 3 — Installation Step 35 — The next screen allows y ou add your NAS to y our my dlink account . If you clicked Y es , I already ha ve a m ydlink ac count , en ter your E-mail addr ess and Passw ord . Click Nex t to continiue . Step 36 — Y ou can create a new acc ount by selecting, No , I need to sign up for […]
-
Страница 88
83 D-Link DNS -327L User Manual Sec tion 3 — Installation Step 37 — A message appears asking you to V erify your e-mail . Follo w the instructions in order to activate your ac count. Click OK to con tinue. Step 38 — The wizar d provides y ou with a mydlink No . Y ou can use this my dlink number for futur e refer ence. Y ou can also check the box es[…]
-
Страница 89
84 D-Link DNS -327L User Manual Sec tion 3 — Installation Step 39 — Setup is Complete! Y our device is now installed and ready to use . Click FINISH to exit the Setup Wizard . Step 40 — Y ou should now be able to see the DNS-327L in the F inder on the left panel.[…]
-
Страница 90
85 D-Link DNS -327L User Manual Sec tion 3 — Installation Step 41 — Click the icon t o view contents of y our NAS.[…]
-
Страница 91
86 D-Link DNS -327L User Manual Sec tion 4 — Congur ation DNS-327L W eb UI (User Inter face) is a bro wser-based utility that allows you t o manage and congure the di erent tools and services. The W eb UI is divided into three main sections: 1. Home 2. Applications 3. Management Managing Y our DNS -327L SECTION OPTION DESCRIPTION Managemen[…]
-
Страница 92
87 D-Link DNS -327L User Manual Sec tion 2 — Getting Star ted When rst pow ered on, during the initial boot sequence, the D NS-327L will wait to be assigned an I P address via DHCP . I f it does not receiv e a DHCP assigned IP address , the device will be automatically assigned a 169.254.xxx.xxx addr ess. It is recommended that you use the inclu[…]
-
Страница 93
88 D-Link DNS -327L User Manual Sec tion 2 — Getting Star ted Selec t the DNS-327L from the list and click the Congur ation button. This will launch the comput er ’ s default web bro wser and direct it to the IP address list ed for the device . Make sure the bro wser is not congured t o use a pro x y ser ver . Note: The computer used t o ac[…]
-
Страница 94
89 D-Link DNS -327L User Manual Sec tion 2 — Getting Star ted D -Link Stor age Utility — F or Mac Step 1: Download the D-Link Storage Utility for Mac from h ttp://ww w .my dlink .com/support. D ouble — click the .dmg le to install the progr am. 1 Step 2: After installation, y ou should see the icon for the D -Link Storage Utility for Mac .[…]
-
Страница 95
90 D-Link DNS -327L User Manual Sec tion 2 — Getting Star ted Step 3: Open the D-Link Storage Utility . Step 4: Make sure y ou are connected to your local LAN. Click the Refresh button to refr esh the Network Storage Device list. The D -Link Storage Utility will display the D-Link DNS-327L.[…]
-
Страница 96
91 D-Link DNS -327L User Manual Sec tion 2 — Getting Star ted Step 5: Select Enable by Receive DHCP to obtain IP settings automatically from a DHCP server . W hen Disable is selec ted, Static IP allo ws you to assig n the following par ameters manually : IP : Enter an IP address f or the DNS-327L. Netmask : Enter the subnet mask of y our network . […]
-
Страница 97
92 D-Link DNS -327L User Manual Sec tion 2 — Getting Star ted Step 7: Click the C onnect button to map a selected V olume from the list.[…]
-
Страница 98
93 D-Link DNS -327L User Manual Sec tion 2 — Getting Star ted Step 8: The login window appears. Select Guest or Registered U ser . Step 9: Enter a username and passw ord for the DNS-327L and click C onnect .[…]
-
Страница 99
94 D-Link DNS -327L User Manual Sec tion 2 — Getting Star ted Step 10: Y ou will see a pop-up window that will say you suc cessfully mapped a drive . Click OK to con tinue. Note: Use the Disconnect button on the D-Link Storage Utility to unmap drive(s). Step 11: Y ou should now be able to open the DNS-327L in the F inder , under the SHARED heading […]
-
Страница 100
95 D-Link DNS -327L User Manual Sec tion 2 — Getting Star ted Step 12: Click the About button a t the he bottom of the D-Link Storage Utility to see the software version.[…]
-
Страница 101
96 D-Link DNS -327L User Manual Sec tion 4 — Congur ation Note: The comput er you use to acc ess the web-based conguration manager m ust be on the same subnet as the DNS-327L. I f your network is using a DHCP ser ver and the comput er receives IP settings from the DHCP , the device will automatic ally be in the same subnet. T o access the W e[…]
-
Страница 102
97 D-Link DNS -327L User Manual Sec tion 4 — Congur ation Y ou will see the Home tab in the upper left corner . The Applications and Management tabs ar e directly to the right of it. Home[…]
-
Страница 103
98 D-Link DNS -327L User Manual Sec tion 4 — Congur ation Applica tions The Applications page c ontains icons for FTP/HT TP D ownloads, Remot e Backups, L ocal Backups , P2P Downloads, My F iles, and Amazon S3 . Click on each icon to view the submenus . Y ou can also nd the applications that you hav e installed using the Setup Wizard .[…]
-
Страница 104
99 D-Link DNS -327L User Manual Sec tion 4 — Congur ation Management The Management page contains ic ons for the Setup Wizard , Disk Management, Acc ount Management, Network Management, Application Management, S ystem Management, and System Status . Click on each icon t o view the submenus.[…]
-
Страница 105
100 D-Link DNS -327L User Manual Sec tion 4 — Congur ation Setup W izard ( W eb UI) The DNS-327L has a Setup Wizard that allow s you to quickly congure some of the basic device settings . Click the Setup Wizard ic on to open it. Step 1 — Click the Run W izard button t o star t the Setup Wizard . Step 2 — Click Nex t to continue.[…]
-
Страница 106
101 D-Link DNS -327L User Manual Sec tion 4 — Congur ation Step 3 — Y ou may change the admin acc ount password her e and conrm the password , or leave it blank. Click Nex t to continue . Step 4 — Select from the drop-down menu the correct time zone for your loca tion. Click Nex t to continue or click Skip to ignore this step .[…]
-
Страница 107
102 D-Link DNS -327L User Manual Sec tion 4 — Congur ation Step 5 — Select DHCP Client to obtain IP settings automatically fr om a DHCP ser ver (rout er) or Static IP to assign the par ameters below manually . IP Addr ess: Enter an IP address f or the DNS-327L. Subnet Mask: Enter the subnet mask of your network. Gatewa y IP Addr ess: Enter the I[…]
-
Страница 108
103 D-Link DNS -327L User Manual Sec tion 4 — Congur ation Step 7 — Click Account and enter your E-mail inf ormation in the box es provided , in order to r eceive status inf ormation about your DNS-327L . Click T est E-Mail to verify y our settings are correct. Click Nex t to continue or click Skip to ignore this step . Step 8 — Y ou can select […]
-
Страница 109
104 D-Link DNS -327L User Manual Sec tion 4 — Congur ation Step 9 — Y ou can click Pr evious to check your settings and make an y necessar y changes. If you ar e satised with your settings, click the F inish button t o save your settings and complet e the wizard. Click Exit to end the wizar d without saving the settings.[…]
-
Страница 110
105 D-Link DNS -327L User Manual Sec tion 4 — Congur ation Disk Management Hard Driv e Congur ation T o setup the Hard Drive RAID conguration of your DNS-327L, click on the Management tab and then the Disk Management icon. Select Hard Drive Congur ation from the list that appears belo w Disk Management . This page will allow y ou to set[…]
-
Страница 111
106 D-Link DNS -327L User Manual Sec tion 4 — Congur ation Hard Driv e Congur ation Wizar d The Hard Drive Congur ation page displays the Current RAID T yp e . Click Set RAID T ype and Re -F ormat. When you select Management > Disk Management > Har d Drive C onguration , and clik on Set RAID type and Re -F ormat , you will start t[…]
-
Страница 112
107 D-Link DNS -327L User Manual Sec tion 4 — Congur ation The Physical Disk Information page displa ys information about the har d drives on your DNS-327L. It shows the Disk number , V endor , Model, Serial Number , and Size . Click Nex t to continue . Select the format by clicking on the preferred RAID type . (Selec ted type will be highlighte[…]
-
Страница 113
108 D-Link DNS -327L User Manual Sec tion 4 — Congur ation V olume Encr yption gives y ou the option to encr ypt one or both drives to keep them safe fr om hackers. Select the V olume(s) you would like to encrypt by check ing in the box next to it. Click Nex t to continue. A s you proceed thr ough the wizard, y ou can click on Pre vious to edit […]
-
Страница 114
109 D-Link DNS -327L User Manual Sec tion 4 — Congur ation The Volume Configur ation Summar y , shows a summary of your conguration selections. The V olume Name , the RAID Ty p e , the File Sy stem used, the disk Siz e , and the Disk array number are display ed. Check marks at the beginning of each ro w indicate whether or not you enabled Enc[…]
-
Страница 115
110 D-Link DNS -327L User Manual Sec tion 4 — Congur ation A warning message will appear to inform y ou that all data will erased when the hard drive(s) is r e -formatted. Click Ye s to continue, or click No to exit. If you clicked on Ye s , par titioning will begin. Y ou must be patient during this process . Do not turn o your NAS.[…]
-
Страница 116
111 D-Link DNS -327L User Manual Sec tion 4 — Congur ation Next the formatting process will beg in. A progr ess bar will show the percentage f ormatted. Do not turn o your NAS during this pr ocess. If you would like to change y our settings at this stage, click Exit . Next the system updates . Y ou must be patient during this process . Do not[…]
-
Страница 117
112 D-Link DNS -327L User Manual Sec tion 4 — Congur ation Setup is now complete . This scr een shows the V olume Name(s) , File Sy stem used, the RAID Mode , and the Disk array number . Click Finish t o complete the proc ess. If you chose to encrypt one or both dr ives, y ou can conrm encr yption by navigating t o Management > Disk Manage[…]
-
Страница 118
113 D-Link DNS -327L User Manual Sec tion 4 — Congur ation Select the V olume and click SA VE . This will save the encryption key on your local hard driv e for future r eferenc e. Save the le t o your local hard drive . Depending on your bro wser , click OK to sav e[…]
-
Страница 119
114 D-Link DNS -327L User Manual Sec tion 4 — Congur ation JBOD Select a R AID T ype JBOD in order to cr eate a single volume fr om all of the drives. Click Nex t to continue . V olume Encr yption gives y ou the option to encr ypt the drive to keep it safe fr om hackers. Check the box under Encryption . Click Nex t to continue. A s you proc eed […]
-
Страница 120
115 D-Link DNS -327L User Manual Sec tion 4 — Congur ation A warning message appears indicating that selection of this option could result in a slow down in access speed . Click Ye s to continue. Setup a password f or the encr ypted drive. En ter a passw ord and re- enter the same passwor d to verify . Check the box b y Auto Mount if y ou want t[…]
-
Страница 121
116 D-Link DNS -327L User Manual Sec tion 4 — Congur ation If you do not enter a passwor d in the eld provided , a message will prompt you to do so . Click Ye s to enter a P assword . Click Nex t to continue . The Volume Configur ation Summar y , shows a summary of your conguration selections. The V olume Name , the RAID Ty p e , the File […]
-
Страница 122
117 D-Link DNS -327L User Manual Sec tion 4 — Congur ation A warning message will appear to inform y ou that all data will erased when the hard drive(s) is r e -formatted. Click Ye s to continue, or click No to exit. If you clicked on Ye s , par titioning will begin. Y ou must be patient during this process . Do not turn o your NAS.[…]
-
Страница 123
118 D-Link DNS -327L User Manual Sec tion 4 — Congur ation Next the formatting process will beg in. A progr ess bar will show the percentage f ormatted. Do not turn o your NAS during this pr ocess. If you would like to change y our settings at this stage, click Exit . Next the system updates . Y ou must be patient during this process . Do not[…]
-
Страница 124
119 D-Link DNS -327L User Manual Sec tion 4 — Congur ation Setup is now complete . This screen sho ws the V olume Name , File S ystem used, the RAID Mode , and the Disk array number . Click Finish t o complete the proc ess.[…]
-
Страница 125
120 D-Link DNS -327L User Manual Sec tion 4 — Congur ation RAID 0 Select a R AID T ype RAID 0 (t wo drives ar e striped into one volume). Click Nex t to continue . RAID Size Settings allows you to tweak the siz e of the RAID 0 V olume. Use the slider to change the RAID size or ent er a number in the eld provided. Check the box b y the words ,[…]
-
Страница 126
121 D-Link DNS -327L User Manual Sec tion 4 — Congur ation V olume Encr yption gives y ou the option to encr ypt one or both drives to keep them safe fr om hackers. Select the V olume you would like to encrypt by checking in the box next to it. Click Nex t to continue. A s you proc eed through the wizard, y ou can click on Previous t o edit any […]
-
Страница 127
122 D-Link DNS -327L User Manual Sec tion 4 — Congur ation Setup a password f or the encr ypted drive. Ent er a password and r e — enter the same passwor d to verify . Check the box b y Auto Mount if y ou want the encr ypted drive to be automatically mounted without en tering a password every time you boot up . Click Nex t to continue . If you d[…]
-
Страница 128
123 D-Link DNS -327L User Manual Sec tion 4 — Congur ation The Volume Configur ation Summar y , shows a summary of your conguration selections. The V olume Name , the RAID Ty p e , the File Sy stem used, the disk Siz e , and the Disk ar ray number are displayed . Check marks at the beginning of the ro w indicate you enabled Encryption and/or […]
-
Страница 129
124 D-Link DNS -327L User Manual Sec tion 4 — Congur ation If you clicked on Ye s , par titioning will begin. Y ou must be patient during this process . Do not turn o your NAS. Next the formatting process will beg in. A progress bar will sho w the percentage f ormatted. Do not turn o your NAS during this pr ocess. If you would like to chan[…]
-
Страница 130
125 D-Link DNS -327L User Manual Sec tion 4 — Congur ation Next the system updates . Y ou must be patient during this process . Do not turn o your NAS. Setup is now complete . This screen sho ws the V olume Name(s ), Fi le Sy stem used, the RAID Mode , and the Disk number . Click Finish t o complete the proc ess.[…]
-
Страница 131
126 D-Link DNS -327L User Manual Sec tion 4 — Congur ation RAID 1 Select a R AID T ype RAID 1 (copies one disk and produces a mirror ed copy of the other .) Click Nex t to continue . RAID Size Settings allows you to tweak the siz e of the RAID 1 V olume. Use the slider to change the RAID size or ent er a number in the eld provided . Check the[…]
-
Страница 132
127 D-Link DNS -327L User Manual Sec tion 4 — Congur ation Click Enable Aut o -Rebuild to automatically r ebuild a failed drive if it has been replaced with a new one . Select Disable Auto-Rebuild if you w ant to star t the rebuild pr ocess manually after replacing a failed drive . Click Nex t to continue . V olume Encr yption giv es you the opt[…]
-
Страница 133
128 D-Link DNS -327L User Manual Sec tion 4 — Congur ation A warning message appears indicating that selection of this option could result in a slow down in access speed . Click Ye s to continue. Setup a password f or the encr ypted drive. Ent er a password and r e — enter the same passwor d to verify . Check the box by A uto Mount if you want t[…]
-
Страница 134
129 D-Link DNS -327L User Manual Sec tion 4 — Congur ation If you do not enter a passwor d in the eld provided , a message will prompt you to do so . Click Ye s to enter a P assword . Click Nex t to continue . The Volume Configur ation Summar y , shows a summary of your conguration selections. The V olume Name , the RAID Ty p e , the File […]
-
Страница 135
130 D-Link DNS -327L User Manual Sec tion 4 — Congur ation If you clicked on Ye s , par titioning will begin. Y ou must be patient during this process . Do not turn o your NAS. Next the formatting process will beg in. A progr ess bar will show the percentage f ormatted. Do not turn o your NAS during this pr ocess. If you would like to chan[…]
-
Страница 136
131 D-Link DNS -327L User Manual Sec tion 4 — Congur ation Next the system updates . Y ou must be patient during this process . Do not turn o your NAS. Setup is now complete . This scr een shows the V olume Name(s) , File Sy stem used, the RAID Mode , and the Disk array number . Click Finish t o complete the proc ess.[…]
-
Страница 137
132 D-Link DNS -327L User Manual Sec tion 4 — Congur ation Upgrade fr om Standard Mode to RAID 1 Standard Mode does not o er redundancy . This lack of mirroring means that if one driv e fails, all the data on the volume will be lost. It is recommended that you upgr ade from Standard Mode to RAID 1 because this ensures tha t your data is prot […]
-
Страница 138
133 D-Link DNS -327L User Manual Sec tion 4 — Congur ation Step 3 — Go to Management > D isk Management > Hard Driv e Congur ation . Y ou will see two options after you add a new drive: 1. Set RAID T ype and Re -F ormat 2. F ormat the new driv e as Standard type If you select the rst option, Set R AID T ype and Re -F ormat , the Hard[…]
-
Страница 139
134 D-Link DNS -327L User Manual Sec tion 4 — Congur ation Step 4 — Under Physical Disk Information , you will be able t o see information about the drive you just installed . The screen sho ws Slot location, V endor , Model number , S erial Number , and disk Size . Check the checkbox that gives y ou the option to Recongur e to RAID 1 . Click[…]
-
Страница 140
135 D-Link DNS -327L User Manual Sec tion 4 — Congur ation Step 6 — A warning message will appear to inf orm you that all data will erased when the hard driv e is re -formatted . Click Ye s to continue, or click No to exit. Step 7 — If you click Ye s , you will see a warning message while the software communicates with the har dware to build a l[…]
-
Страница 141
136 D-Link DNS -327L User Manual Sec tion 4 — Congur ation Step 8 — Next the formatti ng process will beg in. A progr ess bar will show the percen tage formatted. Do not turn o y our NAS during this process. If you would like to change y our settings at this stage, click Exit . Step 9 — Next the system updat es. Y ou must be patient during th[…]
-
Страница 142
137 D-Link DNS -327L User Manual Sec tion 4 — Congur ation Step 10- Setup is complete . This scr een shows you nal inf ormation for the Slot , V endor , M odel number , and S erial Number . Click Finish t o complete the proc ess.[…]
-
Страница 143
138 D-Link DNS -327L User Manual Sec tion 4 — Congur ation S.M.A.R.T . T est Click Management > Disk Management > S.M.A.R.T . T est . T o run the S.M.A.R. T T est , check the box by the hard drive y ou would like to test . Select T est T yp e of Quick T est or Ex tended T est . The Quick T est usually takes less than 10 minutes. This test […]
-
Страница 144
139 D-Link DNS -327L User Manual Sec tion 4 — Congur ation When the test is complet e, the results will be display ed in the Result column, on the right side of the screen. When the S.M.A.R. T . T est begins , you will notice the scr een now includes a column for P rogress and Result . A percen tage completed will display under the Progress head[…]
-
Страница 145
140 D-Link DNS -327L User Manual Sec tion 4 — Congur ation Crea ting a Schedule T o create a schedule, rst select the disks/volumes t o run the test on. Under Schedule , selec t the period ( Day of W eek , W eek ly , or Monthly ) and then select the Time fr om the drop- down menu. Click Create . T o view the S chedule List , click on the turq[…]
-
Страница 146
141 D-Link DNS -327L User Manual Sec tion 4 — Congur ation Scan Disk Scan Disk provides a method t o test the disk ’ s le system on y our DNS-327L . S can Disk scans your disk’ s le system f or errors and/or corruption. Click Management > Disk Management > Scan Disk . Select the V olume(s) you wish to sca n from the drop-down lis[…]
-
Страница 147
142 D-Link DNS -327L User Manual Sec tion 4 — Congur ation A warning message will prompt you t o stop all network activit y and avoid accessing data on the har d drive befor e star ting Scan Disk . Click Ye s to proceed or No to cancel . The DNS-327L will initialize the volume(s) and beg in scanning. Please wait while the software scans the volu[…]
-
Страница 148
143 D-Link DNS -327L User Manual Sec tion 4 — Congur ation V olume Encr yption Click Management > Disk Management > V olume Encr yption. If you created an encrypted volume using the Setup Wizard , you will see it listed below the Modify button. If you would like to modify the encrypted data, click the V olume Name you wish to modify . The […]
-
Страница 149
144 D-Link DNS -327L User Manual Sec tion 4 — Congur ation T o change the settings on an encr ypted volume , you need to enter the Original P assword in the eld pr ovided. Y ou can click the radio button by Upload Encryped Key F ile and then the Brow se to locate an encrypted key le. Click Nex t to continue . Select key le to upload.[…]
-
Страница 150
145 D-Link DNS -327L User Manual Sec tion 4 — Congur ation Check the Auto Moun t check box to ha ve the system mount the V olume automatically . Enter a New P assword , and ent er once again to verify the passw ord. Click Apply to con tinue. W ait while the drive is being encrypted.[…]
-
Страница 151
146 D-Link DNS -327L User Manual Sec tion 4 — Congur ation Click Exit t o close the wizard and return to the V olume Encr yption page. Alt ernatively , you can click Do wnload Encr ypted Ke y File . Y ou have the option to open or sav e the le. With Sav e File selected, click OK to sav e. Note: Using V olume Encryption will slow down the spee[…]
-
Страница 152
147 D-Link DNS -327L User Manual Sec tion 4 — Congur ation A ccoun t Management Users/Gr oups The Users/Groups page is for cr eating and managing user and gr oup accounts. Up t o 256 users and 32 groups can be crea ted. By default, all users have r ead and write access to all f olders. How ever , access rules can be creat ed and changed on the N[…]
-
Страница 153
148 D-Link DNS -327L User Manual Sec tion 4 — Congur ation Step 1 — Select Create A Ne w User Ac count , and then click Nex t to continue . Step 2 — Enter the U ser Name and Passw ord, and then click Next to continue .[…]
-
Страница 154
149 D-Link DNS -327L User Manual Sec tion 4 — Congur ation Step 3 — If you already crea ted a group or gr oups, you will ha ve the following option: A dd the User to a Group by checking the Group checkbox. If you have not cr eated a gr oup or groups, y ou will see the screen that sa ys, No Group(s) hav e been added to this NAS . Click Nex t to c[…]
-
Страница 155
150 D-Link DNS -327L User Manual Sec tion 4 — Congur ation Under Assign Privileges — A ccess Methods you can s elect either FTP or W ebD A V . ( CIFS and AFP are set by default.) • CIFS is f or Common Internet F ile Syst em. • AFP is f or Apple F iling Pr otocol. • FTP is f or F ile T ransfer Pr otocol. • W ebDA V is for Web-based Distri[…]
-
Страница 156
151 D-Link DNS -327L User Manual Sec tion 4 — Congur ation Step 5 — Ent er the amount of disk space you wish to assig n the user on each volume . Enter 0 if you would like t o provide unlimited disk space to the user . Click N ex t to continue. Step 6 — Review the Summar y of your settings. Click F inish to accept the settings , Previous t o go […]
-
Страница 157
152 D-Link DNS -327L User Manual Sec tion 4 — Congur ation Crea ting Multiple Users Step 1 — T o create an account f or multiple users, select C reate Multiple Users and then click Next to continue. Step 2 — Enter the following: • Username Prex is the rst part of the account name for the Multiple User List . • Acc ount Prex is f or […]
-
Страница 158
153 D-Link DNS -327L User Manual Sec tion 4 — Congur ation Step 3 — If you already cr eated a gr oup or groups, y ou will have the following option: A dd the User to a Group by checking the Group checkbox. If you have not cr eated a gr oup or groups, y ou will see the screen that sa ys, No Group(s) hav e been added to this NAS . Click Nex t to c[…]
-
Страница 159
154 D-Link DNS -327L User Manual Sec tion 4 — Congur ation Under Assign Privileges — Ac cess Methods s elect FTP . CIFS is set by default. • CIFS is f or Common Internet F ile Syst em. • FTP is f or F ile T ransfer Pr otocol. Click Nex t to continue . Step 5 — Enter the amount of disk space you wish to assig n the users on each volume . Ente[…]
-
Страница 160
155 D-Link DNS -327L User Manual Sec tion 4 — Congur ation Step 6 — Review the Summar y of your settings. Click F inish to accept the settings , Previous t o go back and make changes, or click Exit to canc el the changes. Under User Settings you will see User Names for the users crea ted.[…]
-
Страница 161
156 D-Link DNS -327L User Manual Sec tion 4 — Congur ation Modify Users Step 1 — Under User Settings , click the name of the user you wish to modify . The selected User Name will be in red . Click Modify to continue . Step 2 — This star ts the User Setup Wizard . Click Nex t to continue .[…]
-
Страница 162
157 D-Link DNS -327L User Manual Sec tion 4 — Congur ation Step 3 — Y ou can change the User Name or P asswor d . Click Nex t to continue . Step 4 — Y ou can change the Network Share Settings . Click Nex t to continue .[…]
-
Страница 163
158 D-Link DNS -327L User Manual Sec tion 4 — Congur ation Step 6 — Y ou can re -assign the amount of disk space f or the user on each volume . Enter 0 to pro vide unlimited disk space to the user . Click Nex t to continue . Step 5 — F or changes to Assign P rivileges — Access Methods , you can select either FTP or W ebDA V . ( CIFS and AFP are […]
-
Страница 164
159 D-Link DNS -327L User Manual Sec tion 4 — Congur ation Step 7 — Review the Summary of your settings. Click F inish to accept the settings , Previous t o go back and make changes, or click Exit to cancel the changes . Step 8 — Y ou will see a message that says the user changes w ere successful . Click Ye s to exit the wizard .[…]
-
Страница 165
160 D-Link DNS -327L User Manual Sec tion 4 — Congur ation Deleting Users Step 1 — Under User Settings , click the name of the user you wish to delete . The selected User Name will be in r ed. Click Delete . Step 2 — Y ou will see a message prompting you to conrm deletion of the user . Click Ye s to conrm. The user is remo ved from the lis[…]
-
Страница 166
161 D-Link DNS -327L User Manual Sec tion 4 — Congur ation Impor ting Users Step 1 — Naviga te to Management > Ac count Management > Users/Groups . Under User Settings , click on Import Users . Step 2 — The Impor t Users Setup Wizard will star t. Click Nex t to continue .[…]
-
Страница 167
162 D-Link DNS -327L User Manual Sec tion 4 — Congur ation Step 3 — Click Download t o see a sample le. (import_le.txt) Required F ormat: user name/user passwor d/user groups/shared folder(rw)/shared folder(r o)/shared folder(den y)/user quota Example: sta3/sta3/Group_Sta2/F older_R W1///100 Note: Y ou must create the user gr oups[…]
-
Страница 168
163 D-Link DNS -327L User Manual Sec tion 4 — Congur ation Step 5 — The Summar y will show a list of the impor ted users. If there are pr oblems with the user list, errors will be in red . Click Pre vious go back to change the impor ted le. Y ou can click the “ i ” button to view the details f or each user . The Details include User Name […]
-
Страница 169
164 D-Link DNS -327L User Manual Sec tion 4 — Congur ation Crea ting a Group Step 1 — Naviga te to Management > Acc ount Management > Users/Groups . Click the turquoise arro w next to Group Settings and settings window will appear . Click New to create a new gr oup. Step 2 — The Group Setup Wizard will start. Click N ex t to continue.[…]
-
Страница 170
165 D-Link DNS -327L User Manual Sec tion 4 — Congur ation Step 3 — Enter a Gr oup Name . Click Nex t to continue. Step 4 — Click the checkbox by the user(s) y ou want to add to the group and then click Next to continue.[…]
-
Страница 171
166 D-Link DNS -327L User Manual Sec tion 4 — Congur ation Step 5 — Select the Network Share Settings for the group . Check the box belo w Read Only , Read/Write , or Den y Ac cess for the corresponding v olume. Click Nex t to continue . Step 6 — Under Assign Privileges — Acc ess Methods you can select FTP and W ebD A V . Both CIFS and AFP are s[…]
-
Страница 172
167 D-Link DNS -327L User Manual Sec tion 4 — Congur ation Step 7 — If you checked the bo x by W ebDav , check the box for Read Only or Read/W rite permission for the volume(s) the g roup can have W ebDA V access to . Click Nex t to continue . Step 8 — Enter the amoun t of hard drive space y ou want to assign to the gr oup for each v olume. Ent […]
-
Страница 173
168 D-Link DNS -327L User Manual Sec tion 4 — Congur ation Step 9 — The wizard is complete . Review the Summar y of your settings. Click F inish to accept the settings , Previous t o go back and make changes, or click Exit to canc el the changes. Step 10 — When y ou exit the Group Setup Wizard , you will see the table under Group Settings contai[…]
-
Страница 174
169 D-Link DNS -327L User Manual Sec tion 4 — Congur ation Modifying a Group Step 1 — Naviga te to Management > Ac count Management > Users/Groups . Click the turquoise arro w next to Group Settings and the Group Settings table will appear below . Step 2 — Select the Group Name for the gr oup you want to modify . The ro w for the selected […]
-
Страница 175
170 D-Link DNS -327L User Manual Sec tion 4 — Congur ation Step 3 — The Group Setup Wizard will start. Click N ex t to continue. Step 4 — Check the bo xes by the U ser Name(s) to add users to the group , or uncheck to r emove users . Click Nex t to continue.[…]
-
Страница 176
171 D-Link DNS -327L User Manual Sec tion 4 — Congur ation Step 5 — The Net work Share Settings allow you t o change permissions for the f or the group . Check the box es below Read Only , Read/Write , or Den y Ac cess for the c orresponding volume. Click Nex t to continue . Step 6 — Under Assign Privileges — Acc ess Methods you can select or un[…]
-
Страница 177
172 D-Link DNS -327L User Manual Sec tion 4 — Congur ation Step 7 — If you checked the bo x by W ebDav , check the box for Read Only or Read/W rite permission for the volume(s) the g roup can have W ebDA V access to . Click Nex t to continue . Step 8 — Y ou can edit the amount of space you w ant to assign to the group f or each volume . Y ou can[…]
-
Страница 178
173 D-Link DNS -327L User Manual Sec tion 4 — Congur ation Step 9 — Y ou will see a warning message if you attempt t o assign a quota that is smaller than the quota on the user ’ s account. Click Ye s to go back to Quota S ettings and change the quota. Step 10 — The wizard is complete . Review the Summar y of your settings. Click F inish to ac[…]
-
Страница 179
174 D-Link DNS -327L User Manual Sec tion 4 — Congur ation Deleting a Group Step 1 — Under Group Settings, select the Group Name y ou want to remo ve. The selected Group Name and User Names will be red . Click Delete . Step 2 — A warning message will appear asking you to verify that you want t o delete the group . Click Ye s to delete the Group […]
-
Страница 180
175 D-Link DNS -327L User Manual Sec tion 4 — Congur ation Quotas The DNS-327L allows st orage quotas to be set for both gr oups and individuals. By default, users and gr oups do not have a quota. Assig n a quota to a group or user t o limit the amount of storage permitted. Click Management > A cc ount Management and then Quotas on the left s[…]
-
Страница 181
176 D-Link DNS -327L User Manual Sec tion 4 — Congur ation Select the user whose quota you would like to modify . Y our selection will turn red. Click Modify to change the user ’ s settings. The Quota S ettings screen will display the selected user accoun t. Enter a new quota amount f or each volume. En ter 0 to assign an unlimited quota. Clic[…]
-
Страница 182
177 D-Link DNS -327L User Manual Sec tion 4 — Congur ation The modied quota settings f or the user will be displayed in the table under User Quota Settings . T o locate a group and view quota settings, click the tur quoise arrow by Group Quota Settings. Y ou will see the group quota table .[…]
-
Страница 183
178 D-Link DNS -327L User Manual Sec tion 4 — Congur ation Select the group whose quota you would like t o modify . Y our selection will turn red. Click Modify . The Quota Settings screen will display the selected Group Name . Enter a new quota amount f or each volume for the g roup and click Apply .[…]
-
Страница 184
179 D-Link DNS -327L User Manual Sec tion 4 — Congur ation The modied quota settings will be display ed in the Group Quota Settings table.[…]
-
Страница 185
180 D-Link DNS -327L User Manual Sec tion 4 — Congur ation The Network Shares page allows the user to c ongure shared f olders and assign rights to specic users and groups , using the Network Shares Setup Wizard . (Ref er to page 181.) Y ou can also mount .iso les in the ISO Mount Shares settings . When a user has access to a moun ted .[…]
-
Страница 186
181 D-Link DNS -327L User Manual Sec tion 4 — Congur ation Add/Modify Network S hares Wizar d The follo wing section will descr ibe how to add and congur e Network Shares on the DNS-327L. Go to Management > Ac count Management > Network Shar es . Step 1 — Click on the New button to launch the wizar d. Using the Network Shares Setup Wiza[…]
-
Страница 187
182 D-Link DNS -327L User Manual Sec tion 4 — Congur ation Step 3 — Select All Ac counts to allo w access to this f older from all of the user accounts . Selec t Specic User/Group to only allo w certain users or groups access to this f older . Click Nex t to continue . Step 4 — If you selected All A ccounts abo ve, Assign A ccess Rights for a[…]
-
Страница 188
183 D-Link DNS -327L User Manual Sec tion 4 — Congur ation Step 5 — If you selected Specic User/Group in Step 3 , then this step allows y ou to set the access rights f or each individual user account on the DNS-327L . Click Nex t to continue . Step 6 — If you selected Specic user/Group in Step 3 , then this step allows y ou to set the acce[…]
-
Страница 189
184 D-Link DNS -327L User Manual Sec tion 4 — Congur ation Step 7 — Here y ou can assign Network Share Settings . Oplocks (Opportunistic locks) are guarantees made by a server for a shared logical v olume. These guarantees inform the Client tha t a le ’ s content will not be allo wed to be changed by the server . If some change is imminent,[…]
-
Страница 190
185 D-Link DNS -327L User Manual Sec tion 4 — Congur ation Step 9 — If you checked FTP in Step 8 you can congur e the FTP settings for this shar e. Choose from the f ollowing: 1) FTP Anon ymous None (No Access). 2) FTP Anon ymous Read Only (Limited Access). 3) FTP Anon ymous Read/Writ e (F ull Acc ess). Click Nex t to continue . If you checke[…]
-
Страница 191
186 D-Link DNS -327L User Manual Sec tion 4 — Congur ation If you checked W ebD A V in step 8 as an access method to y our network share, then this st ep allows you t o selec t W ebDav S ettings. Choose from the f ollowing: Read Only or Read/Write . Click Nex t to continue . Step 10 — Review the summary of your settings. Click Finish to sa ve yo[…]
-
Страница 192
187 D-Link DNS -327L User Manual Sec tion 4 — Congur ation Deleting a Network Shar e Go to Management > Ac count Management > Network Shar es . Under Network Share Settings , select the Network Share you wish to delete . Y our selection will tur n red. Click Delete to remov e the share . A warning message will appear requesting that y ou v[…]
-
Страница 193
188 D-Link DNS -327L User Manual Sec tion 4 — Congur ation If you clicked Ye s , the deleted Share will be gone from the list.[…]
-
Страница 194
189 D-Link DNS -327L User Manual Sec tion 4 — Congur ation Resetting the Network Shares Click the Reset Network Shar es button. A warning message will remind y ou that if you reset, no passw ord is required by default. Click Ye s to conrm your selection, or No to cancel . Go to Management > A ccount Managemen t > Network Shar es .[…]
-
Страница 195
190 D-Link DNS -327L User Manual Sec tion 4 — Congur ation ISO Shares Setup Wizar d Y ou can create an ISO image that is an ar chive le of a group of les on y our NAS (Refer to page 195). Mounting the ISO image crea tes a vir tual CD/DVD drive. The follo wing sec tion describes how to add a new ISO mount on the DNS-327L. This will launch t[…]
-
Страница 196
191 D-Link DNS -327L User Manual Sec tion 4 — Congur ation Assign acc ess rights: • Selec t All A ccoun ts to assign the ISO mount shar ed folder access rights to all users . • Selec t Specic User/Group in or der to assign the ISO mount shared f older access rights to individual users or to specic groups of users . Click Nex t to conti[…]
-
Страница 197
192 D-Link DNS -327L User Manual Sec tion 4 — Congur ation Y ou can add a comment that describes the ISO Mount Share. Click Nex t to continue . If you selected All Ac counts in the previous st ep, the ne x t step is to assign Read Only access , or you can Den y Ac cess privileges to the selected ISO mount shared f older . Click the radio button […]
-
Страница 198
193 D-Link DNS -327L User Manual Sec tion 4 — Congur ation Review the summar y of the share settings. Click on the F inish button to save the settings , click Pre vious to go back and make changes, or Exit to canc el the changes. When you click F inish , you ha ve completed the wizar d. Under Assign Privileges — Acc ess Methods you can choose fr[…]
-
Страница 199
194 D-Link DNS -327L User Manual Sec tion 4 — Congur ation Using the D-Link Storage Utility , the ISO mount share can be mapped to your c omputer as a normal network share. (Refer t o page 87 for mor e information about the D-Link storage Utility .)[…]
-
Страница 200
195 D-Link DNS -327L User Manual Sec tion 4 — Congur ation Crea ting an ISO Image Y ou can create an ISO image that is an ar chive le of a group of les on y our NAS. The f ollowing section will describe how to create an ISO image from your NAS and e xpor t the ISO le to your PC. Click Accou nt Management > Network Shar es > ISO Mo[…]
-
Страница 201
196 D-Link DNS -327L User Manual Sec tion 4 — Congur ation Select the I mage Size based on how y ou intend to use it: • CDROM (650MB/74MIN) — ISO le size for burning ont o a CDROM. • DVD5 (4.7GB) — ISO le size for burning ont o a single -layer DVD . • DVD9 (8.5GB) — ISO le size f or burning onto a double -layer DVD . Select the I […]
-
Страница 202
197 D-Link DNS -327L User Manual Sec tion 4 — Congur ation Select the V olume to save it there , or click New to create a new director y and click OK . Enter an Image Name for the ISO le . Click Nex t .[…]
-
Страница 203
198 D-Link DNS -327L User Manual Sec tion 4 — Congur ation Y ou will see a warning message that says you ar e about to create an ISO image that cannot be modied. Click Ye s to continue or No to cancel. On the left side of the ISO Image T ree Editing window y ou can select the option to Overwrite an existing ISO le or Skip it. Y ou will als[…]
-
Страница 204
199 D-Link DNS -327L User Manual Sec tion 4 — Congur ation On the right side of the window you will see the t otal available space of the ISO le and the space curren tly being used. At the bottom of the windo w , you will see a eld that sa ys Select Path . This is the path that is used when y ou would like to to r emove a le or folder f[…]
-
Страница 205
200 D-Link DNS -327L User Manual Sec tion 4 — Congur ation V erifying the ISO image Open W indow s Explorer , click the Network icon, double — click your DNS-327L . Double — click the icon for the volume wher e you sav ed the ISO . Y ou should see the ISO image le.[…]
-
Страница 206
201 D-Link DNS -327L User Manual Sec tion 4 — Congur ation Admin P assword Enter the f ollowing under Administr ator Settings: 1. Enter a new U ser Name . 2. T ype the current Passw ord . 3. Enter a New P asswor d . 4. C onrm Passw ord by typing the new password again. Click Sav e Settings to apply the changes, or Don ’ t Save Settings to c[…]
-
Страница 207
202 D-Link DNS -327L User Manual Sec tion 4 — Congur ation Network Management Network Management manages all aspects of LAN settings. Even if y our LAN settings were initially congur ed in the installation Setup Wizard , they can be recongur ed here, using the LAN Setup Wizard . Go to Management > Network Managemen t and then LAN S etup[…]
-
Страница 208
203 D-Link DNS -327L User Manual Sec tion 4 — Congur ation The LAN Setup Wizard provides st ep -by-step instructions on how to congur e the IP settings. Click Nex t to continue . Step one allow s you to congur e your LAN IP Settings. Here you can choose between DHCP Client or Sta tic IP . If you selec t Static IP , you will have to manuall[…]
-
Страница 209
204 D-Link DNS -327L User Manual Sec tion 4 — Congur ation Review the Summar y of your settings. Click on the F inish button to sav e the settings, click Pre vious to go back and make changes, or Exit t o cancel the changes. When you click on F inish , the LAN Setup Wizard is complete.[…]
-
Страница 210
205 D-Link DNS -327L User Manual Sec tion 4 — Congur ation IPv6 Setup Go to Management > Network Managemen t > LAN S etup . Under IPv6 S ettings click Setup . An IP v6 Setup window will appear .[…]
-
Страница 211
206 D-Link DNS -327L User Manual Sec tion 4 — Congur ation Under IP v6 Setup , there are f our connection modes to selec t from: Auto , DHCP , Static and O . • Auto — Requests inf ormation from an IPv6-enabled router and automatically congur es your settings. • DHCP — Requests information from a DHCP server . • Static — Y ou must ent[…]
-
Страница 212
207 D-Link DNS -327L User Manual Sec tion 4 — Congur ation Below IPv6 S ettings, you should see y our settings in the table.[…]
-
Страница 213
208 D-Link DNS -327L User Manual Sec tion 4 — Congur ation Link Speed and LL TD Settings Select either Auto ( Auto-Negotiate) , 100Mbps , or 1000Mbps from the drop-down menu. Click the Sav e Settings button to sav e the Link Speed settings. This device supports LL TD (Link Layer T opology Discovery) and is used by the Network Map application tha[…]
-
Страница 214
209 D-Link DNS -327L User Manual Sec tion 4 — Congur ation DDNS The DDNS fea ture allows y ou to host a ser ver ( Web , FTP , Game S er ver , etc.) using a domain name that y ou can purchase (www.wha teveryournameis. com) with your dynamically assig ned IP address. Most broadband Internet Service Providers assig n dynamic (changing) IP addresses[…]
-
Страница 215
210 D-Link DNS -327L User Manual Sec tion 4 — Congur ation P or t F or warding The DNS-327L suppor ts Universal Plug and Pla y (UPnP) P or t F or warding , which congures port forwarding automatically on your UP nP-enabled router . Note: Y ou must have a UPnP router on y our network. Log in and click Management > Network Management > P […]
-
Страница 216
211 D-Link DNS -327L User Manual Sec tion 4 — Congur ation A message will pop-up when the UPnP router has been loca ted on the network. Click Ye s . Note: Y ou must enable UPnP on your router . Click the turquoise arro w next to Port Forwarding t o see the Port F or warding options .[…]
-
Страница 217
212 D-Link DNS -327L User Manual Sec tion 4 — Congur ation Click Add to proceed . This launches the P or t Forwar ding Settings Wizard. Click Nex t to continue .[…]
-
Страница 218
213 D-Link DNS -327L User Manual Sec tion 4 — Congur ation Click Selec t default ser vice scan to select the por t for warding ser vices from a list, or select C ustom a por t forwarding service to manually congur e your own settings. Click Nex t to continue . If you chose Selec t default service scan , check the box by the Ser vice to be use[…]
-
Страница 219
214 D-Link DNS -327L User Manual Sec tion 4 — Congur ation FTP Ser ver The Application Management section allows y ou to congure multiple services for your DNS-327L. The ser ver and ser vice settings include: FTP S er ver , Add-Ons, AFP Ser vice, NFS Ser vice , and Multimedia Ser vices . Let’ s begin by looking at conguration options for[…]
-
Страница 220
215 D-Link DNS -327L User Manual Sec tion 4 — Congur ation Block IP List Below the FTP Ser ver Settings section, you will see a turquiose arrow by the heading , Block IP List. This feature allo ws you to block IP addr ess that you consider threat ening to your network. Click the turquoise arrow t o open the conguration table. Click the turquo[…]
-
Страница 221
216 D-Link DNS -327L User Manual Sec tion 4 — Congur ation If you selected T emporary , then selec t a time frame and click Apply to con tinue. The Blocked IP List will display any IP addr ess(es) that have been blocked, as well as some of the details , like the Block Duration and Release Date .[…]
-
Страница 222
217 D-Link DNS -327L User Manual Sec tion 4 — Congur ation Click the turquoise arro w next to FTP S erver Status to review the FTP details. The FTP server is stopped by default. Click Start FTP Ser ver to run. After you click the Start FTP Ser ver button, the Status changes to Star ted.[…]
-
Страница 223
218 D-Link DNS -327L User Manual Sec tion 4 — Congur ation Now you can open y our default browser or FTP applica tion and log-in to your FTP server .[…]
-
Страница 224
219 D-Link DNS -327L User Manual Sec tion 4 — Congur ation A vailable A dd- on Ser vices Add-ons add extra ser vices to the DNS-327L. Here is a look at each Add-on ser vice available . AjaXplorer: Photo C enter: Squeeze Cent er: Blog ( W ordPress): Audio Str eamer: aMule: Joomla: phpBB: phpMyAdmin: T ransmission: AjaXplorer pr ovides an enhanced[…]
-
Страница 225
220 D-Link DNS -327L User Manual Sec tion 4 — Congur ation Enabling Add-on P ack ages from the Setup Wizar d Add-on pack ages are available fr om ww w .my dlink.com/suppor t for your DNS-327L. The list includes AjaXplorer , Audio Streamer , Blog , Photo Center , aMule, Jo omla , phpBB , phpMyAdmin , T ransmission and Squeeze Center . Installatio[…]
-
Страница 226
221 D-Link DNS -327L User Manual Sec tion 4 — Congur ation The next two screens show the add-on packages disabled.[…]
-
Страница 227
222 D-Link DNS -327L User Manual Sec tion 4 — Congur ation Y ou may have chosen to install A dd-ons using the installation S etup Wizard . If not, you can install them later from the W eb UI. Open your default bro wser and go to Management > Application Management > A dd- Ons . The table below c ontains a list of available add-on pack ages[…]
-
Страница 228
223 D-Link DNS -327L User Manual Sec tion 4 — Congur ation Y ou must rst download the Setup Wizard from D-Link ’ s suppor t site. Go to www .mydlink.com/support and locate the DNS-327L under the Storage tab . Within the f older for the Setup Wizard , y ou will nd a folder called Add-ons . Open the folder and navigat e to the desired add-[…]
-
Страница 229
224 D-Link DNS -327L User Manual Sec tion 4 — Congur ation AFP Ser vice Go to Management > Application Management > AFP Ser vice. Click the Enable radio button to turn on AFP Service . Click Save Settings . Go to Management > Application Management > NFS Ser vice. Click the Enable radio button to turn on NFS Service . Click Save Sett[…]
-
Страница 230
225 D-Link DNS -327L User Manual Sec tion 4 — Congur ation Multimedia Ser vices The Multimedia Ser vices are f or creating a media library from photo , video , and audio les. Users can upload les to a desig nated Media Share f older on the DNS-327L , and Multimedia Ser vices will organize and publish the data in one library . Once these ph[…]
-
Страница 231
226 D-Link DNS -327L User Manual Sec tion 4 — Congur ation Go to Management > Application Management > Multimedia Services . Under Multimedia Shares Settings , click Add to cr eate a Shared F older .[…]
-
Страница 232
227 D-Link DNS -327L User Manual Sec tion 4 — Congur ation Select a volume or a folder to designa te as the Shared F older under Multimedia Shares Settings. Click Apply . A progr ess bar will reect the progress of the initializa tion process.[…]
-
Страница 233
228 D-Link DNS -327L User Manual Sec tion 4 — Congur ation The DNS-327L builds the media library automatically . When the system has nished building the media libr ar y , you will see a success message . Click Ye s to continue.[…]
-
Страница 234
229 D-Link DNS -327L User Manual Sec tion 4 — Congur ation UPnP A V S er ver Once the media libr ar y has been created (see page 226), go to M anagement > Application Management > Multimedia Ser vices . Below UPnP A V Ser ver Settings , click the Enable radio button. Click Save Settings to c ongure the UPnP A V share. Click Refresh to u[…]
-
Страница 235
230 D-Link DNS -327L User Manual Sec tion 4 — Congur ation iT unes Ser ver The DNS-327L f eatures an iT unes Ser ver . This ser ver prov ides the ability to share music to computers on the local network running iT unes. If the server is enabled, the device will be aut omatically detected by the iT unes program and the music contained in the spec[…]
-
Страница 236
231 D-Link DNS -327L User Manual Sec tion 4 — Congur ation Language Users hav e the ability to customize the DNS-327L by installing whichever language(s) they pr efer . Y ou can download a language package from the D-Link website. Go to Management > S ystem Management > Language to install a new language. Click on Brow se to sear ch for th[…]
-
Страница 237
232 D-Link DNS -327L User Manual Sec tion 4 — Congur ation T ime and Date The Time and Date congura tion option allows you t o update and maintain the correct time and date on the in ternal system clock. Y ou can sync the time and date of your c omputer as the system time . Or you can select an NTP (Network Time P rotocol) Server in order to […]
-
Страница 238
233 D-Link DNS -327L User Manual Sec tion 4 — Congur ation Device Under Device Settings , you can assign a W ork group , Name and Description to the DNS-327L. Then y ou can access this device by typing the name in the URL section of your web bro wser . For example: h ttp://dlink-d10001. Go to Management > Syst em Management > Device . W or[…]
-
Страница 239
234 D-Link DNS -327L User Manual Sec tion 4 — Congur ation Sy stem Settings System Settings provid es feature s to manage your DNS-327L. Y ou can restar t your NAS, r estore the sy stem to it’ s original state , set idle times, shut down the system, and c ongure settings, like your system ’ s temperatur e threshold setting . Go to Managem[…]
-
Страница 240
235 D-Link DNS -327L User Manual Sec tion 4 — Congur ation P ow er Management The NAS P ower Management f eature allows y ou to manage power c onsumption. Y ou can congure the drives t o shut down while power r emains constant to the devic e. The driv es will power up again when data is acc essed. Go to Management > S ystem Managemen t >[…]
-
Страница 241
236 D-Link DNS -327L User Manual Sec tion 4 — Congur ation P ower On/O Scheduling: Y ou can power o the NAS at scheduled times f or a specic day or multiple day s of the week. By Power On/O , click Enable to turn on this function. Schedule the Po wer On/O func tion by checking the check box to the right of the da y(s) of the wee[…]
-
Страница 242
237 D-Link DNS -327L User Manual Sec tion 4 — Congur ation Notications E-mail Settings Login Method: Select Accou nt or Anonymous . Choosing Anon ymous means a user name and password ar e not required . Username: Enter the user name f or your E-mail account. P assword: Enter the passw ord for y our E-mail account. P or t: Enter the SMTP por t[…]
-
Страница 243
238 D-Link DNS -327L User Manual Sec tion 4 — Congur ation SMS Settings Similar to the way alerts for system c onditions can be sent to an E-mail box, they can also be sen t to a mobile phone. SMS (Short M essage Ser vice) allows the ex change of text messages between mobile phone devices. The user must hav e an agreement with a SMS gat eway pro[…]
-
Страница 244
239 D-Link DNS -327L User Manual Sec tion 4 — Congur ation Adding an SMS Service Pro vider The SMS (Short M essage Ser vice) Setup Wizard allows you t o add an SMS Ser vice Pro vider . Y ou can star t the SMS Setup Wizard from S ystem Management > Notications . Under SMS Settings , click the Add button. (Refer to SMS Settings description o[…]
-
Страница 245
240 D-Link DNS -327L User Manual Sec tion 4 — Congur ation Ev ent Settings By check ing the box es under Event Settings, y ou can specify which ev ents will be sent as E-mail alerts and/or SMS text messages. Examples of events that can be checked to trigger alerts: “ The Administrator P asswor d has been changed, ” and “ The Firm ware has […]
-
Страница 246
241 D-Link DNS -327L User Manual Sec tion 4 — Congur ation Logs F rom the Lo g s menu, you can setup your DNS-327L to send the NAS ’ s log events to the SysL og ser ver . Y ou can also view the NAS system logs and the FTP logs here . Under Management > Sy stem Management > Logs , go to Ser ver Settings . Enable Sy slog: Check the box to […]
-
Страница 247
242 D-Link DNS -327L User Manual Sec tion 4 — Congur ation F irmw are Upgr ade The Firm ware Upgr ade page makes it simple to upload new rmwar e releases to the NAS. Check f or new rmware on the D-Link suppor t website . If new rmwar e is available, y ou can download the le to your local c omputer . Go to Management > Syst em Mana[…]
-
Страница 248
243 D-Link DNS -327L User Manual Sec tion 4 — Congur ation USB Devices T o enable Net work UPS to your NAS: 1. Check the box to enable the N etwork UPS . 2. Enter an IP address of the netw ork UPS master . 3. Click Save Settings to r eceive the critical power sta tus from the network UPS master . The UPS Status will display the curr ent status o[…]
-
Страница 249
244 D-Link DNS -327L User Manual Sec tion 4 — Congur ation Click the turquoise arro w to reveal P rinter Information . If a USB printer is connected, you will see the name of the Manufacturer , P roduct , and Connection D etails . Click Clear Prin t Queue(s) to remov e ac tive print jobs. ( The button is gr eyed out when there are no active prin[…]
-
Страница 250
245 D-Link DNS -327L User Manual Sec tion 4 — Congur ation Sy stem S tatus The System Info screen pr ovides extensive information about the DNS-327L. LAN Information includes IP Address , Subnet Mask and Mac Address . V olume Information displays the V olume Name , Volume T ype , and T otal Hard Drive Capacity . The Resource Monitor scr een cont[…]
-
Страница 251
246 D-Link DNS -327L User Manual Sec tion 4 — Congur ation Go to Management > S ystem Sta tus > Resource Monitor . Click the turquoise arro w to reveal the r esource details . Y ou can review information about the f ollowing resourc es: • CPU • Memory • Bandwidth • Proc esses[…]
-
Страница 252
247 D-Link DNS -327L User Manual Sec tion 4 — Congur ation Home The Home tab is considered to be the cent er for all important les on your DNS-327L. Home has one main subfolder called My F older , which contains four main applications , My Photos , My Files , My Music , and My Sur veillance . The pages that follo w describe each of these apps[…]
-
Страница 253
248 D-Link DNS -327L User Manual Sec tion 4 — Congur ation My Photos My Photos is an app for cr eating photo albums on the DNS-327L. Ther e is a Photo Album Wizar d to assist you with uploading photos to y our NAS. Y ou can share photos via Picasa, F acebook, Flickr and Cooliris. F rom Home , click the My Phot os icon to open the application. Th[…]
-
Страница 254
249 D-Link DNS -327L User Manual Sec tion 4 — Congur ation The second button is Upload fr om NAS . The third butt on is Edit . The fourth and last button is Refresh .[…]
-
Страница 255
250 D-Link DNS -327L User Manual Sec tion 4 — Congur ation Crea ting an Album Go to Home > My Photos . A new tab will appear . ( T o exit My Photos , you can click on the tab to the left to return to the Home scr een.) Click Upload from m y computer . This opens the Photo Album Wizar d . A Create Album window pops up . (Instructions for the P[…]
-
Страница 256
251 D-Link DNS -327L User Manual Sec tion 4 — Congur ation Photo Album W izard The Photo Album W izard will assist you with uploading photos fr om your computer t o the DNS-327L in order to creat e a photo album. Enter a name for the album In the Album Name eld, and then en ter a description in the Description eld. Click Nex t to continue.[…]
-
Страница 257
252 D-Link DNS -327L User Manual Sec tion 4 — Congur ation Under S elect Photo , click the Bro wse button to sear ch on your computer f or your photo les . If you would like to add mor e than one photo, y ou can hold the Shift/Contr ol button on your keyboard when y ou select the les. Click the Open button to add them to the Album .[…]
-
Страница 258
253 D-Link DNS -327L User Manual Sec tion 4 — Congur ation Under S elect Photo , you will see the le names of the photos y ou selec ted. Click Next to upload the photos. Y ou will see a spinning circle with a message that says , Creating an Album while the DNS-327L automatically uploads the photos t o the NAS.[…]
-
Страница 259
254 D-Link DNS -327L User Manual Sec tion 4 — Congur ation The Photo Albums scr een now contains y our photo album.[…]
-
Страница 260
255 D-Link DNS -327L User Manual Sec tion 4 — Congur ation Editing Photos in an A lbum Go to Home > My Photos . Click on your P hoto Album. A Back button appears above Photo Albums , and a Select All checkbox appears below the photo album ’ s name. Click on the Edit button on the upper right corner of the scr een. Back Select All[…]
-
Страница 261
256 D-Link DNS -327L User Manual Sec tion 4 — Congur ation After you click the Edit butt on, the buttons in the upper right corner of the screen change . When you select images to edit, gr een check marks appear on the ones that are selected. Next you can select an action for the selected images. When you ho ver over a butt on in the upper right[…]
-
Страница 262
257 D-Link DNS -327L User Manual Sec tion 4 — Congur ation Select the third button if you wish to Delet e the current photo from the photo album. (Refer t o page 262.) Select the four th button if you wish to shar e the current photo to P icasa . (Refer to page 263.) Select the f th button if you wish to shar e the current photo to F acebook […]
-
Страница 263
258 D-Link DNS -327L User Manual Sec tion 4 — Congur ation Selec t a Photo as a C ov er image Y ou will see the Set Cov er button in the upper right corner of your screen only if you ar e in editing mode. Y ou are asked to verify y our selec tion of this photo as the album co ver . Click Ye s to continue, or No to exit. Click Set Co ver to selec[…]
-
Страница 264
259 D-Link DNS -327L User Manual Sec tion 4 — Congur ation Y ou will see a message indicating the operation was successful . Click Ye s to continue. Y ou will see a spinning circle while the application creates the c over image.[…]
-
Страница 265
260 D-Link DNS -327L User Manual Sec tion 4 — Congur ation Selec t a Photo to Mov e Go to Home > My Photos > Photo A lbums . Click on the Photo Album you wish to select the photo from. Select the image for the photo and click Mo ve .[…]
-
Страница 266
261 D-Link DNS -327L User Manual Sec tion 4 — Congur ation The Selec t Album window will open. Check the bo x by the Album Name you wish to mo ve the photo to . When you r eturn to the Photo Album , you will see that the pr eviously selected photo is no longer visible.[…]
-
Страница 267
262 D-Link DNS -327L User Manual Sec tion 4 — Congur ation Delete a Photo Click Home > My Photos > Photo Albums . Click on the P hoto Album you wish to select the photo from. Select the Photo and click Delete . The Sy stem will automatically delete the le without v erication.[…]
-
Страница 268
263 D-Link DNS -327L User Manual Sec tion 4 — Congur ation Add a P hoto to an Album on P icasa Click Home > My Photos > Photo Albums . Click on the P hoto Album you wish to select a photo from. When you select the photo you wish to shar e on Picasa , you will see a green check -mark on the selec ted image. Click S hare to Picasa .[…]
-
Страница 269
264 D-Link DNS -327L User Manual Sec tion 4 — Congur ation Y ou will see the Google log-in screen. Y ou must have a Google accoun t to upload les to P icasa . Enter your E-mail A ddress , P assword and click Sign In t o proceed. Y ou will see a message from Google requesting that you g rant access to Pic asa W eb Albums . Click Grant A ccess […]
-
Страница 270
265 D-Link DNS -327L User Manual Sec tion 4 — Congur ation If you click Grant A ccess , y ou will be directed to the Shar eCent er ™ Photo Manager . Y ou can share photos to photo albums y ou already hav e in Picasa Web , or cr eate a new web album to shar e. Under Albums , select an existing album from the drop- down list and click Share . If[…]
-
Страница 271
266 D-Link DNS -327L User Manual Sec tion 4 — Congur ation Add a P hoto to an Album on F acebook Click Home > My Photos > Photo Albums . Click on the Photo Album you wish to select a photo from. When you select the photo you wish to share on F acebook , you will see a green check -mark on the selec ted image. Click S hare to F ac ebook . Y[…]
-
Страница 272
267 D-Link DNS -327L User Manual Sec tion 4 — Congur ation The next screen explains the D-Link ShareCenter ™ . Click Go to App to proceed . The D-Link ShareCenter ™ requests permission to post images on your behalf . Click Allow t o continue.[…]
-
Страница 273
268 D-Link DNS -327L User Manual Sec tion 4 — Congur ation If you selected Allow , you will be dir ected to the ShareCen ter ™ Photo Manager . Y ou can selec t an album you already hav e in F acebook, or create a new web album to shar e. If you want to shar e a new album, click on Create Album , enter Album Name, and click Shar e . If you clic[…]
-
Страница 274
269 D-Link DNS -327L User Manual Sec tion 4 — Congur ation Share a Phot o on Flickr Click Home > My Photos > Photo Albums . Click on the Photo Album you wish to select a photo from. When you select the photo you wish t o share on Flickr , you will see a green check -mark on the selec ted image. Click S hare to Flickr . Y ou will see a wind[…]
-
Страница 275
270 D-Link DNS -327L User Manual Sec tion 4 — Congur ation Creat e a Flickr screen name . Y ou will see a message that says, D-Link ShareCenter ™ wants to link to your F lickr account . Click OK, I’LL A UTHORIZE IT to proceed .[…]
-
Страница 276
271 D-Link DNS -327L User Manual Sec tion 4 — Congur ation Select your les and upload to Flickr .[…]
-
Страница 277
272 D-Link DNS -327L User Manual Sec tion 4 — Congur ation Deleting an Album F rom the Photo Albums scr een, when in the editing mode, you will see just two buttons in the upper right corner of y our screen. Click Delete to delete a Photo Album . If you neglected to select an album, you will be prompted to select one item . Click Ye s to continu[…]
-
Страница 278
273 D-Link DNS -327L User Manual Sec tion 4 — Congur ation When you select the image for the P hoto Album you wish to r emove, y ou will see a green check -mark on the selec ted le. Click Delet e . Y ou will see warning message, Are you sure y ou want to delete this album? Click Ye s to continue, or click No to exit. The deleted Phot o Album […]
-
Страница 279
274 D-Link DNS -327L User Manual Sec tion 4 — Congur ation Refreshing the Album Da tabase Click on Home > My Photos > Photo Albums . Click Refresh to r efresh the entire database . Y ou will be prompted to verify y our decision to refresh the da tabase. Click Ye s to continue, or No to exit. Y ou will see a spinning circle while the applic[…]
-
Страница 280
275 D-Link DNS -327L User Manual Sec tion 4 — Congur ation Managing Photos Y ou can access all your photos on the DNS-327L from H ome > My Photos . F ive buttons appear in the upper right corner f or managing photos: Upload from my c omputer , Upload from NAS, Edit, S lideshow , and Cooliris .[…]
-
Страница 281
276 D-Link DNS -327L User Manual Sec tion 4 — Congur ation The Slideshow T oolbar includes: Play button : Photo Information: Galler y Speed Slider : GPS Information: Cooliris link : EXIF : Rotation button : Galler y Navigation : Slideshow T oolbar Click the Play button t o play the galler y images. Photo Information displa ys the image name and […]
-
Страница 282
277 D-Link DNS -327L User Manual Sec tion 4 — Congur ation This button pla ys the Slideshow . This slider adjusts the speed of the Slideshow . This button beams y our Slideshow to a local device or to a T V via AirPlay-enabled device.[…]
-
Страница 283
278 D-Link DNS -327L User Manual Sec tion 4 — Congur ation This button pr ovides GPS information about the images in your Slideshow . This fea ture transfers the Slidesho w to Cooliris mode. (Refer to page 280.) This button f or EXIF information for the images in y our Slideshow .[…]
-
Страница 284
279 D-Link DNS -327L User Manual Sec tion 4 — Congur ation These buttons ar e for rotating the images in y our Slideshow . This button pops up the br owser window to displa y images from your Slideshow .[…]
-
Страница 285
280 D-Link DNS -327L User Manual Sec tion 4 — Congur ation When you click the C ooliris icon, it opens C ooliris in a new tab. Click the arrow s on each side of the Cooliris windo w to scroll between images.[…]
-
Страница 286
281 D-Link DNS -327L User Manual Sec tion 4 — Congur ation Click here to activate F acebook in Cooliris . Click here to activate T witter in Cooliris . Click here to enable F ull-Screen mode . Photo Selection Slider .[…]
-
Страница 287
282 D-Link DNS -327L User Manual Sec tion 4 — Congur ation Click on a photo to view separa tely . On the upper right corner of the image are the social networking links. Click here to close Single-Image view . Click here to enable into F ull-Screen mode. Click here to c onnec t to F ac ebook , or click here to connect to T witter .[…]
-
Страница 288
283 D-Link DNS -327L User Manual Sec tion 4 — Congur ation When you click the F acebook button to connect the images to your F acebook acc ount, you will see the L og in screen. When you click the T witter button to c onnect the images to your T witter account, y ou will see the Sign in screen.[…]
-
Страница 289
284 D-Link DNS -327L User Manual Sec tion 4 — Congur ation Beam a Slideshow to y our T V Y ou can enjoy your Slideshow on y our T V by using an AirPlay-enabled device with your DNS-327L. When the NAS connects to a shar ed AirPlay-enabled device on the Network, you will see a message indicating success. Click Ye s to continue.[…]
-
Страница 290
285 D-Link DNS -327L User Manual Sec tion 4 — Congur ation Photo Galler y Click Photo Galler y to view the images in your gallery . Near the top right-hand corner ther e are three buttons . Click here to view A ll Photos . Click here to view B y Calendar . Click here to Refr esh the page.[…]
-
Страница 291
286 D-Link DNS -327L User Manual Sec tion 4 — Congur ation Click the All Photos button t o view all your photos in your P hoto Galler y . Click the By Calendar butt on to view your Photo Gallery by date. Click the Refresh button t o refresh the database . Y ou will see a message requesting conrmation that y ou want to r efresh the database no[…]
-
Страница 292
287 D-Link DNS -327L User Manual Sec tion 4 — Congur ation My F iles Y ou can access your les on the DNS-327L by clicking the My Files icon in the My F older window under the Home tab . My Files pr ovides access to all your les using a br owser ov er the Internet. The My Files windo w displays a list of the V olumes creat ed on the NAS. Cl[…]
-
Страница 293
288 D-Link DNS -327L User Manual Sec tion 4 — Congur ation My F iles Buttons The buttons near the right-hand side of the screen ar e for the My F iles featur es. Click the rst button to Refr esh the view . Click the second button to Do wnload les to your local PC. (Ref er to page 291.) Click the third button t o Upload les to the NAS. ([…]
-
Страница 294
289 D-Link DNS -327L User Manual Sec tion 4 — Congur ation Upload T o upload les to a selec ted volume , click the Upload button near the right-hand side of the My Files scr een. This will open the Upload windo w . Under the Upload heading, click the Brow se button to nd les on y our computer to upload t o the NAS.[…]
-
Страница 295
290 D-Link DNS -327L User Manual Sec tion 4 — Congur ation Locat e the path of the le(s) you want to upload and click Open . Click Upload to start the uploading process. Click Exit to close the Upload window . The le updates t o the NAS are displayed in the dir ector y table.[…]
-
Страница 296
291 D-Link DNS -327L User Manual Sec tion 4 — Congur ation Download T o download les from the NAS to your c omputer , selec t the le you want to download . Selec ted le will be in red. Click the Download butt on. Depending on your bro wser download settings, the br owser automatically downloads the le to y our saved location. In gene[…]
-
Страница 297
292 D-Link DNS -327L User Manual Sec tion 4 — Congur ation Co py Y ou can copy les from one f older to another folder on the DNS-327L. Bro wse for a le to c opy using the folder view on the left, and the le view on the right. Go to Applications > My F iles. Select the le you want to c opy (selected le will be in red) and right-[…]
-
Страница 298
293 D-Link DNS -327L User Manual Sec tion 4 — Congur ation Enter a name f or the new folder . Click OK . Select the newly- created f older and click Apply .[…]
-
Страница 299
294 D-Link DNS -327L User Manual Sec tion 4 — Congur ation Y ou can verify that the le copied to the corr ec t destination. Brow se for the le using the folder view on the left, and the le view on the right.[…]
-
Страница 300
295 D-Link DNS -327L User Manual Sec tion 4 — Congur ation M ove Y ou can move les from one f older to another folder of the DNS-327L. Bro wse for a le to mo ve using the folder view on the left, and the le view on the right. Go to Applications > My F iles. Select the le you wan t to move (selected le will be in red) and right-[…]
-
Страница 301
296 D-Link DNS -327L User Manual Sec tion 4 — Congur ation Select a folder from one of the V olumes or click + New to create a new path. Click Apply . Y ou can verify that the le moved t o the correct destination. Browse f or the le using the folder view on the left, and the le view on the right.[…]
-
Страница 302
297 D-Link DNS -327L User Manual Sec tion 4 — Congur ation Delete Y ou can delete les from the DNS-327L usi ng your computer . Browse f or a le to delete using th e folder view on the left, and the le view on t he right. Go to Applications > My F iles. Select the le you want t o delete (selected le will be in red) and right-cli[…]
-
Страница 303
298 D-Link DNS -327L User Manual Sec tion 4 — Congur ation Y ou should no longer see the le in the folder .[…]
-
Страница 304
299 D-Link DNS -327L User Manual Sec tion 4 — Congur ation Rename Y ou can rename les on the DNS-327L. Browse f or a le to rename using the f older view on the left, and the le view on the right. Go to Applications > My F iles. Select the le you want to r ename (selected le will be in red) and right-click . F rom the drop-down […]
-
Страница 305
300 D-Link DNS -327L User Manual Sec tion 4 — Congur ation Enter a new name f or the le in the Rename eld. Click Apply . The renamed le is no w accessible from its original location.[…]
-
Страница 306
301 D-Link DNS -327L User Manual Sec tion 4 — Congur ation Pr oper ties T o get general information about a le(s) from the DNS-327L, view the properties. Brow se for a le using the folder view on the left, and the le view on the right. Go to Applications > My F iles. Select the le you want information about (selected le will be[…]
-
Страница 307
302 D-Link DNS -327L User Manual Sec tion 4 — Congur ation Crea te a Zip F ile Y ou can create le(s) with the .ZIP le f ormat from the DNS-327L. Brow se for the le you wan t to zip using the folder view on the left, and the le view on the right. Go to Applications > My F iles. Select the le you wan t to zip (selected le will[…]
-
Страница 308
303 D-Link DNS -327L User Manual Sec tion 4 — Congur ation Add t o Zip Y ou can add to an existing zip le from the DNS-327L. Brow se for a zip le using the folder view on the left, and the le view on the right. Go to Applications > My F iles. L ocate the zip le you wan t to add a le to . Look at the le siz e of the existing […]
-
Страница 309
304 D-Link DNS -327L User Manual Sec tion 4 — Congur ation Under Add to Zip: Select Path , select the zip le you wan t to have the le added to . Check the checkbox by the le name and click Apply . Y ou can check to see if the new le has been added to the zip le. In this example, w e k now it has because the le size has incr eas[…]
-
Страница 310
305 D-Link DNS -327L User Manual Sec tion 4 — Congur ation Unzipping a Zip F ile Y ou can unzip a zip le on the DNS-327L. Browse for the le y ou want to unzip using the f older view on the left, and the le view on the right. Go to Applications > My F iles. Select the le you want to unzip (selected le will be in red) and right-c[…]
-
Страница 311
306 D-Link DNS -327L User Manual Sec tion 4 — Congur ation Unzipping a T ar File Y ou can unzip a tar archive le on the DNS-327L. An unzipped le with a .tar format w orks with Linux-based systems . Browse f or the tar le you want to unzip using the f older view on the left, and the le view on the right. The unzipping proc ess for a t[…]
-
Страница 312
307 D-Link DNS -327L User Manual Sec tion 4 — Congur ation Opening a F ile Go to Applications > My F iles. Select the le you want to open (selected le will be in red) and right-click. From the dr op- down list click Open (it turns blue). The le opens in a new bro wser window .[…]
-
Страница 313
308 D-Link DNS -327L User Manual Sec tion 4 — Congur ation Pr eviewing a F ile Y ou can preview many le f ormats on the DNS-327L: bmp, gif , ico, j2k, ji , jpeg, jpg , jpg2, pdf , png, ps , psb, psd , webp , doc, docx, xls, xlsx, mp3, and txt. Go to Applications > My F iles. Select the le you want to pr eview . (selected le will b[…]
-
Страница 314
309 D-Link DNS -327L User Manual Sec tion 4 — Congur ation Share t o F acebook Y ou can share an image le on the DNS-327L to F acebook. Go to Applications > My F iles. Select the image le you would like to Share to F acebook (selected le will be in red) and right-click . Fr om the drop- down list click Share t o F acebook (it turns b[…]
-
Страница 315
310 D-Link DNS -327L User Manual Sec tion 4 — Congur ation Share t o Picasa Y ou can share an image le on the DNS-327L to Picasa. Go to Applications > My F iles. Select the image le you want to Share to Picasa (selected le will be in red) and right — click. From the dr op- down list click Share t o Picasa (it turns blue). Y ou will s[…]
-
Страница 316
311 D-Link DNS -327L User Manual Sec tion 4 — Congur ation Share t o Flickr Y ou can share an image le on the DNS-327L to Flickr . Go to Applications > My F iles. Select the image le you want to Share to Flickr (selected le will be in red) and right-click. Fr om the drop- down list click Share t o Flickr (it turns blue). Y ou will se[…]
-
Страница 317
312 D-Link DNS -327L User Manual Sec tion 4 — Congur ation My Music Y ou can access your music les on the DNS-327L by clicking the My Music icon in the My F older window under the Home tab. U sing this application, allows y ou to play music straight fr om the NAS. Y ou can also access music les on the network.[…]
-
Страница 318
313 D-Link DNS -327L User Manual Sec tion 4 — Congur ation Click My Music to view the My Music fea tures.[…]
-
Страница 319
314 D-Link DNS -327L User Manual Sec tion 4 — Congur ation My Music Inter face Click here to pla yback music to an AirPlay-enabled device ( Apple T V ). Click the button in the upper-right corner of the scr een to Refresh . The Music Play er plays tr acks directly from the DNS-327L[…]
-
Страница 320
315 D-Link DNS -327L User Manual Sec tion 4 — Congur ation My Music Cat egories Click All T racks to view all the audio tracks on the DNS-327L. Click Albums to view all the albums on the DNS-327L. Click Artists to view the playlist by artist on the DNS -327L. Click Genres to view the playlist b y genre on the DNS-327L.[…]
-
Страница 321
316 D-Link DNS -327L User Manual Sec tion 4 — Congur ation Click Playlists to view all playlists and cr eate new playlists on the DNS-327L.[…]
-
Страница 322
317 D-Link DNS -327L User Manual Sec tion 4 — Congur ation C opy Music to Y our DNS-327L Acc ess your DNS-327L from your network. Click the NAS V olume directly . Cop y music directly from your local drive t o the Multimedia Shared F older of the DNS-327L. Make sure the les are only MP3 f ormat. The NAS does not acc ept .ac format (F ree L[…]
-
Страница 323
318 D-Link DNS -327L User Manual Sec tion 4 — Congur ation Go to My Music > All T racks and click the Refresh butt on. The Playlist is populat ed with the same tracks you copied on the previous page . Click Albums to view audio tracks b y album. Click Artists to view all the ar tists in your playlist.[…]
-
Страница 324
319 D-Link DNS -327L User Manual Sec tion 4 — Congur ation Playback Music on an A irPlay-Enabled De vice Go to My Music > All T racks . A ccess to your AirP lay-enabled device originates from the rst butt on in the upper right corner of the screen. Click on the name of the AirPla y-enabled device (in the screen shot below , the device name[…]
-
Страница 325
320 D-Link DNS -327L User Manual Sec tion 4 — Congur ation The Pla yer Scrollable Music Timeline Stop Button Replay Button Shue Button Genre, Dura tion of the Song, and Size of the F ile Rewind Button Play/P ause Button F ast Forward Button V olume contr ol The Play er is a remote- control-like UI that will displa y the album ar t if the l[…]
-
Страница 326
321 D-Link DNS -327L User Manual Sec tion 4 — Congur ation Crea te a Playlist Click the Playlist option at the bott om of the list, under My Music . Click the Plus button at the top right -hand corner of the screen. The Create a New Playlist window appears . Enter a name by Pla ylist Name and click the songs you wish to add t o the playlist. Cli[…]
-
Страница 327
322 D-Link DNS -327L User Manual Sec tion 4 — Congur ation Click the Edit button to add or delet e songs from the Playlist . Once you ar e in Edit mode, click the track y ou want to delete and click the Delete button. Click on the Playlist to view its con tents. Click the Back button t o return to the Playlist menu[…]
-
Страница 328
323 D-Link DNS -327L User Manual Sec tion 4 — Congur ation My Sur veillance The My Sur veillance app works with most D-Link Cloud cameras (see list below). It manages your IP cameras from the NAS and allo ws all streaming data to be sav ed to the NAS. My Sur veillanc e can connect up to four cameras. By default, My Surveillanc e is disabled. The[…]
-
Страница 329
324 D-Link DNS -327L User Manual Sec tion 4 — Congur ation After My Sur veillance is enabled , a new brow ser window opens. Befor e you proc eed, make sure y ou have the corr ec t plug-ins to view the streaming video . Ther e may be a message at the top of y our browser that says , Missing plug-in on this page . Click where it says , Click Here […]
-
Страница 330
325 D-Link DNS -327L User Manual Sec tion 4 — Congur ation Once the le is downloaded , double — click or right- click the Downloads window and select Open . The Sur veillanceCent erRealInstall Setup Wizard will giv e you step-by-step instructions on how to install the progr am on your computer . Click Nex t to continue .[…]
-
Страница 331
326 D-Link DNS -327L User Manual Sec tion 4 — Congur ation Click on Brow se and selec t a location for the installation f older . Y ou have the option t o click on Everyone if y ou would like to install the software for everyone who uses your comput er . Click Nex t to continue . Click Nex t to proceed with installa tion.[…]
-
Страница 332
327 D-Link DNS -327L User Manual Sec tion 4 — Congur ation The nal window will ha ve a heading that says , Installation Complet e. Click Close to continue . Now when you c onnec t a suppor ted camera to the network, the My Surveillance software will detect it automatically . The software will recog nize the IP address, model number and bit r […]
-
Страница 333
328 D-Link DNS -327L User Manual Sec tion 4 — Congur ation Logging in to My Sur veillance f or the rst time using Internet Explorer requires an add-on. The add-on message appears at the top of the brow ser , nex t to the question mark. Click on the line that says , If you trust the w ebsite and the add-on and want to install it , click here .[…]
-
Страница 334
329 D-Link DNS -327L User Manual Sec tion 4 — Congur ation A warning message appears for the Global Digital program by D-Link Corporation. Click Ye s to conrm that you w ant to allow the following program t o make changes to your c omputer . After conrmation is rec eived, Internet Explorer will displa y the live camera feed .[…]
-
Страница 335
330 D-Link DNS -327L User Manual Sec tion 4 — Congur ation The Surveillance Center Camer a Configur ation wizard is launched automatically when you ac cess Live Video . It automatically searches f or any a vailable network cameras. Y ou will see a list of connected cameras at the bottom of the window . If no cameras are detected, a r ed notic[…]
-
Страница 336
331 D-Link DNS -327L User Manual Sec tion 4 — Congur ation When the Surveillance Center C amera Congur ation window closes, y our brow ser will display the LIVE VIEW . Note: If there are no c ameras connected , there is no video stream to display . Make sure y our camer as are properly connected . Close the brow ser tab to exit.[…]
-
Страница 337
332 D-Link DNS -327L User Manual Sec tion 4 — Congur ation My Sur veillance U ser Inter face The My Sur veillance user interface is based on the camera featur es. Ev er yday operation is dependent upon the camer a functionalit y . Y ou will see live video in the window s below the heading, LIVE VIEW . See details below . Click on this link to vi[…]
-
Страница 338
333 D-Link DNS -327L User Manual Sec tion 4 — Congur ation My Sur veillance Logo Camer a Name(s) and IP Address Camer a Vie w Mode E-map , Snapshot, and A uto Scan Mute and V olume Slider Pan- Tilt-Zoom C ontrol (PTZ) Stop/Start Live Camer a Vie w Manual Recording & General Settings T ab Digital Zoom Camer a details Live V iew Pa trol Modes […]
-
Страница 339
334 D-Link DNS -327L User Manual Sec tion 4 — Congur ation Live V iew Components C OMPONENT DESCRIPTION Live V ideo View the Liv e Video fr om cameras connected to your DNS-327L via the network. Stop/Start Click to Stop or Start Live Camera View . Manual Recording & General Settings T ab Click the Manual Recording button to S top or Star t M[…]
-
Страница 340
335 D-Link DNS -327L User Manual Sec tion 4 — Congur ation Use these buttons to St op or Star t the operation of the selected camera. These icons show the S tatus of each camera and allow you t o double — click to toggle between the Status of each camera. These icons allow y ou to switch the Camera View to display a sing le Camera V iew or View […]
-
Страница 341
336 D-Link DNS -327L User Manual Sec tion 4 — Congur ation Click this button to select the Single Camera Mode . The viewing area changes from f our screens to a single , full-frame image. Click this butt on to return to Split C amera Mode . Single Camer a Live V ideo Mode[…]
-
Страница 342
337 D-Link DNS -327L User Manual Sec tion 4 — Congur ation Click this button to select F ull Screen Camer a Mode . The viewing angle expands t o cover the en tire screen. Click this button to return t o Split Screen Camera Mode , dividing the scr een into four images fr om four di erent cameras . ( This can also be accomplished b y switching […]
-
Страница 343
338 D-Link DNS -327L User Manual Sec tion 4 — Congur ation When Enable Digital Zoom is checked, the soft ware allo ws you to z oom in and out on an area of the image. Y ou can place the mouse pointer in the bottom right c orner of the image to click and drag so you can view di erent parts of the screen. Y ou can also click directly on the par[…]
-
Страница 344
339 D-Link DNS -327L User Manual Sec tion 4 — Congur ation Y ou can access the E-map fr om the Live Video screen b y click ing the button. Click the button to upload images int o the database. When you click E-map Upload , you ar e directed to the E-map window . Note: you m ust have installed E-map JPEG les in order to use this feature . (Ref[…]
-
Страница 345
340 D-Link DNS -327L User Manual Sec tion 4 — Congur ation Snapshot V iew Y ou can access Snapshot fr om the Live Video screen by click ing the button. This takes a snapshot of your current liv e screen image . Y ou can copy this image t o the clipboard by clicking on the button, or you can sav e the image to disk by clicking the button. Click t[…]
-
Страница 346
341 D-Link DNS -327L User Manual Sec tion 4 — Congur ation If the camera is congured to r ecord when motion is det ected, the camera icon on the E-map scr een will change to red whenev er motion is detected, as shown belo w . When motion is detected, an alarm is triggered. Click on the Red C amera icon on the E-map to play the r ecorded ev en[…]
-
Страница 347
342 D-Link DNS -327L User Manual Sec tion 4 — Congur ation P atrol settings ar e dependent upon the camera you ar e using. The Sur veillance C enter w orks with the following D-Link PTZ cameras: • DCS-5230/5230L, and DCS-5222L/5211L (P atrol Once). Click the P atro l icon to congure P atrol settings. C onguring Pa trol Settings Scroll do[…]
-
Страница 348
343 D-Link DNS -327L User Manual Sec tion 4 — Congur ation When you click the P reset P oint icon a drop- down list appears. Y ou can edit the existing Pr esets. Click the Pr eset Poin t icon and select whichever preset you wish t o delete. C onguring Pa trol P reset P oints This opens the PTZ P reset P oint window . Enter a Preset Name and c[…]
-
Страница 349
344 D-Link DNS -327L User Manual Sec tion 4 — Congur ation Click the Go to Preset P oint icon. This directs the camera to the designated poin ts. V iewing Pr eset P oints[…]
-
Страница 350
345 D-Link DNS -327L User Manual Sec tion 4 — Congur ation Live V ideo/Playback Settings Y ou can access the General Setting window from the V ideo Playback window by clicking the Settings (cog) button on the Playback screen. Record Display The Record Display function is only available when accessed fr om the Playback scr een. The Record Display[…]
-
Страница 351
346 D-Link DNS -327L User Manual Sec tion 4 — Congur ation OSD Settings Y ou can access the OSD (On-Screen Displa y) Setting window from the Video Playback window b y click ing the Settings button and then selecting the OSD tab at the top . The OSD Setting window allo ws you to adjust settings f or the information and the backgr ound color you w[…]
-
Страница 352
347 D-Link DNS -327L User Manual Sec tion 4 — Congur ation Playback Open Record Camer a Vie w Mode Settings/Snapshot/Sync Playback Mute and V olume Slider Digital Zoom Playback C ontrols Recorded V ideo Playback Note: See description of components on the next page of this Manual. Camer a Details[…]
-
Страница 353
348 D-Link DNS -327L User Manual Sec tion 4 — Congur ation C OMPONENT DESCRIPTION Recorded V ideo Playback View the Recor ded Video . Playback C ontrols Contr ol the Video Pla yback from here (clockwise): Play/St op/Pause/ P revious Second/P revious Minute/Next M inute/ Next Second / Speed Up/Speed Down / Zoom In/Zoom Out. Camera Details This ar[…]
-
Страница 354
349 D-Link DNS -327L User Manual Sec tion 4 — Congur ation The Playback scr een is where you can view r ecordings fr om the cameras. Use this button to View the Recorded Video Information. (See next page for details.) The top two ic ons allow you t o control the C amera View fr om a Single Camera to up to F our Network Cameras . The bottom two i[…]
-
Страница 355
350 D-Link DNS -327L User Manual Sec tion 4 — Congur ation When you click the Open Recor ding button on the Playback screen, you will see the Recor d Information window . This scr een allows you to see details about the recor dings that have been made with the connected cameras. Depending on your settings, y ou may see a Calendar View or List of[…]
-
Страница 356
351 D-Link DNS -327L User Manual Sec tion 4 — Congur ation Playback Setup Camer a Setup Audio & Video Setup Recording Setup Ev ent Setup E-map Upload Backup Ser ver P ort S etup Note: See detailed description of Setup on the pages that follow .[…]
-
Страница 357
352 D-Link DNS -327L User Manual Sec tion 4 — Congur ation Camer a Setup Once you click Setup , Camera Setup is the rst screen to congur e. On the left side are the sub-menus while on the right are the congurable options. Camer a Setup is divided into four sections. W izard , Camera List , C amera Search , and Auto Install .[…]
-
Страница 358
353 D-Link DNS -327L User Manual Sec tion 4 — Congur ation Y ou can add a camera with the Camera Setup Wizard . Click Run W izard to open. Y ou will see a list of the steps used for setting up the camera. Click Nex t to continue . The Setup Wizard does a camera sear ch. Y ou will see the word , Searching… in red. W ait for search r esults. If […]
-
Страница 359
354 D-Link DNS -327L User Manual Sec tion 4 — Congur ation The Camer a Search screen appears blank if the Camer a Setup Wizard was unable to nd your camer a. Make sure you hav e either connected your camera to the r outer , or you have enabled DHCP on y our router to detect your camera. If you have set up y our camera properly , you will see […]
-
Страница 360
355 D-Link DNS -327L User Manual Sec tion 4 — Congur ation Click the Selec t button by the the camera details and click Next . If you set up your IP camera on the network corr ectly, the elds within the D evice Information windo w will be automatically populated with your device information. Click the T est Camera button t o view streaming vi[…]
-
Страница 361
356 D-Link DNS -327L User Manual Sec tion 4 — Congur ation Under Basic Recording , select your recor ding method. In this instance, we hav e chosen, Record By Schedule . Drag and Dr op your mouse ov er the elds represen ting the day and time you wish to r ecord. The selected area is highlighted in blue . Click Motion Detection Record if you p[…]
-
Страница 362
357 D-Link DNS -327L User Manual Sec tion 4 — Congur ation Under Camera Setup , the Camer a List includes your newly-congured camera. Y ou can modify the camera settings. Select a camera from the Camer a List . Y ou will see the details for the selected camera. Y ou can change the Name, IP Address and Por t . Y ou can enter the Username and P[…]
-
Страница 363
358 D-Link DNS -327L User Manual Sec tion 4 — Congur ation Y ou will see a pop -up message with a green check mark, indicating the conguration was suc cessful. Click Ye s to continue. Y ou can also delete a camera from the Camer a List . Select a camera from the camera list. Under the delete heading , click the T rash icon. A pop-up message w[…]
-
Страница 364
359 D-Link DNS -327L User Manual Sec tion 4 — Congur ation A pop-up message indicates the operation was successful . Click Ye s to exit.[…]
-
Страница 365
360 D-Link DNS -327L User Manual Sec tion 4 — Congur ation Search and A dd a Camera Click the Search button to sear ch all available cameras on the network. Select one camera and click Ad d T o to add a camera to the list . (Camera2 is used in this example.)[…]
-
Страница 366
361 D-Link DNS -327L User Manual Sec tion 4 — Congur ation Enter the camera passw ord and click the T est Camera butt on to view streaming video from the c onnected camera. Click Modify to add the camera to the Camer a List. Y ou will see the additional camera on the list. Click Save Settings to continue .[…]
-
Страница 367
362 D-Link DNS -327L User Manual Sec tion 4 — Congur ation A pop-up message conrms the camera was congured succ essfully . Click Ye s . Under Auto Install , check the box b y Enable Auto Install to det ect other IP Cameras the next time you acc ess the LIVE VIEW .[…]
-
Страница 368
363 D-Link DNS -327L User Manual Sec tion 4 — Congur ation Audio and V ideo The Audio and Video screen allo ws you to c ongure all your audio and video settings f or each camera on the Camer a List . Below are instructions for a single camera conguration. Under Setup > Audio and Video , y ou will see Name , Address and Model for all cam[…]
-
Страница 369
364 D-Link DNS -327L User Manual Sec tion 4 — Congur ation V ideo Prole : Select a prole number from the dr op -down list. V ideo F ormat : Choose the video format to use f or your rec ordings. Each format has di erent size and quality characteristics. Fr ame Rate: This is the number of frames per second recor ded. A higher number of fr[…]
-
Страница 370
365 D-Link DNS -327L User Manual Sec tion 4 — Congur ation Recording Setup The Recor ding Setup screen allows you t o congure all your r ecording settings f or each camera on the Camera List . The setup options include Quota Setting, Event Rec ord, and Rec ording mode.[…]
-
Страница 371
366 D-Link DNS -327L User Manual Sec tion 4 — Congur ation Under S etup > Recording Setup , you will see Index number , Name , A ddress, and Used/Quota for all cameras on your Camer a List . If you double — click on the name of the device, y ou will see the conguration options below .[…]
-
Страница 372
367 D-Link DNS -327L User Manual Sec tion 4 — Congur ation Estimated data spac e usage per day (appro x.) C OMPONENT DESCRIPTION Motion Detection When using the Recor d by Schedule mode together with the Motion Detection func tion, you must rst click the Go to W eb link and log in to the camera ’ s web inter face and enable the motion detec[…]
-
Страница 373
368 D-Link DNS -327L User Manual Sec tion 4 — Congur ation Copy Component: If you want to cop y a camera ’ s Recording Setup to other similar cameras, click on the button under the Copy heading. Motion Detection Component: Allows the user t o enable or disable the motion detection function. Here is an example of a camera ’ s Motion Detec tio[…]
-
Страница 374
369 D-Link DNS -327L User Manual Sec tion 4 — Congur ation The Copy Recording Setup window opens. Check the box es by each Camera Name to copy setup t o similar cameras. Click Save to continue. A message pops up that indicates c onguration was successful . Click Ye s to continue.[…]
-
Страница 375
370 D-Link DNS -327L User Manual Sec tion 4 — Congur ation Recording Mode C omponent: Recording Mode with Rec ord by Schedule selected: Click the blue box, b y Alway s Record , t o set normal recording mode . ( This means the camera will alwa ys recor d for a specic period.) Drag your mouse o ver the time frame you w ant to set for r ecording[…]
-
Страница 376
371 D-Link DNS -327L User Manual Sec tion 4 — Congur ation Recording Mode , with Rec ord by Schedule selected: Click the red box, by Motion Detection Record if y ou want to w ait f or motion to be detected befor e the camera begins rec ording. Drag the mouse ov er the time frame you want to set f or recor ding. The selected frames turn to red to[…]
-
Страница 377
372 D-Link DNS -327L User Manual Sec tion 4 — Congur ation T o delete selec ted time frames, click the ligh t blue Delete box. Drag the mouse ov er the selec ted frames you w ant to unselect. The selected frames should no longer be visible. Click Save Settings to nish.[…]
-
Страница 378
373 D-Link DNS -327L User Manual Sec tion 4 — Congur ation Recording Mode , with Rec ord by Schedule selected: If you would like to ha ve cameras rec ording at all times, click Selec t All to ll in all time frames with pr eferred Recor ding Mode .[…]
-
Страница 379
374 D-Link DNS -327L User Manual Sec tion 4 — Congur ation Ev ent Setup The Event Setup conguration t ool displays options for each camer a. The basic settings specify how y ou want your surveillance notications sent. The A dvanced button under E vent Setup takes you to the Notic ation Setup window , where you can congur e your E-mai[…]
-
Страница 380
375 D-Link DNS -327L User Manual Sec tion 4 — Congur ation C OMPONENT DESCRIPTION New Camera A dd Noties you when a new camera is c onnec ted. Camera Delete Noties you when a camera is delet ed from the connected cameras. Connection Lost Noties you when there is a netw ork error . Connection Resumed Noties you when the network is bac[…]
-
Страница 381
376 D-Link DNS -327L User Manual Sec tion 4 — Congur ation T o ac tivate advanced f eatures , click the Advanc ed button. The Notication Setup window pops up . E-mail Settings were originally co vered in this manual on page 237. Ref er to this page if you need mor e details about completing the required elds . Click S av e Settings when do[…]
-
Страница 382
377 D-Link DNS -327L User Manual Sec tion 4 — Congur ation E-Map Upload The E-Map Upload congur ation page allows you t o impor t a schematic illustration of the home or oce space y ou want to monitor using y our IP cameras. T he E-map can be uploaded in JPEG, BMP , GIF , or PNG format to the DNS-327L . Then y ou can access the E-Map from […]
-
Страница 383
378 D-Link DNS -327L User Manual Sec tion 4 — Congur ation Under E-Map Upload , click the Brow se button, and navigate to the location of the E-map you wan t to use. After you select the le, you will see it in the File P ath eld. Click Upload .[…]
-
Страница 384
379 D-Link DNS -327L User Manual Sec tion 4 — Congur ation The image from the le will be displa yed on right side of the screen. The next step is to click and drag a camera name fr om the Camera list to the left of the image. After you dr ag the camera name to the desired location on the image, double- click to set the orientation of the came[…]
-
Страница 385
380 D-Link DNS -327L User Manual Sec tion 4 — Congur ation Y ou will see a pop -up message indicating E-Map was set up successfully . Click Ye s to continue.[…]
-
Страница 386
381 D-Link DNS -327L User Manual Sec tion 4 — Congur ation Backup The Setup > Backup page allows you t o congure the DNS-327L to back up and r estore the IP Camera r ecordings .[…]
-
Страница 387
382 D-Link DNS -327L User Manual Sec tion 4 — Congur ation Under Create New Backup , you can enter the name f or the backup Folder in the eld provided , and click the Brow se button to select a Destination path. The Selec t Path windo w will open. Select a path on the NAS where you want the backup to r eside. Click Apply . If you do not have […]
-
Страница 388
383 D-Link DNS -327L User Manual Sec tion 4 — Congur ation Check the the F older name and the Destination path. F rom the drop-down menus, you can select a Start Date/Time and a Stop Dat e/Time .[…]
-
Страница 389
384 D-Link DNS -327L User Manual Sec tion 4 — Congur ation T o ac tivate the camera you w ould like to use for backup , check the box next to the camera ’ s name. Click Save Settings to nish. The Archive table at the bottom populates after you sav e the data. A pop-up message conrms the new backup was added successfully . Click Ye s to c[…]
-
Страница 390
385 D-Link DNS -327L User Manual Sec tion 4 — Congur ation After you cr eate a new backup, it will appear in the table in the Archiv e section. Y ou can control which archiv e folders are included in the Playback List that is accessible fr om the Playback screen by adding or r emoving a check mark in the Playback List column. If you want to dele[…]
-
Страница 391
386 D-Link DNS -327L User Manual Sec tion 4 — Congur ation Ser ver P or t The Ser ver Port page allows you t o modify the ser ver por ts for the Live V ideo Ser ver , Playback Ser ver and Conguration Server . Y ou may wish to do this if you hav e por t restrictions on your local network. Change the por t numbers using the elds provided and[…]
-
Страница 392
387 D-Link DNS -327L User Manual Sec tion 4 — Congur ation Camera S tatus Log Playback S tatus Note: See detailed description of Status on the pages that follow .[…]
-
Страница 393
388 D-Link DNS -327L User Manual Sec tion 4 — Congur ation Camer a Status and Log The Status congur ation section consists of two things — Camera Status and Log . The Camera Status show s the Connection Status of all the cameras connected to the network, and Lo g shows a history of signicant events tha t occurred with the Sur veillance C e[…]
-
Страница 394
389 D-Link DNS -327L User Manual Sec tion 4 — Congur ation T o back up your log to a t ext le, click the Backup Log button. Select a S a ve A s folder location and click Save . The pop-up message indicates the log is successfully sa ved. Click Y es to continue .[…]
-
Страница 395
390 D-Link DNS -327L User Manual Sec tion 4 — Congur ation T o clear the log, click the Clear Log button. Y ou are asked to verify that you w ant to clear the log. Click Ye s to continue . There will only be one ev ent remaining in your log , under Info , that says Log le w as cleared .[…]
-
Страница 396
391 D-Link DNS -327L User Manual Sec tion 4 — Congur ation My F av orites A pplication The My F avorites Applications section allows users to add applications to the Home section so users can easily access these applications. F ollow these steps to setup easy acc ess to your fav orite apps under the Home tab .[…]
-
Страница 397
392 D-Link DNS -327L User Manual Sec tion 4 — Congur ation Adding A pplications Under M y F avorite Applic ations , click the Add/Remov e button. Click the checkbox below each application you wish t o add to the Home screen. Click Apply to con tinue. The shortcut for the selected application is now visible on the Home scr een.[…]
-
Страница 398
393 D-Link DNS -327L User Manual Sec tion 4 — Congur ation Schedule le and folder backups from an FTP server , web ser ver , or local network share. Alwa ys test the URL bef ore applying changes. This will help to ensure a succ essful download. Applica tions Category: Selec t the type of ser ver that the source les and f olders for the sch[…]
-
Страница 399
394 D-Link DNS -327L User Manual Sec tion 4 — Congur ation Category: Click the HT TP radio button to specify that the sour ce les are located on a web server . URL: Enter the HT TP site address for the scheduled download. Click on T est to verify access to the sit e address and le/folder . If you selected File from the dr op- down list, yo[…]
-
Страница 400
395 D-Link DNS -327L User Manual Sec tion 4 — Congur ation Remote Backups The Remote Backups section allows you to back up y our DNS-327L to another NAS or Linux Server . Or the other way around, fr om a remote NAS or Linux Ser ver to your DNS-327L . Click the Creat e button, located abov e the Remote Backups list, to start the Remote Backup Wiz[…]
-
Страница 401
396 D-Link DNS -327L User Manual Sec tion 4 — Congur ation Remote Backup W izard When you click the Create button, located abov e the Remote Backup list, the Remote Backup Wizard starts. The wizard provides st ep -by-step instructions for a remote backup . Step 1 — Review the ve -step process . Click Nex t to continue. Step 2 — Selec t Ser vi[…]
-
Страница 402
397 D-Link DNS -327L User Manual Sec tion 4 — Congur ation Step 3 — Enter L ocal Settings: T ask (Name) — name used to refer t o the backup job, which will appear later in the Remote Backup list. F older Path — click Bro wse and select a local network share folder or le as the target or sour ce for the backup job . Click Nex t to continue. St[…]
-
Страница 403
398 D-Link DNS -327L User Manual Sec tion 4 — Congur ation Step 5 — Continue Remote Settings: Remote Pa th — Fr om the drop- down menu, select the le system (folder) pa th to the remote target or sour ce system for backup. Click Nex t to continue. Step 6 — Enter Schedule Settings: Select S chedule mode from one of the follo wing: • Manual -[…]
-
Страница 404
399 D-Link DNS -327L User Manual Sec tion 4 — Congur ation Step 7 — Click on the Finish button if y ou are satised with the settings of the Backup job created . O ther wise click on the Previous butt on to go back and make changes, or click Exit to close the wizar d without adding a Remote Backup job . Step 8 — Review details of Remote Backup[…]
-
Страница 405
400 D-Link DNS -327L User Manual Sec tion 4 — Congur ation Local Backups Schedule local le and folder backups from the local network shar e of the device or from the local comput er . Always test the URL bef ore applying changes. This will help to ensure a succ essful backup. Category: If your NAS device has two volumes, y ou can click the In[…]
-
Страница 406
401 D-Link DNS -327L User Manual Sec tion 4 — Congur ation T ime Machine The Time Machine section allows the Mac user to congure the DNS-327L so that it becomes a backup destination in the Mac OS® X Time Machine. In order to use this function, Apple F iling Prot ocol (AFP) is requir ed. The AFP ser vice will star t automatically as soon as t[…]
-
Страница 407
402 D-Link DNS -327L User Manual Sec tion 4 — Congur ation Setup W izard Go to Applications > Local Backups > T ime Machine . Under Time Machine Enable/Disable click the Enable Time Machine checkbox. Click the turquoise arrow next to T ime Machine Settings to see the conguration options . Click New under Time Machine Settings to open th[…]
-
Страница 408
403 D-Link DNS -327L User Manual Sec tion 4 — Congur ation Check the box(es) b y the V olume(s) you want t o use for Time Machine destinations and click Nex t to continue. A Summary displays your selected destinations. Click F inish .[…]
-
Страница 409
404 D-Link DNS -327L User Manual Sec tion 4 — Congur ation When the Setup Wizard window closes , you will see the T ime Machine table. Under Time Machine Settings , you will see the V olumes you just selected for the backup process . The V olumes are also viewable in the Finder .[…]
-
Страница 410
405 D-Link DNS -327L User Manual Sec tion 4 — Congur ation Y ou can browse the Volume in F inder to ensure you made the c orrect selection. Go to System P references . Under System , click T ime Machine .[…]
-
Страница 411
406 D-Link DNS -327L User Manual Sec tion 4 — Congur ation F rom the Time Machine screen, click Select Backup Disk … Locat e the DNS-327L V olumes.[…]
-
Страница 412
407 D-Link DNS -327L User Manual Sec tion 4 — Congur ation Select the V olume you want to use f or the backup and click Use Disk . Log in to the server . Enter a Name and P assword . Click Connect .[…]
-
Страница 413
408 D-Link DNS -327L User Manual Sec tion 4 — Congur ation The Time Machine backup process is complete . Review your settings. Note: Y ou can deactivate T ime Machine, by moving the slider fr om ON to OFF . However , this does not delete the Volumes fr om the DNS-327L settings.[…]
-
Страница 414
409 D-Link DNS -327L User Manual Sec tion 4 — Congur ation Delete a V olume Under Time Machine Settings, select the V olume you want to delet e. When you click on a V olume , the row turns red. Click the Delet e button. A pop-up message prompts you to v erify that you want to delet e the V olume. Click Ye s .[…]
-
Страница 415
410 D-Link DNS -327L User Manual Sec tion 4 — Congur ation The V olume is no longer visible in Finder . If you need to remo ve all network shares, click Remove A ll Network Shares . (If not, you can skip the next page of instruc tions.)[…]
-
Страница 416
411 D-Link DNS -327L User Manual Sec tion 4 — Congur ation After all shares ar e removed , you will see an empty table under Time Machine Settings. A pop-up message appears ask ing you to conrm you w ant to remove all shares . Click Y es to continue.[…]
-
Страница 417
412 D-Link DNS -327L User Manual Sec tion 4 — Congur ation USB and MTP Backups The USB Backups section allows the user t o congure the DNS-327L so that it becomes a backup destination f or a USB device that is connected to your NAS. F or example , you can backup data from a USB stor age device to the DNS-327L, or from the NAS to a USB st orag[…]
-
Страница 418
413 D-Link DNS -327L User Manual Sec tion 4 — Congur ation Click on the Save Settings button t o save the MTP Backups settings . Click on the Save Settings button t o save the USB Backups settings . MTP Backups USB Backups MTP Backups: Click Enable to allow your DNS-327L to c opy digital media content fr om a MTP — compatible USB device . Destin[…]
-
Страница 419
414 D-Link DNS -327L User Manual Sec tion 4 — Congur ation 1. Connec t a MTP USB device t o the USB por t on the back panel of the device . The DNS-327L will enter backup mode if MTP Backups has been enabled in the MTP Backup settings. (Ref er to previous page .) 2. Pr ess the USB button to start the back up process . The white USB LED ashes […]
-
Страница 420
415 D-Link DNS -327L User Manual Sec tion 4 — Congur ation 4. When the backup is complete , the ashing white LED will become solid white . Pr ess and hold the USB button on the front of the NAS f or a minimum of ve seconds , and the DNS-327L will unmount the device. 3. Go to S yst em Management > USB Devices . Under USB Stor age Informa[…]
-
Страница 421
416 D-Link DNS -327L User Manual Sec tion 4 — Congur ation 1. Connect a USB storage device t o the USB por t on the back panel of the device . The LED will blink and then become solid once it is r eady for backup , if USB Backups has been enabled in the USB backup settings. (Refer t o page 413.) . 2. Press the USB button on the fr ont of the NAS[…]
-
Страница 422
417 D-Link DNS -327L User Manual Sec tion 4 — Congur ation 3. When the backup is completed , the ashing white LED will become solid white . One way to unmoun t the USB storage device is t o press and hold the USB button at the front of the DNS-327L f or a minimum of ve seconds . The other wa y is, go to Management > Syt em Management &g[…]
-
Страница 423
418 D-Link DNS -327L User Manual Sec tion 4 — Congur ation Go to P2P Downloads > Settings to congur e the P2P (peer-to-peer) download management settings. P2P: Selec t Enable or Disable . Download Schedule: Using the Date/Time table , the user can schedule the P2P downloads. Simply click on the Start Download and Stop Download bo x and sel[…]
-
Страница 424
419 D-Link DNS -327L User Manual Sec tion 4 — Congur ation P2P Download List Under P2P Downloads , the user can add torrent les and view P2P download lists . Add T orren t from URL: I n the eld provided you can c opy and paste a link to a torrent le hosted on the Internet. The P2P download manager will add the torre nt file to the downl[…]
-
Страница 425
420 D-Link DNS -327L User Manual Sec tion 4 — Congur ation Amazon S3 (Simple Storage Service) is an online storage web service oered by A WS (Amazon W eb Services). I t provides a simple web services interface that can be used to store and r etrieve any amount of data a t any time from an ywhere on the web . With Amazon S3 support, it is poss[…]
-
Страница 426
421 D-Link DNS -327L User Manual Sec tion 4 — Congur ation Crea ting an A WS Acc ount Open your web br owser and type the follo wing link for the Amazon W eb Ser vices : http://ww w .a ws.amaz on.com/s3. Then click on the link on the right side of the screen, Sign Up No w . F ollow the instructions to creat e your A WS account.[…]
-
Страница 427
422 D-Link DNS -327L User Manual Sec tion 4 — Congur ation Enter your E-mail address, click the I am a Ne w User radio button, and follow the instructions to select the amount of desired stor age. This creates y our Amazon S3 account. Y ou will be issued the following keys as cr edentials to give y ou access to the accoun t: 1. Acc ess Key ID 2.[…]
-
Страница 428
423 D-Link DNS -327L User Manual Sec tion 4 — Congur ation Y ou can either create a DNS-327L backup , or transfer a rest ore job to the Amazon S3 Cloud Storage. Y ou must provide the da ta requested by the wizard in or der to creat e a backup or restore job . Step 1: Enter Job Name Settings: In the text box by Job Name , enter a 16 character nam[…]
-
Страница 429
424 D-Link DNS -327L User Manual Sec tion 4 — Congur ation Step 2: Enter Remot e Settings: Ac cess K ey ID: Enter the Amazon S3 Acc ess Key ID you w ere assigned when you crea ted your A WS (Amazon W eb Ser vices) account. This is required f or access to Amazon S3 Cloud St orage. Secret Ac cess K ey: Enter the Secret Acc ess Key you w ere assign[…]
-
Страница 430
425 D-Link DNS -327L User Manual Sec tion 4 — Congur ation Step 4: Enter L o cal Settings: Use the Bro wser button to locate the path t o the DNS-327L ’ s le location for either the backup or rest ore job . Click Nex t to continue . Step 5: Enter Schedule Settings: The Schedule Mode for the job can be either Manual (now or later fr om the j[…]
-
Страница 431
426 D-Link DNS -327L User Manual Sec tion 4 — Congur ation Modify Button Once a backup or restor e job is created , the Modify button is used to change the settings described in the Amazon S3 Settings Wizard instructions. When you click on a job in the Amazon S3 table , the text turns red. Click the Modify button if you w ant to edit the setting[…]
-
Страница 432
427 D-Link DNS -327L User Manual Sec tion 4 — Congur ation The free m ydlink ser vice provides DNS-327L users ac cess to Cloud Ser vices. Connect to the m ydlink ser vice from an y location, using any operating system. If you ar e not connecting to the ser vice directly from the DNS-327L, open your bro wser and type in w ww .mydlink.com. Sign in[…]
-
Страница 433
428 D-Link DNS -327L User Manual Sec tion 4 — Congur ation After you sign up f or a my dlink account, check your E-mail bo x. Y ou should receive an E-mail like the one belo w . Click the link to activate your my dlink account. m ydlink V erication[…]
-
Страница 434
429 D-Link DNS -327L User Manual Sec tion 4 — Congur ation Y ou will receive an E-mail that sa ys your E-mail address has been v eried. Y ou can change your P assword and/or updat e your Pr ole Information .[…]
-
Страница 435
430 D-Link DNS -327L User Manual Sec tion 4 — Congur ation When you rst log int o your account , you may see a screen tha t says you need the Jav a Runtime Environment (JRE). This screen has a button that says Do wnload JRE . Note: JRE is also referred t o as Java Virtual Machine. m ydlink Ja va Runtime En vironment[…]
-
Страница 436
431 D-Link DNS -327L User Manual Sec tion 4 — Congur ation The Jav a download takes a few steps . F ollow the instructions:[…]
-
Страница 437
432 D-Link DNS -327L User Manual Sec tion 4 — Congur ation After you install Jav a , you will see the Security Information window . Click Run to run the mydlink applica tion. When prompted , enter the P assword and click OK .[…]
-
Страница 438
433 D-Link DNS -327L User Manual Sec tion 4 — Congur ation Once you ar e connected, you can view y our existing storage on the Cloud and on your DNS-327L. Y ou can also upload and download les using your bro wser , create new f olders, rename f olders and delete folders . (See instruc tions on the next page of this manual.)[…]
-
Страница 439
434 D-Link DNS -327L User Manual Sec tion 4 — Congur ation Click on a V olume to see its conten ts. Buttons at the top of the scr een allow you to Upload and Download les , create a N ew F older , Delete and Rename les.[…]
-
Страница 440
435 D-Link DNS -327L User Manual Sec tion 4 — Congur ation F rom the mydlink por tal, click the New F older button to cr eate a new folder . Crea ting a New F older T o delete a folder , click the check box next to the le you wish to delet e and click the Delete button. A conrmation windo w will appear for you to c onrm the deletion. Cl[…]
-
Страница 441
436 D-Link DNS -327L User Manual Sec tion 4 — Congur ation Under the Settings T ab > General Information you can view the pr oper ties of your NAS. This screen displays the Device Name , mydlink No ., Model Name , M AC address (which is associated with your ac count and NAS), and your device activation time and date . Y ou can also see the ro[…]
-
Страница 442
437 D-Link DNS -327L User Manual Sec tion 4 — Congur ation Y ou can check the online status of your DNS-327L while connected to mydlink . Y our online status may be one of the following: DNS-327L Status A green checkmark indicates that your NAS is online and r eady for use . A yellow ex clamation point indicat es that your DNS-327L is online, bu[…]
-
Страница 443
438 D-Link DNS -327L User Manual Sec tion 4 — Congur ation Select the device you wish to delete from y our account and click Delete Devic e . A warning message aler ts you that removing the device will r emov e any mydlink functions related to the devic e . Deleting a m ydlink devic e Enter your m ydlink P assword t o proceed with deleting the d[…]
-
Страница 444
439 D-Link DNS -327L User Manual Sec tion 4 — Congur ation Under P role Information , click the Delete acc ount link at the bottom right corner of the screen. Deleting a m ydlink acc ount A warning message asks you if you ar e certain that you want to delete your acc ount at mydlink? Select No , keep it to do nothing or click Y es, delete it […]
-
Страница 445
440 D-Link DNS -327L User Manual Sec tion 4 — Congur ation A new Delete account window appears . Enter your mydlink password . Click Cancel if y ou would like to keep your ac count, or click C onrm Deletion to delete it. Y ou will see conrmation that your accoun t has been deleted. Click on Exit.[…]
-
Страница 446
441 D-Link DNS -327L User Manual Sec tion 4 — Congur ation The m ydlink A cc ess NAS App Acc ess your les anytime , anywhere with your DNS-327L NAS and the my dlink Access-NAS app . Str eam your stored phot os, documents, music , and movies directly to your iOS and A ndroid devices ov er 3G or Wi-F i.[…]
-
Страница 447
[…]
-
Страница 448
443 D-Link DNS -327L User Manual Sec tion 4 — Congur ation C ompatibility mydlink A ccess-NAS is c ompatible with the following models: • DNS-320L ShareCent er 2-Bay Cloud Network Storage Enclosur e • DNS-327L ShareCent er 2-Bay Network Attached Stor age • More coming soon! Note: If you are using a DNS-325 or DNS-345, please use the mydlin[…]
-
Страница 449
444 D-Link DNS -327L User Manual Sec tion 4 — Congur ation Y ou can download the mydlink Ac cess-NAS app fr om links below : iOS (iT unes App Store) https://itunes.apple .com/us/app/my dlink-access-nas/ id531078699?l=zh&mt=8 Android ( Google Play) https://play .google.com/store/apps/details?id=c om.dlink.nas&hl=en[…]
-
Страница 450
445 D-Link DNS -327L User Manual Sec tion 5 — Knowledge Base Knowledge Base Wha t is RAID? RAID , shor t for Redundant Array of Independent Disks , is a combination of two or more disks with the aim of pr oviding fault tolerance and per formance impro vement. There are sev eral dieren t levels of RAID , with each one providing a di erent meth[…]
-
Страница 451
446 D-Link DNS -327L User Manual Sec tion 5 — Knowledge Base RAID 0 provides data striping , which spreads out blocks of data ov er all the drives, but does not provide da ta redundancy. Although per formance is impro ved, the lack of fault tolerance means tha t if one drive fails, all data in the array will be lost. RAID 1 RAID 1 provides mirrorin[…]
-
Страница 452
447 D-Link DNS -327L User Manual Sec tion 5 — Knowledge Base RAID Options Below is a list of the RAID options available on the DNS-327L. Standard RAID — creat es a single volume for one driv e or more drives. JBOD — allows you to cr eate a large virtual disk drive by concatena ting two or more smaller drives t ogether . The individual hard drives t[…]
-
Страница 453
448 D-Link DNS -327L User Manual Sec tion 5 — Knowledge Base RAID 1 — allows you to assig n two disks as a mirrored set. Once you crea te the mirrored set, y ou will see it as a single disk drive. But when you write data t o the mirrored set, it will duplicate the data across all members of the set. This ensures that y our data is protected against[…]
-
Страница 454
449 D-Link DNS -327L User Manual Sec tion 5 — Knowledge Base UPS C onnec tivit y The DNS-327L suppor ts USB UPS (Uninterruptible P ower Supply). This gives users the ability to shar e the UPS on their local network and protect from an abnormal shutdown due t o a power failure . Connect a UPS to the USB port on the back of your NAS . Standalone and […]
-
Страница 455
450 D-Link DNS -327L User Manual Sec tion 5 — Knowledge Base Go to Management > Sy stem Management > USB Devices . Click the turquoise arro w next to UPS S ettings . Ther e are two modes to choose from, S tandalone or Master . Select Standalone to use the UPS only on the DNS-327L or select Master to share the UPS with the network UPS slaves .[…]
-
Страница 456
451 D-Link DNS -327L User Manual Sec tion 5 — Knowledge Base Enter the IP address of the other UPS sla ve on the network. Click the + button if you need t o add more IP addresses . Make sure the DNS-327L and the UPS slaves ar e on the same physical network. Once you ha ve enter ed an IP address, the syst em will check its database for IP addr ess r[…]
-
Страница 457
452 D-Link DNS -327L User Manual Sec tion 5 — Knowledge Base The UPS Settings table will display the IP address(es) you added . Y our DNS-327L is now setup as the network master to notify the network slaves in the ev ent of critical power status .[…]
-
Страница 458
453 D-Link DNS -327L User Manual Sec tion 5 — Knowledge Base Deleting a UPS Sla ve Under Management > Syst em Management > USB Devices > UPS Setting , select the IP address. Y our selection will tur n red. Click Delete . While proc essing your request, ther e will be a message that says , W aiting for UPS Settings … When processing is c […]
-
Страница 459
454 D-Link DNS -327L User Manual Sec tion 5 — Knowledge Base The deleted IP addr ess will no longer be visible in the table under UPS Setting.[…]
-
Страница 460
455 D-Link DNS -327L User Manual Sec tion 5 — Knowledge Base USB P rint Ser ver The DNS-327L featur es a built-in USB print ser ver , giving users the ability to share a printer on their local network. Connect a USB printer to the USB por t on the back of the device. It is impor tant to ensure tha t any of the printer manufacturer ’ s dr ivers ar[…]
-
Страница 461
456 D-Link DNS -327L User Manual Sec tion 5 — Knowledge Base Select the pr inter driver by using the installed Manufacturer list or click the Hav e Disk button to brow se for the printer driver le . Click OK to continue . The W indows ® Add P rinter Wizard will launch: Connect to your device with Samba and then double- click the lP icon.[…]
-
Страница 462
457 D-Link DNS -327L User Manual Sec tion 5 — Knowledge Base Make sure the correct drive is selected and click OK to install the printer . The printer is now installed and the print er queue will appear .[…]
-
Страница 463
458 D-Link DNS -327L User Manual Sec tion 5 — Knowledge Base Setting up a Prin ter U sing Mac OS® X 10.8 Go to Management > Sy stem Management > USB Devices to view the printer attached to y our NAS. Go to Management > S ystem Managemen t > Device > De vice Settings to check settings.[…]
-
Страница 464
459 D-Link DNS -327L User Manual Sec tion 5 — Knowledge Base Download drivers from the r espective printer manufacturer(s) to install on your Mac. ( Y ou need to selec t the proper rmw are for Mac OS 10.8) Go to Sy stem Pref erences > Hardware , and click Print & Scan .[…]
-
Страница 465
460 D-Link DNS -327L User Manual Sec tion 5 — Knowledge Base Within the P rint & Scan window , click the + sign to set up a printer . Within the Add window , click the IP tab .[…]
-
Страница 466
461 D-Link DNS -327L User Manual Sec tion 5 — Knowledge Base Enter the IP A ddress and the Queue information. Note: Under the Queue section, enter “lp ” (where “ lp ” stands for Line Printer). Under Location , Select Printer Software .[…]
-
Страница 467
462 D-Link DNS -327L User Manual Sec tion 5 — Knowledge Base Select your specic printer . (I f you cannot nd a driver f or your printer , download the driver fr om the manufac turer’ s web site and install it.) The IP printer now appears under P rint & Scan . The IP address is clearly visible in the conguration settings .[…]
-
Страница 468
463 D-Link DNS -327L User Manual Appendix A — T echnical Specications T echnical Specications Standards • IEEE 802.3 • IEEE 802.3ab • IEEE 802.3u • AFP • Bonjour • CIFS/SMB • DDNS • DHCP Client • FTP over SSL/TLS, FXP • HT TP/HT TPS • LL TD • NFS • NTP • PnP — X • T CP/IP • UPnP A V • USB 3.0 • W ebDA V Sup[…]
-
Страница 469
464 D-Link DNS -327L User Manual Appendix A — T echnical Specications Backup Management • Schedule Backup from PC to NAS (D-Link ShareCent er™ Sync) • Schedule Local Backups • Schedule Remote Backup • Apple T ime Machine Suppor t • USB Backup • Cloud Backup (Amazon S3) Device Management • Internet Explorer 8+, Mozilla F iref ox 4[…]
-
Страница 470
465 D-Link DNS -327L User Manual Appendix B — C ontacting T echnical Suppor t C ontac ting T echnical Suppor t U .S. and Canadian customers can c ontact D -Link technical suppor t through our website or b y phone. Befor e you contact technical suppor t, please hav e the following r eady : • Model number of the product (e.g . DNS-327L) • Hardwar[…]
-
Страница 471
466 D-Link DNS -327L User Manual Appendix C — W arranty W arr anty Subject to the terms and conditions set forth herein, D-Link Systems, Inc. (“D-Link”) provides this Limited W arranty: • Only to the person or entity that originally purchased the pr oduct from D -Link or its authorized reseller or distributor . • Only for products purchased[…]
-
Страница 472
467 D-Link DNS -327L User Manual Appendix C — W arranty Limited S oft ware W arranty: D-Link warrants that the soft ware portion of the product (“Sof tware ”) will substantially conform to D-Link ’ s then current functional specications for the Software, as set f or th in the applicable documentation, from the date of orig inal retail purc[…]
-
Страница 473
468 D-Link DNS -327L User Manual Appendix C — W arranty • After an RMA number is issued , the defective product must be pack aged securely in the original or other suitable shipping package o ensure that it will not be damaged in tr ansit, and the RMA number must be prominen tly marked on the outside of the pack age. Do not include any manuals or[…]
-
Страница 474
469 D-Link DNS -327L User Manual Appendix C — W arranty Limitation of Liability: T O THE MA XIMUM EXTENT PERMIT TED BY LA W , D -LINK IS NO T LIABLE UNDER ANY CONTRA C T , NEGLIGENCE, STRIC T LIABILIT Y OR O THER LEGAL OR EQUIT ABLE THEORY FOR ANY L OSS OF USE OF THE PRODUC T , INCONVENIENCE OR DA MAGES OF AN Y CHARAC TER, WHETHER DIREC T , SPECIAL[…]
-
Страница 475
470 D-Link DNS -327L User Manual Appendix C — W arranty FC C Stat ement: This equipment has been test ed and found to comply with the limits f or a Class B device, pursuant t o Part 15 of the FCC Rules . These limits ar e designed to pr ovide reasonable prot ection against har mful interference in a r esidential installation. This equipment gener a[…]