-
Contents
-
Table of Contents
-
Troubleshooting
-
Bookmarks
Quick Links
Powered By
eForms
User Guide
Related Manuals for FileMaker Electronic Forms
Summary of Contents for FileMaker Electronic Forms
-
Page 1
Powered By eForms User Guide… -
Page 2: Table Of Contents
WSDOT eForms User Guide Index of Topics Basic Instructions Form Buttons Entering Information Browsing Records Finding Records Menus Printing Layouts Importing and Exporting Records Supported Systems and Printers Glossary of Terms Powered by — March 2010 10-1 Appendix A Page ii…
-
Page 3: Importing And Exporting Records
WSDOT eForms User Guide New for the March 2010 Release We have added more electronic forms: 9 New and 58 Revised FileMaker Pro Runtime Forms If this is your first installation of the WSDOT eForms, please disregard this section This release of the WSDOT eForms will install the Runtime forms in a new directory named WSDOT_Forms\DOTeForms_3.10 in the c:\Program Files\WSDOT_Forms folder.
-
Page 4
WSDOT eForms User Guide 350-092B EF Hot Mix Asphalt Compaction Report (80 Ton) 350-120 EF Reduced Acceptance Criteria Checklist 421-050 EF Design-Build Contract — Minor Change 530-040 EF Supplier Confirmation or Specification Compliance 670-079 EF Standard Prequalification Questionnaire (Ferries) Revised: 130-015 EF Y Agreement Information 140-039 EF… -
Page 5
WSDOT eForms User Guide 272-006 EF Contract — Highway Construction 272-008 EF Contract — Building Construction 272-036C EF Region Ad and Award Contract Proposal — Signature Page 272-036D EF Proposal — Signature Page 272-036H EF Non Collusion and Debarment Affidavit 272-040 EF Certification for Federal Aid Contracts 272-056 EF… -
Page 6: Printing
There are 352 FileMaker Pro Runtime forms available on this release and 15 Adobe Acrobat PDF forms. As more electronic forms become available, they will be added to the system. Please let us know about any desired addtions or any problems with using the system.
-
Page 7: Form Buttons
List View layout using the layout dialog box. The ‘Main Menu’ button will close the current form file and return to the CD Library Electronic Forms Main Menu. The keyboard shrotcut is “Ctrl+W”. eForms User Guide Page 2 — 1…
-
Page 8: Finding Records
Buttons These ‘Forms Buttons’ will be found on all List Views: The ‘Print List’ button will call up the Print Dialog Box. Click on ‘Records Being Browsed’ to print the List View. See section 10 of the User Guide for more information.
-
Page 9: Entering Information
Entering Information Filling in information or entering data is perhaps the easiest and most used function of electronic forms. This section describes the various options available in filling in forms using FileMaker Pro. A New Form Three options are available to fill in a new form (or record): 1.
-
Page 10: Menus
Entering Information Text Fields can contain up to 64,000 characters, however depending how the layout is arranged, not all data may show when printed. The only data that will print is what is displayed within the defined field boundary within that layout. The extra data is still in the database, it will simply not print.
-
Page 11
Entering Information Repeating field in vertical orientation Field #1 Field #2 Field #3 Field #4 Altering data in an Existing Record Altering an existing form is very similar to entering information in a “New Record’. Simply ‘Find’ or ‘Browse’ to the record desired. Either ‘Tab’… -
Page 12: Browsing Records
Browsing Records In ‘Browse’ you can create new records and edit, sort, print, and export them to another file. The records appear in the current layout. FileMaker Pro opens a file in ‘Browse’ mode by default. Status Area Flip through the pages of the book to browse through the records contained in…
-
Page 13
Browsing Records The list view does not include all fields in the database but enough information is included to identify specific records. After a specific record(s) is located you may then switch back to the ‘Form Layout’ to view or print that record on the form. -
Page 14
Finding Records Using Find Mode In ‘Find Mode’ you make ‘Find’ requests to locate records based on selected criteria. The located records become the ‘Found Set’ for browsing, sorting, previewing, and printing. FileMaker Pro switches to Browse after completing a find request. Use ‘Find Mode’… -
Page 15
Finding Records Click on the ‘Perform Find’ button (or press ‘Enter’) to execute Find. Omit Choose this option when you want to include all records except those meeting the selected criteria. Example: “Mary” as the selected criteria with ‘Omit’ checked will find all records except those with “Mary”… -
Page 16
Finding Records eForms User Guide Choose the ‘*’ wildcard to substitute for any number of unknown characters. For example, to find McKineh and McKenneh, type McK*. Page 5 — 3… -
Page 17
FileMaker and Form Menus FileMaker Pro has nine pull-down menus on the menu bar. File Edit View Insert The menu groups, definitions and commands available within each group are as follows. The explanations are also available within FileMaker Pro Help. File Use File menu commands to manage, print, copy, and recover files, set… -
Page 18
FileMaker and Form Menus Records Use Records menu commands to work with records in the file. The Records menu commands are only available in Browse and Preview Modes Scripts Use Scripts menu commands to activate individual commands and scripts. Window Use the Window menu commands to arrange and activate file windows. -
Page 19
Printing Forms eForms User Guide There are several ways that electronic forms may be printed. One way is to use the ‘Print’ buttons provided that use a ‘Script’ to perform a function of FileMaker Pro. The ‘Print’ button will print all pages of the current Layout. -
Page 20
— To print a range of pages, click ‘Pages’ and type the first page in the ‘From’ box and the last page in the To box. — If your printer offers different print qualities, click ‘Print Quality’ and select a print quality option such as a dpi value (dots per inch) or High, Medium, Low, or Draft. -
Page 21: Troubleshooting Printer Problems
These margins are defined by the maximum printable area for the printer selected and is not definable by the user. This causes most of the problems such as multiple pages running onto the next or previous page(s).
-
Page 22
Returns to the CD Library Electronic Forms Main Menu Electronic forms will always have at least two layouts: the Form Layout and a List View Layout. Other layouts may be included as required such as supplements, instructions or related forms. Some form files may also include several different form layouts using a shared database (such as the ‘Special… -
Page 23
Importing and Exporting Records Importing Records into FileMaker Pro You can import records from other FileMaker Pro files or from files created in other applications. To import records from a FileMaker Pro file or files from other applications: 1. Open the destination file. This is the file that will receive the imported records. 2. -
Page 24
Importing and Exporting Records eForms User Guide 4. The fields in the source file will map to the fields in the destination file as shown in the list. You can drag the field names in the ‘Fields In’ list to change where FileMaker Pro maps data. Click the ‘Scan Data’… -
Page 25
Importing and Exporting Records 7. Click on ‘OK’ and FileMaker Pro will do the rest. Exporting Records from FileMaker Pro Exporting records from FileMaker Pro to another application type is just as simple. 1. Open the source file — Locate the source file in the files list and click ‘OK’. Some of the exportable file types are: *.DBF = dBase III and IV *.WKS &… -
Page 26
Importing and Exporting Records eForms User Guide Simply perform a ‘Sort’ (see Section 2, Buttons) prior to importing or exporting. Page 9 — 4… -
Page 27: Supported Systems And Printers
This will cause the bottom of pages to be clipped off. On most printers, the clipping will be fairly minimal and not be a significant problem. Some older printers or printers not tested, may have considerable clipping, enough to be unusable with the Runtime electronic forms. eForms User Guide…
-
Page 28
Long Print Times Several different reasons will cause long print times of electronic forms. Troubleshooting long print times can be difficult. The following causes have been found to cause long print times for users. -
Page 29
Glossary of Terms Browse In Browse you can create new records and edit, sort, print, and export them to another file. Button An object, graphic or icon to which a script is attached so wneh the button is ‘pushed’ the attached script or mini-program will start. Click Clicking means to point the pointer or I-bar on an item in the layout and pressing the mouse or pointer button once. -
Page 30
The PC equivelant is directory or subdirectory. Font A style of text type used by a computer to display text on the screen and for printing. Electronic forms use Arial (Helvetica) and Times New Roman (Times) for display and printing. Found Set Records selected using the Find Mode becomes the Found Set. -
Page 31
Preview usually refers to a screen mode to see how records will look like when printed. Read-Only A Read-Only file cannot be saved, updated or written to. Electronic forms files are located in a Read-Only directory. They must be copied to a directory where the user has read and write priveleges.
This manual is also suitable for:
Eforms
С выходом FileMaker 15 соотвественно обновилась и вся документация по платформе. Вся документацию можно найти в FileMaker 15 Product Documentation Center — это каталог документации на сайте самого FileMaker.
Ниже мы приводим ссылки на наиболее востребованные ресурсы:
Он-лайн справка по FileMaker. Help по FileMaker и раньше был доступен через интернет. Однако с выходом 15-й версии интерфейс справки значительно изменился. Кроме того теперь при вызове справки FileMaker по умолчанию сразу обращается в браузер. Однако, те кто работают офлайн, могут скачать справку отсюда.
FileMaker Pro 15 Functions Reference — справка по функциям FileMaker в формате pdf
То же самое в разделе онлайн справки
FileMaker Pro 15 Script Steps Reference — справка по командам скриптов FileMaker в формате pdf
То же самое в разделе онлайн справки
FileMaker 15 SQL Reference — документация по FiLeMaker SQL. Можно использовать как при работе по ODBC, так и при использовании функции ExecuteSQL (напоминаем, что функция ExecuteSQL поддерживает только SELECT)
FileMaker Go 15 Development Guide — онлайн раздел на сайте FileMaker, содержащий полезную информацию об особенностях разработки для iOS-устройств.
Полезные гайды:
FileMaker Server 15 Getting Started Guide (pdf)
FileMaker 15 WebDirect Guide (pdf)
FileMaker 15 ODBC and JDBC Guide (pdf)
FileMaker Server 15 Custom Web Publishing Guide (pdf)
FileMaker Pr 15 SVG Grammar for Button Icons — документация по формату SVG. Начиная с 14-й версии FileMaker поддерживает работы с иконками в кнопках в формате SVG, с возможностью изменения цвета и добавлению собственных файлов в библиотеку иконок. SVG — это векторные формат, основанный на XML, документация подробно описывает его особенности, хотя большинство разработчиков использует графические редакторы для создания иконок, эта документация тоже может быть полезна.
Читайте также
Посмотреть инструкция для FileMaker Pro 12 бесплатно. Руководство относится к категории фото / видео программы, 3 человек(а) дали ему среднюю оценку 9.1. Руководство доступно на следующих языках: английский. У вас есть вопрос о FileMaker Pro 12 или вам нужна помощь? Задайте свой вопрос здесь
Не можете найти ответ на свой вопрос в руководстве? Вы можете найти ответ на свой вопрос ниже, в разделе часто задаваемых вопросов о FileMaker Pro 12.
Какая операционная система в FileMaker Pro 12 используется?
В FileMaker Pro 12 используется PC, Mac как операционная система.
Инструкция FileMaker Pro 12 доступно в русский?
К сожалению, у нас нет руководства для FileMaker Pro 12, доступного в русский. Это руководство доступно в английский.
Не нашли свой вопрос? Задайте свой вопрос здесь
Устройство:
FileMaker Pro 10
Размер: 4,61 MB
Добавлено: 2023-05-15
Количество страниц: 234
Как пользоваться?
Наша цель — обеспечить Вам самый быстрый доступ к руководству по эксплуатации устройства FileMaker Pro 10. Пользуясь просмотром онлайн Вы можете быстро просмотреть содержание и перейти на страницу, на которой найдете решение своей проблемы с FileMaker Pro 10.
Для Вашего удобства
Если просмотр руководства FileMaker Pro 10 непосредственно на этой странице для Вас неудобен, Вы можете воспользоваться двумя возможными решениями:
- Полноэкранный просмотр -, Чтобы удобно просматривать инструкцию (без скачивания на компьютер) Вы можете использовать режим полноэкранного просмотра. Чтобы запустить просмотр инструкции FileMaker Pro 10 на полном экране, используйте кнопку Полный экран.
- Скачивание на компьютер — Вы можете также скачать инструкцию FileMaker Pro 10 на свой компьютер и сохранить ее в своем архиве. Если ты все же не хотите занимать место на своем устройстве, Вы всегда можете скачать ее из ManualsBase.
FileMaker Pro 10 Руководство пользователя — Online PDF
Ознакомьтесь с подробным руководством пользователя для замечательного творения FileMaker, модель Pro 10. Получите ценную информацию и инструкции, чтобы максимально использовать возможности вашего устройства и оптимизировать взаимодействие с пользователем. Раскройте весь потенциал своего устройства FileMaker Pro 10 с помощью этого подробного руководства пользователя, в котором содержатся пошаговые инструкции и советы экспертов, которые сделают работу с ним легкой и приятной.
Печатная версия
Многие предпочитают читать документы не на экране, а в печатной версии. Опция распечатки инструкции также предусмотрена и Вы можете воспользоваться ею нажав на ссылку, находящуюся выше — Печатать инструкцию. Вам не обязательно печатать всю инструкцию FileMaker Pro 10 а только некоторые страницы. Берегите бумагу.
Резюме
Ниже Вы найдете заявки которые находятся на очередных страницах инструкции для FileMaker Pro 10. Если Вы хотите быстро просмотреть содержимое страниц, которые находятся на очередных страницах инструкции, Вы воспользоваться ими.
When you create a new table in FileMaker Pro 19, it starts out with a set of commonly-used default fields. Perhaps these fields aren’t exactly the ones you’d like to start out with — or maybe you don’t want to have any at all. This article will introduce you to how to configure your own set of default fields.
If you’ve configured default fields in previous versions of FileMaker Pro, you may — with a tweak or two — be able to copy just the nodes from the old file to the new one. The enclosing nodes have changed, so don’t copy them. Beyond that, you may want to skim this article to get a sense of what’s different in FileMaker Pro 19.
Just about everything in your FileMaker file is stored as Extensible Markup Language (XML), and the default field settings are no exception. You can find these settings in a file called FMDefaultFields.xml at the following locations:
Mac (view)
/Applications/FileMaker Pro 19/FileMaker Pro 19/Contents/Resources/en.lproj*/FMDefaultFields.xml
* This is the actual application package. To open it, right-click on it and then choose “Show package contents”
** You will see a series of localized folders such as “en.lproj” which is English, “de.lproj” which is German, and so on. Each of these folders contains its own FMDefaultFields.xml file. Choose whichever one matches your language preference in FileMaker Pro.
Windows (view)
C:/Program Files/FileMaker/FileMaker Pro 19/Extensions/English*/FMDefaultFields.xml
* You will see a series of localized directories such as English, Spanish, and Japanese. Each of these folders contains its own FMDefaultFields.xml file. Choose whichever one matches your language preference in FileMaker Pro.
Once you have located the default file, copy it to your desktop or another location where you can edit it. Open it up in a text editor, and you will see XML with the following structure:
<?xml version="1.0" encoding="UTF-8"?>
<FMDefaultFields>
	<ObjectList>
		<Field id="1"...>
			[subnodes describing field options]
		</Field>
		<Field id="2"...>
			[subnodes describing field options]
		</Field>
		...
		<Field id="5"...>
			[subnodes describing field options]
		</Field>
	</ObjectList>
</FMDefaultFields>
The customization process simply involves making changes to the nodes. You can modify them, remove them, or add new ones with appropriate XML representations of the fields you’d like to have created automatically. Of course, the tricky part is getting the XML correct.
One way to figure that out is to create the fields in a new file, export an XML representation of that file, and analyze the portion of the XML representing the fields you created.
Get the Sample Files
Download the sample files to follow along with with my instructions.
- In FileMaker Pro 19, select File > Create New to start creating a new file. A FileMaker Pro dialog window appears, showing various file options.
- Select the Blank option and click the Create button. A file dialog appears.
- Name your file DefaultFieldsTemplate.fmp12 and click the Save button. The file is created. If you have enabled the preference Use Manage Database dialog to create files, the Manage Database dialog appears. If you have not, select File > Manage > Database… to open this dialog.
- Modify the fields in this table to meet your requirements, changing, deleting, and adding fields as you choose. The resulting table should include only those fields that you want as your defaults.
For example, I like my primary key to start with “__pk_TableName” so that’s what I call the field (substituting the actual table name later). Now that the FileMaker Migration Tool helps to coordinate serial numbers during data migrations, I find that I prefer serial numbers to UUIDs, so I make that auto-enter change too.
I’ve found that requiring these fields to have a value has gotten me into hot water, so I also remove that requirement from all of them.
Also, while I rely heavily on the standard metadata fields such as Creation Timestamp, CreatedBy, ModificationTimestamp, and ModifiedBy, I make some tweaks to them:
I prepend a “z_” to them to group them together as utility fields. And because I have a thing for parallel grammar (I believe that it reduces cognitive load), I call the timestamp fields “z_CreatedOn” and “z_ModifiedOn” to match “z_CreatedBy” and “z_ModifiedBy”. I also prefer to record the host timestamp rather than the local timestamp of the user, as this helps keep data consistent when users are in multiple time zones.
To give an example of a calculation, I’m exposing FileMaker’s internal record ID, though normally I’d set it up as an auto-enter field. Can you think of any standard utility fields which make more sense to set up as calculations than as auto-enter fields? I’d love to hear about them in the comments.
I also add a field that always contains the value 1. It’s useful in relationships and summary counts.
And finally, I include an auto-enter number field that records the number of times the record has been modified, giving me a sense of the volume of activity that each record has experienced.
- Once your field changes are finished, click Save to close the Manage Database window.Great! But how do you figure out the XML for the changes that you’ve made? Well, some changes – like the field names – are pretty easy to make directly to the default XML. But I recommend you compare an actual file to the default XML.
- Select Tools > Save a Copy as XML. A file dialog appears.
- Name the file FieldExport.xml and click Save.
- Open the FieldExport file (view). It contains an XML representation of your DefaultFieldsTemplate database file. On Mac OS, I use BBEdit as my text editor, but there are lots of good XML editing applications available. Notepad++ works great for Windows OS users.
- Remove the surrounding XML that isn’t relevant to your default fields: only keep the portion in the <FieldForTables/> node (view).
- I like to add a couple of lines of whitespace between the nodes. This makes it much easier for me to read the XML.
At this point, the nodes of FieldExport.xml should be pretty similar to FMDefaultFields.xml, but you can’t copy from one file to the other without making some changes.
- Figure out what needs to be changed and change it (view). This can be a process of trial and error, but here are some guidelines:
DefaultStyle=”” attribute
Remove the DefaultStyle attribute from the Field node (DefaultStyle = “”). I haven’t been able to figure out what this is for…maybe some nifty future feature?
<UUID/> subnode
Remove this subnode completely. It uniquely identifies the field within the file, so it doesn’t make sense to expect it to be duplicated from one instance of the field to the next.subnode
<TableOccurrenceReference/> subnode
Remove this subnode completely. This is important. It essentially tells FileMaker Pro that you are trying to reference a specific table occurrence with a specific UUID – and that’s not going to exist in any file except the one you got it from. Even in that file, I’ve found that it seems to cause the calculation to have a context of “unknown.”
id=”x” attribute
Your set of default fields should have serial IDs starting from 1. If you are adding a new field to the list of default fields – or removing existing ones — make sure that there are no gaps in the IDs.
<TagList/> subnode
I have a lot to say about this one. If you look at the original set of default fields, the primary key field has this:
<TagList primary="True">#_FMI_0 </TagList>
where the “primary” attribute flags this field as the primary key.
The other four default fields have this:
<TagList>#_FMI_0 </TagList>
The “#_FMI_0 ” tag indicates that these are utility fields, which aren’t added to the default layout automatically when a new table is created.
When I perform the Save a Copy as XML command on my fresh new file – where I’ve made no changes to the default fields of the default table – the primary key field shows up with a new tag included:
<TagList primary="True">#^FMI* #_FMI_0 </TagList>
I’m going to guess that the tag “#^FMI* ” is a new way of indicating a primary key (with the “primary” attribute included for backward compatibility). But that’s just a guess… I don’t know why it’s included on an actual instance of the field but not in the default fields file. It’s a little troubling to me that they are tagged differently. It certainly would be great to see a dictionary of the most common tags.
I’ve tried including the extra tag and not including it, and I don’t see a problem either way when a new table is created. Superstitiously, I’m going to recommend that you stick to including only utility fields in your default fields file and that you tag all of them only with “#_FMI_0 ” – adding it when it’s not there. But if you can shed more light on this, please leave a comment – I’d like to learn more!
- Copy the FMDefaultFields.xml file from its default location described at the beginning of this article to the following custom location:
- macOS (view)
/Users/Shared/FlieMaker/Shared/FMDefaultFields.xml - Windows (view)
C://ProgramData/FIleMaker/Shared/FMDefaultFields.xml
- Open the file in the custom location.
- Copy all the <Field/> nodes from your FieldExport.xml and paste them over all the <Field/> nodes in the copy of your FMDefaultFields.xml file. Your selection should start with the first <Field…> tag and end with the last <Field/> tag.
- Save your customized FMDefaultFields.xml file. That’s it – you do not have to restart FileMaker Pro 19.
- Switch to your DefaultFieldsTemplate.fmp12 file in FileMaker Pro 19 and try creating a new table.
- Are your custom default fields created automatically with the settings you specified? If not, review your FMDefaultFields.xml file for syntax errors. And if you discover something that I’ve missed, please let me know in a comment.
One unexpected behavior that I’ve noticed is that calculations (both regular and auto-enter) that reference other fields first appear to be commented out. But if I commit the table and then re-open the Manage Databases… window, the issue is magically resolved. Since I’m looking at a preview copy, this may be a bug that will be resolved by launch.
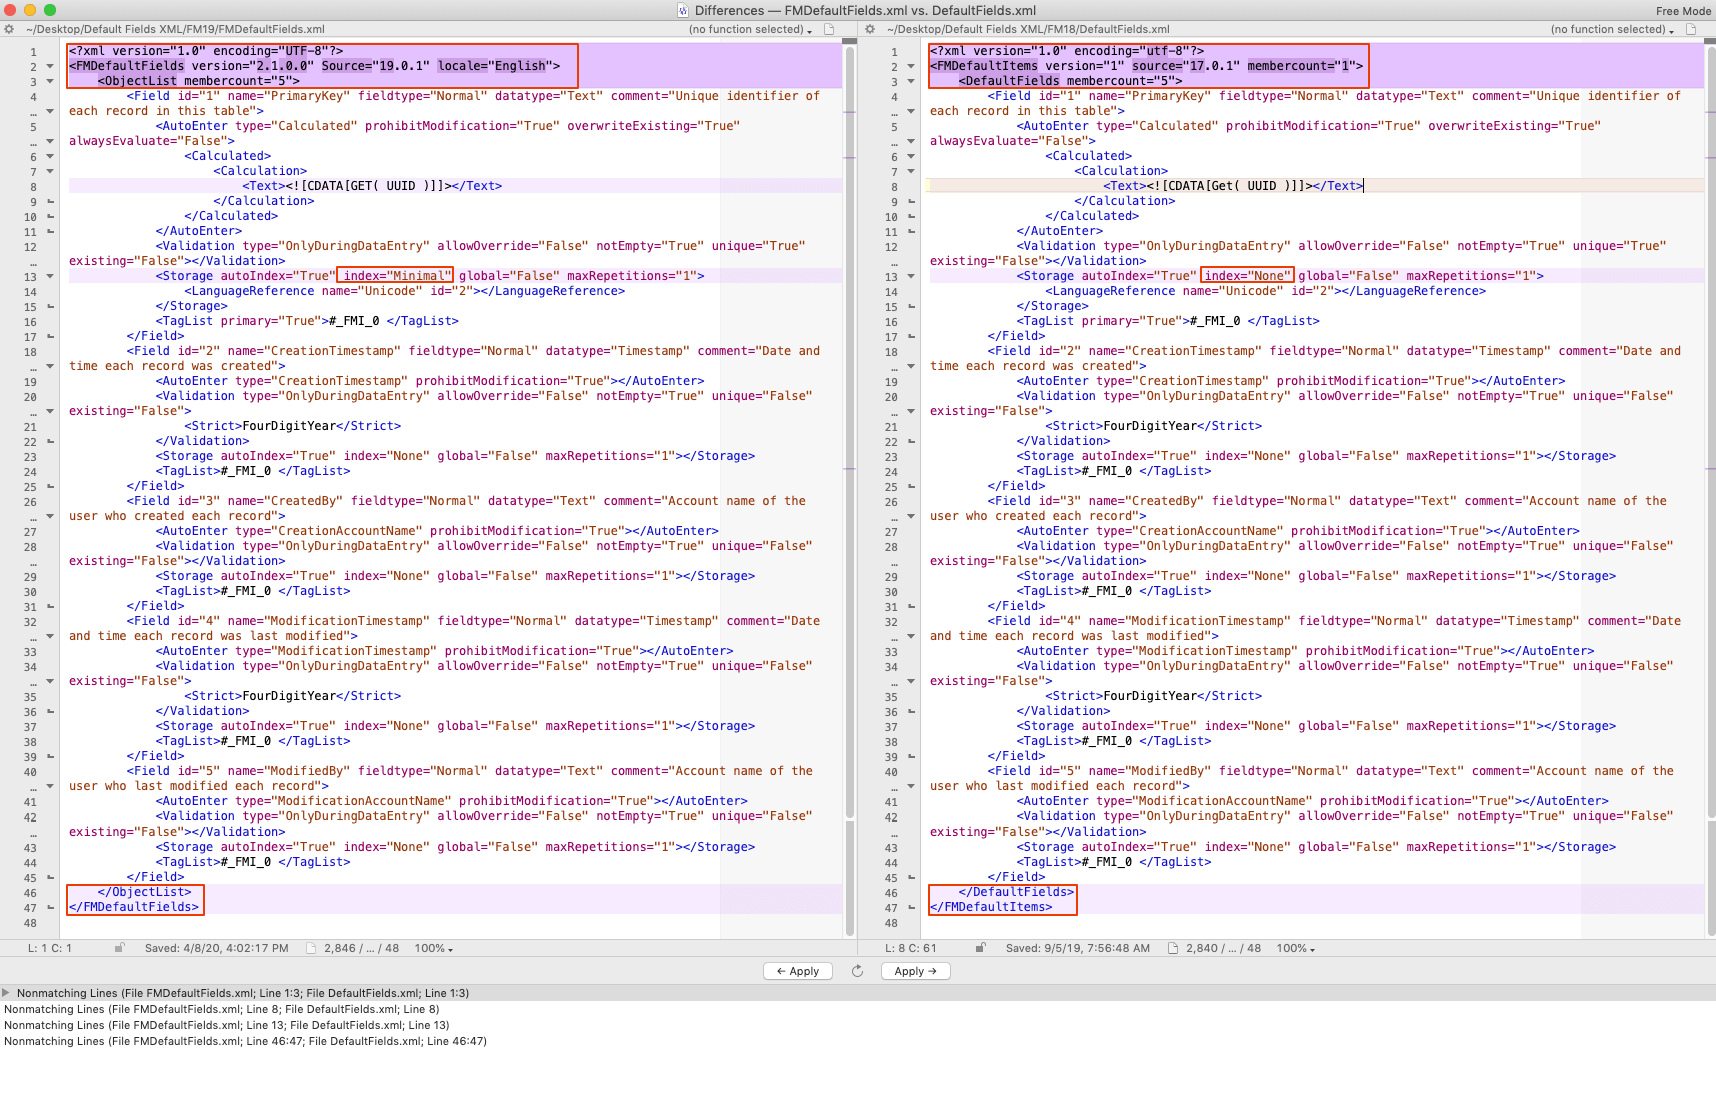
File Differences in FileMaker 19
In summary, although the filename has changed along with a few of the enclosing nodes, there isn’t a huge difference in the overall structure of the new FMDefaultFields.xml file. Likewise, although FileMaker Pro 19 adds some new nodes and attributes to how it represents fields, these differences are easy to accommodate as well.
So put your best field forward when starting a new file — and have some fun doing it!
Moving Forward in FileMaker 19
See more of our insights and resources on FileMaker 19 here. If you have any questions on how to leverage these new features in your solution, our FileMaker consultants are happy to help.