
1
GB
English,1
Contents
Installation, 2-3
Unpacking and levelling, 2
Electric and water connections, 2-3
The first wash cycle, 3
Technical details, 3
Washing machine description, 4-5
Control panel, 4
Display, 5
MEMO Programme, 5
Starting and Programmes, 6
Briefly: how to start a programme, 6
Programme table, 6
Personalisations, 7
Setting the spin cycle, 7
Setting the Delay Timer, 7
Setting the temperature, 7
Functions, 7
Detergents and laundry, 8
Detergent dispenser, 8
Bleach cycle, 8
Preparing your laundry, 8
Special items, 8
Precautions and advice, 9
General safety, 9
Disposal, 9
Saving energy and respecting the environment, 9
Care and maintenance, 10
Cutting off the water or electricity supply, 10
Cleaning your appliance, 10
Cleaning the detergent dispenser, 10
Caring for your appliance door and drum, 10
Cleaning the pump, 10
Checking the water inlet hose, 10
Troubleshooting, 11
Service, 12
Before calling for Assistance, 12
WASHING MACHINE
WIE 107
Instructions for use
GB
Slovenèina,25
SL
РУССКИЙ,13
CIS
Hrvatski,37
HR
Magyar,49
HU
ЕЛЛЗНЙКБ,61
GR
- Manuals
- Brands
- Indesit Manuals
- Washer
- WIE 107
- Instructions for use manual
-
Contents
-
Table of Contents
-
Troubleshooting
-
Bookmarks
Quick Links
English, 13
Downloaded From WashingMachine-Manual.com Manuals
Related Manuals for Indesit WIE 107
Summary of Contents for Indesit WIE 107
-
Page 1
English, 13 Downloaded From WashingMachine-Manual.com Manuals… -
Page 2
(zobacz rysunek). (zobacz rysunek). (zobacz rysunek). (zobacz na s¹siedniej stronie). (zobacz rysunek) . Downloaded From WashingMachine-Manual.com Manuals… -
Page 3
zobacz rysunek (zobacz obok); zobacz obok ° Po zainstalowaniu pr Downloaded From WashingMachine-Manual.com Manuals… -
Page 4
Pokrêt³o Wyœwietlacz Szufladka œrodków pior¹cych (display) Szufladka na œrodki pior¹ce zobacz str. 8 zobacz str. 7 (zobacz str. 7). Pokrêt³o zobacz str. 7 Wyœwietlacz (display) Downloaded From WashingMachine-Manual.com Manuals… -
Page 5
(zobacz str. 7) zobacz str. 7 Zablokowane drzwiczki pralki: (zobacz str. 12). Downloaded From WashingMachine-Manual.com Manuals… -
Page 6
zobacz str. 8 zobacz str. 7 (zobacz str. 7). 9 0 °C 9 0 °C 6 0 °C 4 0 °C 4 0 °C °C 4 0 °C 4 0 °C 3 0 °C 6 0 °C 4 0 °C °C 3 0 °C °C… -
Page 7
(zobacz str. 8 Downloaded From WashingMachine-Manual.com Manuals… -
Page 8
zobacz str. 6 Tradycyjnego delikatnego zobacz rysunek) zobacz str. 7 Downloaded From WashingMachine-Manual.com Manuals… -
Page 9
• zobacz str. 7 Downloaded From WashingMachine-Manual.com Manuals… -
Page 10
zobacz rysunek ; zobacz rysunek zobacz rysunek : Downloaded From WashingMachine-Manual.com Manuals… -
Page 11
zobacz str. 12 zobacz str. 7). zobacz str. 3). zobacz str. 3). zobacz str. 6 zobacz str. 7). zobacz str. 3 zobacz str. 2). zobacz str. 2 zobacz str. 2 zobacz str. 2 zobacz str. 10 zobacz str. 3 Downloaded From WashingMachine-Manual.com Manuals… -
Page 12
• zobacz str. 11); Downloaded From WashingMachine-Manual.com Manuals… -
Page 13: Table Of Contents
Starting and Programmes, 18 Briefly: how to start a programme, 18 Programme table, 18 Personalisations, 19 Setting the spin cycle, 19 WIE 107 Setting the Delay Timer, 19 Setting the temperature, 19 Functions, 19 Detergents and laundry, 20 Detergent dispenser, 20…
-
Page 14: Installation
Installation Keep this instruction manual in a safe place for Levelling your appliance correctly will provide it with future reference. Should the appliance be sold, stability and avoid any vibrations, noise and shifting transferred or moved, make sure the instruction during operation.
-
Page 15: The First Wash Cycle
Technical details exceed 150 cm in length. Electric connection Model WIE 107 Before plugging the appliance into the mains 59.5 cm wide Dimensions 85 cm high socket, make sure that: 53,5 cm deep •…
-
Page 16: Washing Machine Description
Washing machine description Control panel FUNCTION Buttons START/RESET button START/STOP button Display Control knob Detergent dispenser TEMPERATURE button SPIN DELAY TIMER button button Detergent dispenser to add detergent and fabric FUNCTION buttons: to select the functions softener (see page 20). available.
-
Page 17: Display
Display In addition to being a practical tool to programme your appliance (see page 19), the display provides useful information concerning the wash cycle. Once you have pressed the START/RESET button to start the programme, the display will indicate the amount of time left until the end of the wash cycle.
-
Page 18: Starting And Programmes
Starting and Programmes Briefly: starting a programme 5. Add the detergent and any fabric softener (see page 20). 1. Turn the washing machine on by pressing button 6. Start he programme by pressing the START/RESET 2. Load your laundry into the washing machine and button.
-
Page 19: Personalisations
Personalisations Setting the spin cycle FUNCTION buttons If, when the appliance is switched on, the KNOB is positioned on a programme with a spin cycle, a fixed appears. Press button and the maximum spin speed allowed for the programme set will be displayed, and the icon flashes.
-
Page 20: Detergents And Laundry
Detergents and laundry Detergent dispenser The use of extra compartment 4 excludes the possibility of using the pre-wash cycle. In addition, Good washing results also depend on the correct the bleach cycle cannot be run with programmes 6 dose of detergent: adding too much detergent won’t (Silk) and Daily (see page 18).
-
Page 21: Precautions And Advice
If you only see a little water through your appliance not be changed. door, this is because thanks to the latest Indesit technology, your washing machine only needs less • This washing machine should only be used by…
-
Page 22: Care And Maintenance
Care and maintenance Cutting off the water or electricity Cleaning the pump supply The washing machine is fitted with a self-cleaning • Turn off the water tap after every wash. This will pump that does not require any maintenance. limit the wear of your appliance’s water system Sometimes, small items (such as coins or buttons) and also prevent leaks.
-
Page 23: Troubleshooting
Troubleshooting Your washing machine could fail to work. Before calling for Assistance (see page 24), make sure the problem can’t easily be solved by consulting the following list. Possible causes/Solution: Problem • The appliance is not plugged into the socket, or not enough to The washing machine won’t make contact.
-
Page 24: Service
Service 195042001.00 11/2003 — Xerox Business Services Before calling for Assistance: • Check whether you can solve the problem on your own (see page 23); • Restart the programme to check whether the problem has been solved; • If this is not the case, contact an authorised Technical Service Centre on the telephone number provided on the guarantee certificate.

Instructions for use
WASHING MACHINE
Contents
GB
Installation, 2-3
GB
CIS
SL
Unpacking and levelling, 2
Electric and water connections, 2-3
English,1
ÐÓÑÑÊÈÉ,13
Slovenèina,25
The first wash cycle, 3
Technical details, 3
Washing machine description, 4-5
HR
HU
GR
Control panel, 4
Display, 5
Hrvatski,37
Magyar,4 9
ÅËËÇÍÉÊÁ,61
MEMO Programme, 5
Starting and Programmes, 6
Briefly: how to start a programme, 6
Programme table, 6
Personalisations, 7
Setting the spin cycle, 7
WIE 107
Setting the Delay Timer, 7
Setting the temperature, 7
Functions, 7
Detergents and laundry, 8
Detergent dispenser, 8
Bleach cycle, 8
Preparing your laundry, 8
Special items, 8
Precautions and advice, 9
General safety, 9
Disposal, 9
Saving energy and respecting the environment, 9
Care and maintenance, 10
Cutting off the water or electricity supply, 10
Cleaning your appliance, 10
Cleaning the detergent dispenser, 10
Caring for your appliance door and drum, 10
Cleaning the pump, 10
Checking the water inlet hose, 10
Troubleshooting, 11
Service, 12
Before calling for Assistance, 12
1
Installation
Keep this instruction manual in a safe place for
Levelling your appliance correctly will provide it with
GB
future reference. Should the appliance be sold,
stability and avoid any vibrations, noise and shifting
transferred or moved, make sure the instruction
during operation. If it is placed on a fitted or loose
manual accompanies the washing machine to inform
carpet, adjust the feet in such a way as to allow
the new owner as to its operation and features.
enough room for ventilation beneath the washing
machine.
Read these instructions carefully: they contain vital
information on installation, use and safety.
Electric and water connections
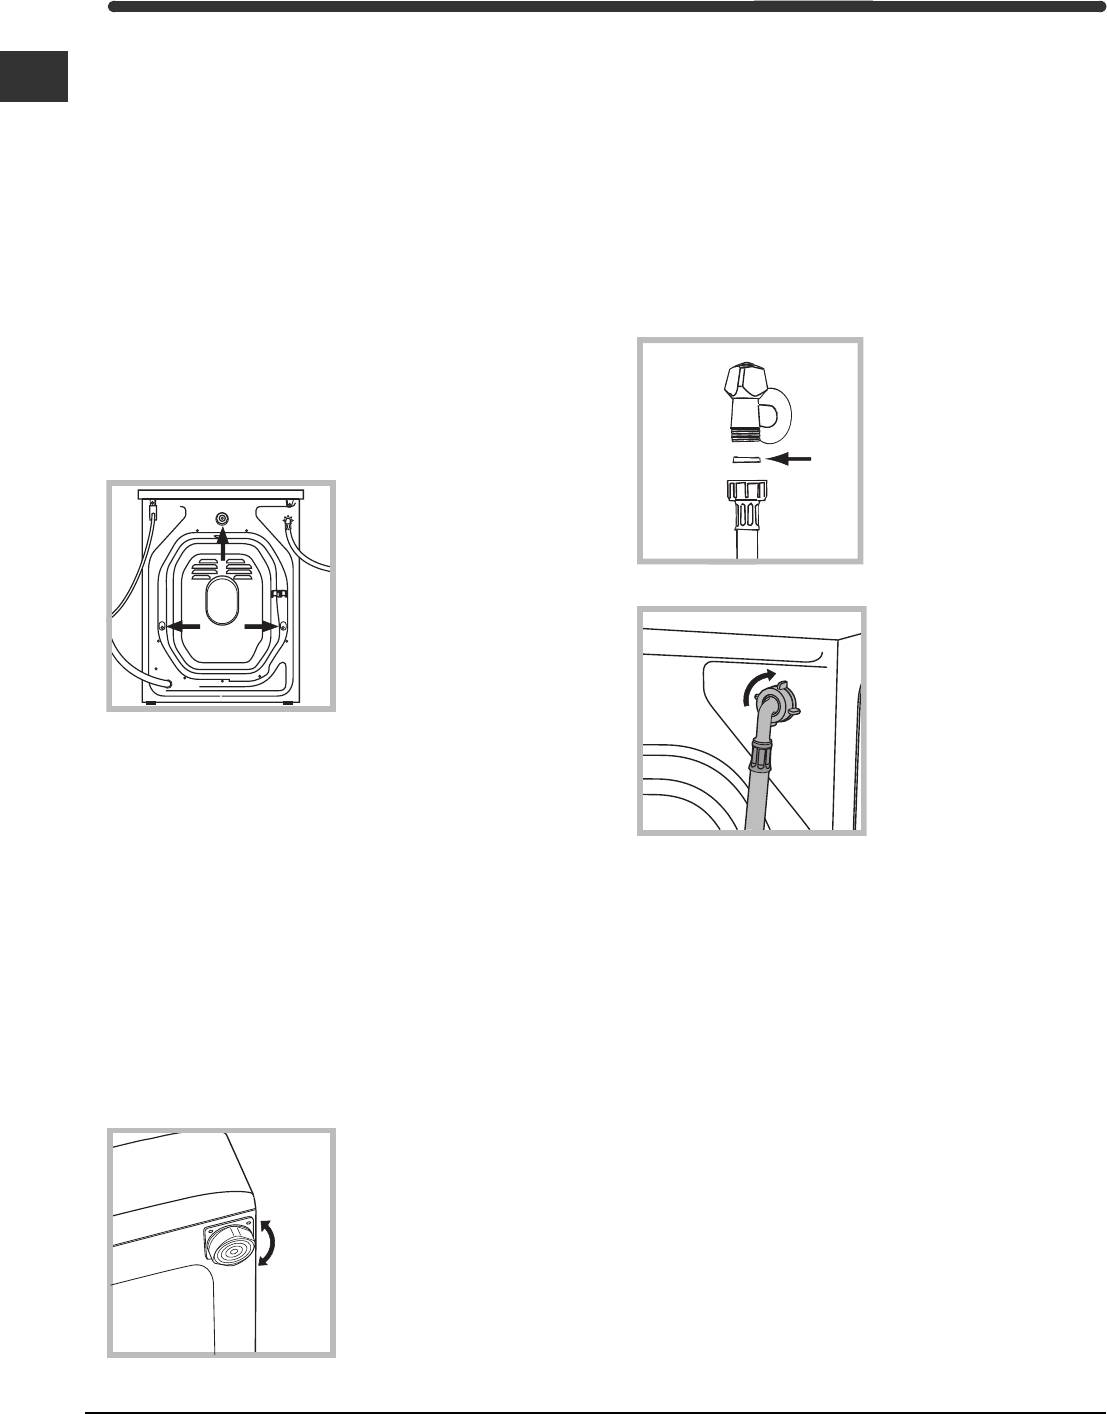
Unpacking and levelling
Connecting the water inlet hose
Unpacking
1. Insert seal A into the
1. Unpack the washing machine.
end of the inlet hose
2. Check whether the washing machine has been
and screw the latter
damaged during transport. If this is the case, do not
onto a cold water tap
install it and contact your retailer.
with a 3/4 gas threaded
A
mouth (see figure).
3. Remove the 3
Before making the
protective screws and
connection, allow the
the rubber washer with
water to run freely until
the respective spacer,
it is perfectly clear.
situated on the rear of
the appliance (see
2. Connect the other end
figure).
of the water inlet hose to
the washing machine,
screwing it onto the
appliance’s cold water
inlet, situated on the top
right-hand side on the
4. Seal the gaps using the plastic plugs provided.
rear of the appliance
5. Use the plug provided to seal the three holes
(see figure).
where the plug was housed, situated on the lower
right-hand side on the rear of your appliance.
6. Keep all the parts: you will need them again if the
3. Make sure there are no kinks or bends in the
washing machine needs to be moved to another
hose.
location.
The water pressure at the tap must be within the
Packaging materials are not children’s toys.
values indicated in the Technical details table
(on the next page).
Levelling
If the water inlet hose is not long enough, contact
1. Install the washing machine on a flat sturdy floor,
a specialist store or an authorised serviceman.
without resting it up against walls, furniture cabinets
or other.
2. If the floor is not
perfectly level, compen-
sate for any unevenness
by tightening or
loosening the adjustable
front feet (see figure);
the angle of inclination,
measured according to
the worktop, must not
exceed 2°.
2
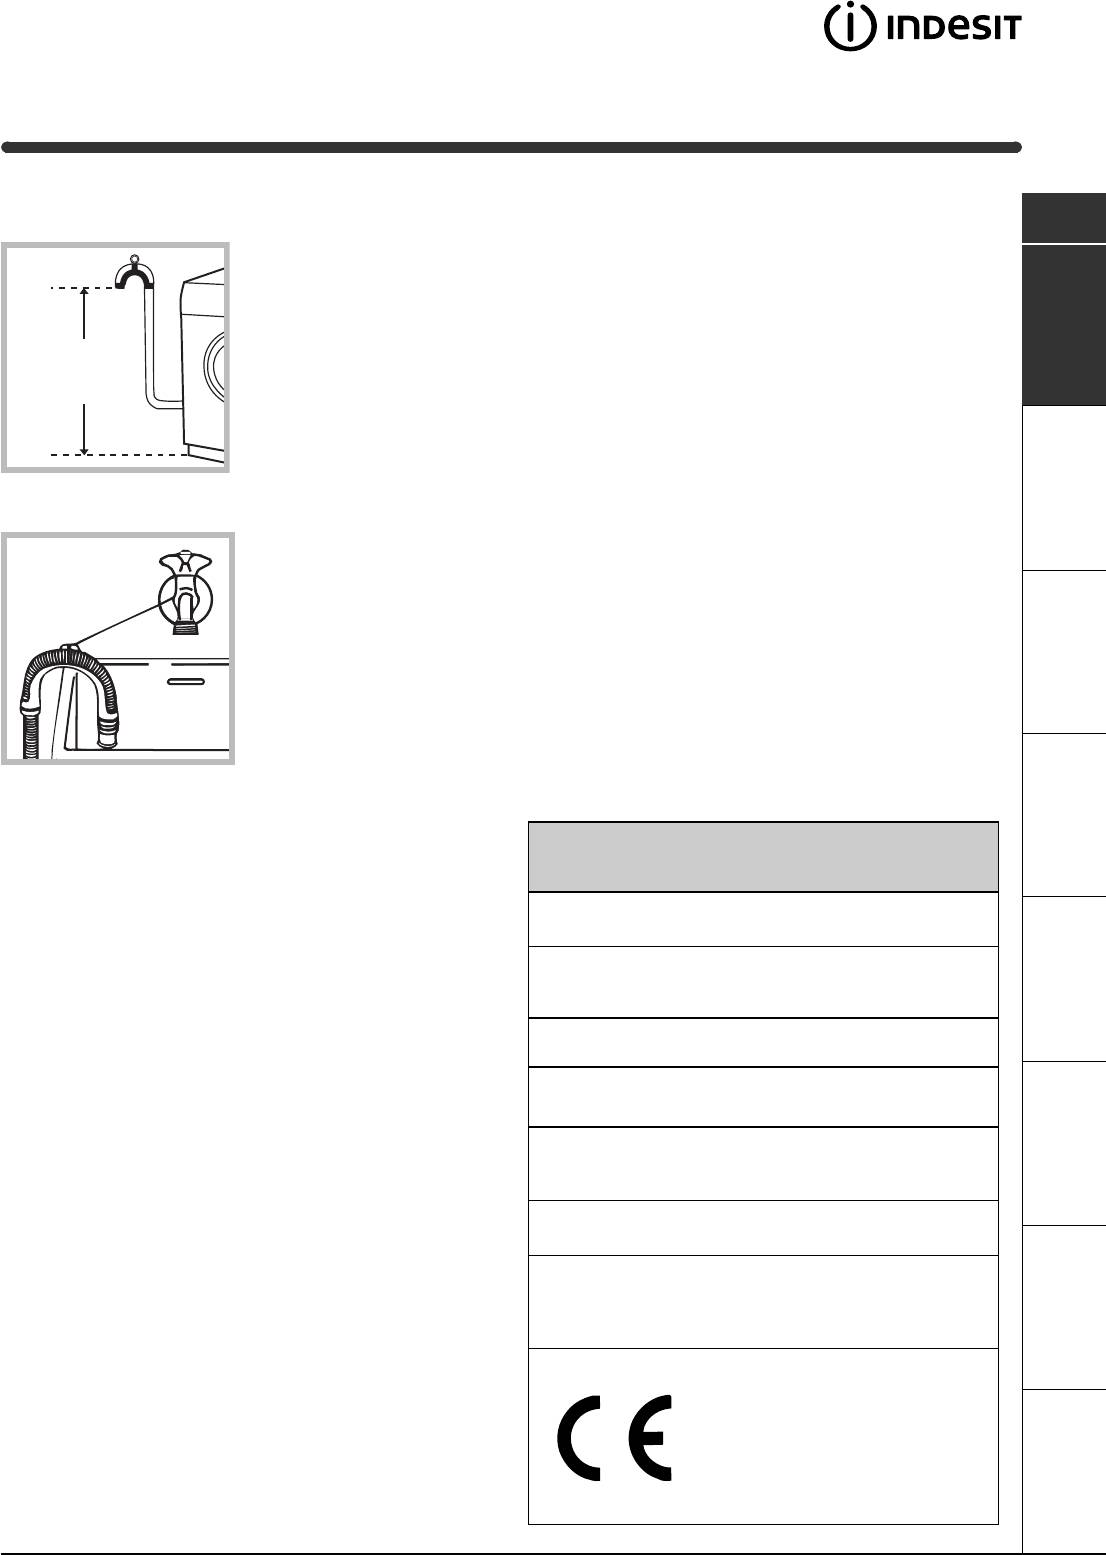
Connecting the drain hose
Do not use extensions or multiple sockets.
GB
Connect the drain hose,
The power supply cable must never be bent or
without bending it, to a
dangerously compressed.
draining duct or a wall
drain situated between
The power supply cable must only be replaced by
65 and 100 cm from
an authorised serviceman.
65 — 100 cm
the floor;
Warning! The company denies all liability if and when
these norms are not respected.
The first wash cycle
Once the appliance has been installed, and before
alternatively, place it
you use it for the first time, run a wash cycle with
over the edge of a
detergent and no laundry, setting the 90°C
basin, sink or tub,
programme without a pre-wash cycle.
fastening the duct
supplied to the tap (see
figure). The free end of
the hose should not be
underwater.
We advise against the use of hose extensions; in
case of absolute need, the extension must have the
same diameter as the original hose and must not
Technical details
exceed 150 cm in length.
Electric connection
Model
WIE 107
Before plugging the appliance into the mains
59.5 cm wide
Dimensions
85 cm high
socket, make sure that:
52.5 cm deep
the socket is earthed and in compliance with the
applicable law;
Capacity
from 1 to 5 kg
the socket is able to sustain the appliance’s
Electric
voltage 220/230 Volts 50 Hz
maximum power load indicated in the Technical
connections
maximum absorbed power 1850 W
details table (on the right);
maximum pressure 1 MPa (10 bar)
Water
minimum pressure 0.05 MPa (0.5 bar)
connections
the supply voltage is included within the values i
drum capacity 46 litres
ndicated on the Technical details table
(on the right);
Spin speed
up to 1000 rpm
Control
the socket is compatible with the washing
programmes
programme 2; temperature 60°C;
machine’s plug. If this is not the case, replace
according to
run with a load of 5 kg.
the socket or the plug.
IEC456 directive
This appliance is compliant with the
The washing machine should not be installed in an
following European Community
outdoor environment, not even when the area is
Directives:
sheltered, because it may be very dangerous to
— 73/23/CEE of 19/02/73 (Low
ServiceTroubleshootingPrecautions CareProgrammes DetergentsInstallation Description
leave it exposed to rain and thunderstorms.
Voltage) and subsequent amendments
— 89/336/CEE of 03/05/89
When the washing machine is installed, the mains
(Electromagnetic Compatibility) and
subsequent amendments
socket must be within easy reach.
3
(Ocr-Read Summary of Contents of some pages of the Indesit WIE 107 Document (Main Content), UPD: 08 August 2023)
-
63, 63 GR Óýíäåóç ôïõ óùëÞíá áäåéÜóìáôïò íåñïý ÓõíäÝóôå ôïí óùëÞíá áäåéÜóìáôïò íåñïý ÷ùñßò íá ôïí ôóáêßóåôå óå ìéá áðï÷Ýôåõóç Þ óå ìéá åðéôïß÷éá áðï÷Ýôåõóç óå ýøïò áðü ôï Ýäáöïò ìåôáîý 65 êáé 100 cm. Ìðïñåßôå åðßóçò íá óôçñßîåôå ôïí óùëÞíá áäåéÜóìáôïò íåñïý óôï ÷�…
-
38, 38 HR Vano je saèuvati ove upute kako bi ste ih mogli prouèiti u svakom trenutku. U sluèaju prodaje, ustupanja ili seljenja, provjeriti da se nalaze zajedno s perilicom kako bi se novog vlasnika obavijestilo o funkcioniranju stroja i o upozorenjima koja se na njega odnose. Pozorno proèitajte upute: one sadre vane obavijesti o postavljanju, uporabi i sigurnosti. Raspakiravanje i izravnavanje Raspakiravanje 1. Raspakirajte …
-
4, 4 GB Control panel Washing machine description Control knob Display Detergent dispenser SPIN button TEMPERATURE button START/STOP button START/RESET button Detergent dispenser to add detergent and fabric softener (see page 8). SPIN button to adjust the spin speed or exclude it altogether (see page 7). DELAY TIMER button to delay the start of the set programme for a maximum period of 24 hours (see page …
-
8, 8 GB Detergent dispenser Good washing results also depend on the correct dose of detergent: adding too much detergent won’t necessarily make for a more efficient wash, and may in fact cause build up on the interior of your appliance and even pollute the environment. Open up the detergent dispenser and pour in the detergent and fabric softener, as follows. compartment 1: Detergent for pre-wash (powder) Before pouring in the de…
-
55, 55 HU Program módosítások SzervizRendellenességekÓvintézkedések KarbantartásProgramok Mosószerek Üzembehelyezés Leírás Centrifugálás beállítása Ha a mosógép bekapcsolásakor a TÁRCSA olyan programra van állítva, amelynél a centrifugálást be kell állítani, az ikon folyamatosan világít. Az gomb megnyomásával megjelenik a beállított programra vonatkozó maximáli…
-
67, Indesit WIE 107 67 GR ÐñïóùðéêÝò Ñõèìßóåéò ÕðïóôÞñéîçÁíùìáëßåòÐñïöõëÜîåéò ÓõíôÞñçóçÐñïãñÜììáôá ÁðïññõðáíôéêÜÅãêáôÜóôáóç ÐåñéãñáöÞ Ñõèìßóôå ôï óôýøéìï Áí êáôÜ ôçí Ýíáñîç ëåéôïõñãßáò ôïõ ìç÷áíÞìáôïò ï ÅÐÉËÏÃÅÁÓ åßíáé ôïðïèåôçìÝíïò óå Ýíá ðñüãñáììá ðï�…
-
21, CIS Ïðåäóïðåæäåíèÿ è ðåêîìåíäàöèè Ñòèðàëüíàÿ ìàøèíà ñïðîåêòèðîâàíà è èçãîòîâëå- íà â ñîîòâåòñòâèè ñ ìåæäóíàðîäíûìè íîðìàìè áå- çîïàñíîñòè. Âíèìàòåëüíî ïðî÷èòàéòå íàñòîÿùèå ïðå- äóïðåæäåíèÿ, ñîñòàâëåííûå â öåëÿõ âàøå…
-
19, ’ CIS Ïåðñîíàëèçàöèÿ ñòèðêè ÏðîãðàììûÓñòàíîâêà Îïèñàíèå ÑåðâèñÍåèñïðàâíîñòè Ìåðû áåçîïàñíîñòè Îáñëóæèâàíèå è óõîä Ìîþùèå ñðåäñòâà Óñòàíîâêà ñêîðîñòè îòæèìà Åñëè, êîãäà ìàøèíà âêëþ÷åíà, Ïðîãðàììàòîð óñòàíîâëåíà íà ïðîãðàììó, ïðåäóñìà�…
-
32, Indesit WIE 107 32 SL Predal za pralna sredstva Dobri uèinki pranja so odvisni tudi od pravilnega odmerjanja pralnih sredstev. Èe z njimi pretiravamo, perilo ni niè bolje oprano, poveèamo pa verjetnost nastajanja usedlin v pralnem stroju in onesnaevanje okolja. Odprite predal za pralna sredstva in v posamezne prekate dajte detergent oziroma dodatke po naslednjih navodilih: Prekat 1: detergent za predpranje (v prahu) Preden odme…
-
46, 46 HR Odravanje i oèuvanje Zatvaranje vode i iskljuèivanje elektriène struje Nakon svakog pranja zatvorite slavinu s vodom. Tako se ogranièava troenje hidrauliènih instalacija perilice i uklanja opasnost gubitka. Iskljuèite utikaè iz struje dok èistite perilicu, kao prilikom izvoðenja radova odravanja. Èiæenje perilice Vanjski dio i gumene dijelove moe se èistiti krpom namoèenom u mlakoj vodi i sapunu. Ne upotrebljavajte rastvorna sred…
-
34, 34 SL Vzdrevanje in èièenje Odklop vodovodne in elektriène napeljave Po vsakem pranju zaprite pipo za dotok vode. Tako zmanjate izrabo vodovodnega sistema v pralnem stroju in prepreèite, da bi voda odtekala. Med èièenjem in vzdrevalnimi deli na pralnem stroju potegnite kabel iz vtiènice. Èièenje pralnega stroja Zunanjost in dele iz gume èistite z krpo, namoèeno v mlaèno milnico. Ne uporabljajte topilnih in abrazivnih èistilnih sredstev. Èièenje preda…
-
50, 50 HU E kézikönyv megõrzése azért fontos, hogy bármikor elõvehesse, és megnézhesse. Ha a mosógépet eladná, átadná vagy másnál helyezné el, gondoskodjon arról, hogy e használati utasítás a géppel együtt maradjon, hogy az új tulajdonos is megismerhesse a mosógép funkcióit és az ezekre vonatkozó figyelmeztetéseket. Figyelmesen olvassa el az utasításokat: fontos információkat tartalmaznak az üzembehelyezésrõl, a használatról és a…
-
35, 35 SL Lahko se zgodi, da pralni stroj ne deluje. Preden se obrnete na servis (glej str. 36), preverite s pomoèjo naslednjega seznama, èe gre za katero od natetih lahko odpravljivih motenj. Motnje in njihovo odpravljanje PomoèMotnjeOpozorila VzdrevanjeProgrami Pralna sredstvaNamestitev Opis Motnje: Pralni stroj se ne vkljuèi. Postopek pranja se ne priène. Pralni stroj se ne polni z vodo (Na prikazovalniku se pok…
-
31, Indesit WIE 107 31 SL Posebne nastavitve PomoèMotnjeOpozorila VzdrevanjeProgrami Pralna sredstvaNamestitev Opis Nastavitev centrifuge Èe je ob vkljuèitvi pralnega stroja GUMB naravnan na program, ki omogoèa nastavitev hitrosti centrifuge, znak miruje (ne utripa). Ob pritisku na tipko se pokae maksimalna hitrost centrifuge, ki jo nastavljeni program omogoèa; znak pri tem utripa. Z nadaljnjim pritiskanjem se hitrost …
-
12, Indesit WIE 107 12 GB Before calling for Assistance: Check whether you can solve the problem on your own (see page 11); Restart the programme to check whether the problem has been solved; If this is not the case, contact an authorised Technical Service Centre on the telephone number provided on the guarantee certificate. Always request the assistance of authorised servicemen. Notify the operator of: the type of problem; the a…
-
51, 51 HU A leeresztõcsõ csatlakoztatása A leeresztõcsövet csatlakoztassa lefolyóhoz vagy a padlótól 65 és 100 cm közötti magasságban lévõ fali lefolyószifonhoz anélkül, hogy megtörné, vagy akassza a mosdó vagy a kád szélére úgy, hogy a tartozékok között lévõ vezetõt a csaphoz erõsíti (lásd ábra). A leeresztõcsõ szabad végének nem szabad vízbe merülnie. To ldások használata nem javasolt. Amennyiben feltétlenül szükséges, a toldás …
-
61, 61 GR ÅËËÇÍÉÊÁ Ðåñéå÷üìåíá ÅãêáôÜóôáóç, 62-63 Áðïóõóêåõáóßá êáé ïñéæïíôßùóç, 62 ÕäñáõëéêÝò êáé çëåêôñéêÝò óõíäÝóåéò, 62-63 Ðñþôïò êýêëïò ðëõóßìáôïò, 63 Ôå÷íéêÜ óôïé÷åßá, 63 ÐåñéãñáöÞ ôïõ ðëõíôçñßïõ, 64-65 Ôáìðëü åëÝã÷ïõ, 64 Ïèüíç, 65 Ðñüãñáììá MEMO, 65 Åêêßíçóç êáé Ðñ�…
-
48, 48 HR Prije pozivanja Servisne slube: provjerite da li sami moete otkloniti nepravilnost (vidi str. 47); ponovno pokrenite program da bi ste provjerili da li je problem otklonjen; U negativnom sluèaju, obratiti se ovlatenoj Tehnièkoj slubi na broj telefona naznaèen na garantnom listu. Nemojte se obraæati neovlatenim tehnièarima. Priopæite: vrstu nepravilnosti; model stroja (Mod.); broj serije (S/N). Ti se po…
More products and manuals for Washers Indesit
| Models | Document Type |
|---|---|
|
WITP 82 |
User Manual
12 pages |
|
WT52 |
User Manual
20 pages |
|
W 105 TX |
User Manual
15 pages |
|
WISL 102 |
User Manual
12 pages |
|
WIT 51 |
User Manual
60 pages |
|
WIE 127 |
User Manual
72 pages |
|
W 63 T |
User Manual
15 pages |
|
WS 642 TX |
User Manual
13 pages |
|
WGS 834 TXR |
User Manual
12 pages |
|
W 93 T |
User Manual
13 pages |
|
WD 125 T |
User Manual
14 pages |
|
PWC 7108 S |
User Manual
24 pages |
|
WIE 127 XS |
User Manual
48 pages |
|
WIXL 105 |
User Manual
72 pages |
|
WITL 106 |
User Manual
72 pages |
|
WIL 105 |
User Manual
60 pages |
|
WD 104 T |
User Manual
14 pages |
|
WIT 61 |
User Manual
72 pages |
|
IWUD 4105 |
User Manual
12 pages |
|
W 145 TX |
User Manual
13 pages |


