- About
- Blog
- Projects
- Help
-
Donate
Donate icon
An illustration of a heart shape - Contact
- Jobs
- Volunteer
- People
Bookreader Item Preview
texts
Kawasaki KLX 250 old service manual
- Addeddate
- 2021-04-02 16:33:42
- Identifier
- manualzilla-id-6033086
- Identifier-ark
- ark:/13960/t0dw27r3f
- Ocr
- tesseract 5.0.0-alpha-20201231-10-g1236
- Ocr_autonomous
- true
- Ocr_detected_lang
- en
- Ocr_detected_lang_conf
- 1.0000
- Ocr_detected_script
- Latin
Cyrillic
Arabic
- Ocr_detected_script_conf
- 0.9951
0.0019
0.0023
- Ocr_module_version
- 0.0.13
- Ocr_parameters
- -l eng+kaz+lat+kir+mkd+Latin+Arabic+Cyrillic
- Ppi
- 600
comment
Reviews
There are no reviews yet. Be the first one to
write a review.
40
Views
DOWNLOAD OPTIONS
Uploaded by
chris85
on
SIMILAR ITEMS (based on metadata)
Материал из Enduro.team
Перейти к: навигация, поиск

Kawasaki KLX250
Ниже представлены прямые ссылки на скачку сервисной документации.
Для Kawasaki KLX 250 (S, SF, R)
- Сервисный мануал (Service Manual) на Kawasaki KLX 250 (KLX250R)
- Сервисный мануал (Service Manual) на Kawasaki KLX 250 (KLX250S, KLX250SF)
Обзор модели
- Kawasaki KLX 250
Категории:
- Сервисная документация
- Kawasaki документация
File Specifications:628/628513-klx250_dtracker_x.pdf file (23 Apr 2023) |
Accompanying Data:
Kawasaki KLX250 D-Tracker X Motorcycle PDF Service Manual (Updated: Sunday 23rd of April 2023 05:21:39 PM)
Rating: 4.4 (rated by 94 users)
Compatible devices: KR-1, Contours 1000GTR, ER-5 2003, A1 1970, Ninja H2 SX 2018, Eliminator 125, ZR1100-C1, 1988 Ninja 250R.
Recommended Documentation:
Service Manual (Text Version):
(Ocr-Read Summary of Contents of some pages of the Kawasaki KLX250 D-Tracker X Document (Main Content), UPD: 23 April 2023)
-
274, 6-10 CLUTCH Clutch Clutch Removal • Drain the engine oil (see Engine Oil Change in the Peri- odic Maintenance chapter). • Remove: Right Engine Cover (see Right Engine Cover Removal). Oil Pump (see Oil Pump Removal in the Engine Lubri- cation System chapter). • Remove: Clutch Pusher [A] Washer [B] Holder [C] • Using the gear holder [A] to prevent the clutch from rotat- ing. Special Tool — Gear Holder:…
-
488, Kawasaki KLX250 D-Tracker X 16-52 ELECTRICAL SYSTEM Starter Motor • Replace the O-ring [A] with a new one. • Install the following parts to the starter motor terminal [B]. O-ring Collar [C] Washer [D] Starter Motor Terminal Locknut [E] Install the collar so that stepped side faces outward. • Tighten: Torque — Starter Motor Terminal Locknut: 11 N·m (1.1 kgf·m, 97 in·lb) • Install the brush springs [A] and insert the brushes [B]. • Apply thin coat of grease to the oil seal [A]. • Replace the …
-
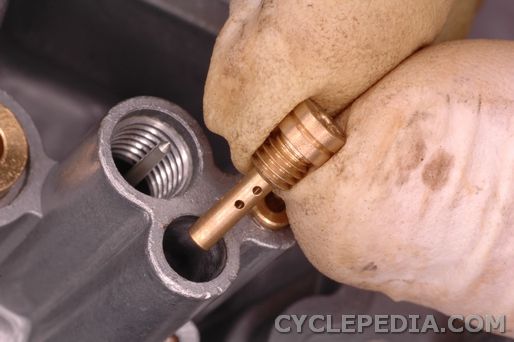
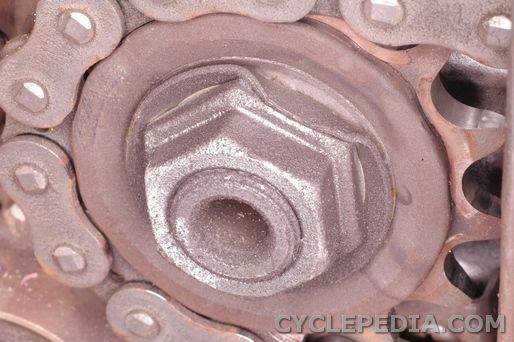
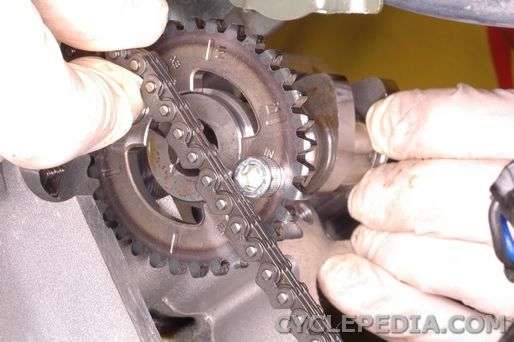
241, ENGINE TOP END 5-19 Camshaft 1st Pin [A] 2nd Pin [B] 32th Pin [C] EX Mark [D] IN Mark [E] Cylinder Head Upper Surface [F] Front [G] • Be sure to install the dowel pins [A]. • Be sure to no damage on the chain guide [A]. If chain guide is damaged, replace it with a new one.
… -
136, Kawasaki KLX250 D-Tracker X 3-52 FUEL SYSTEM (DFI) Inlet Air Temperature Sensor (Service Code 13) Inlet Air Temperature Sensor Removal/Installation NOTICE Never drop the inlet air temperature sensor espe- cially on a hard surface. Such a shock to the sensor can damage it. • Remove the seat (see Seat Removal in the Frame chap- ter). • Disconnect the connector [A] from the inlet air tempera- ture sensor. • Remove the screw [B…
-
29, PERIODIC MAINTENANCE 2-5 Periodic Maintenance Chart *: For higher odometer readings, repeat at the frequency interval established here. Periodic Replacement Parts FREQUENCY Whichever comes first * ODOMETER READING × 1 000 km (× 1 000 mile) 1 12 24 36 48 ITEM Every (0.6) (7.5) (15) (22.5) (30.0) See Page Air cleaner element # — replace 2 years 2-46 Fuel hose — replace 5 years 2-47 Coolant — change 3 …
-
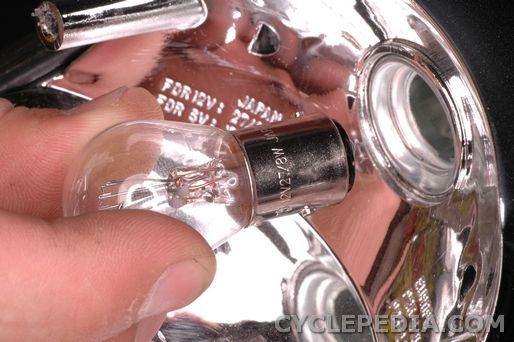
496, 16-60 ELECTRICAL SYSTEM Lighting System • Fit the dust cover with the TOP mark [A] upward. • Check the dust cover onto the headlight body as shown. Correct [A] Incorrect [B] City Light Bulb Replacement (SEA, BR, IN and EUR Models) • Remove the headlight body (see Headlight Body Re- moval). • Pull out the socket [A] together with the bulb. • Remove the wedge-base type bulb [A], pull the bulb straight out of the socket [B]. …
-
510, Kawasaki KLX250 D-Tracker X 16-74 ELECTRICAL SYSTEM Meter, Gauge MODE AND RESET BUTTON Operation Check • Connect the 12 V battery and terminals in the same man- ner as specified in the «Liquid Crystal Display (LCD) Seg- ments Check». • Check that the display [A] change to the ODO, TRIP A and TRIP B displays each time the MODE button [B] is pressed. If the display function does not work, replace the meter assembly. [C] R…
-
521, ELECTRICAL SYSTEM 16-85 Switches and Sensors • Remove: Subthrottle Sensor Connector [A] Bands [B] Sidestand Switch Connector [C] • Remove: Bolt [A] Sidestand Switch Cover [B] Sidestand Switch [C] Sidestand Switch Installation • Install the sidestand switch (see Sidestand Installation in the Frame chapter). • Apply a non-parmanent locking agent to the sidestand switch mounting bolts, and tighten it. Torque — Sidestand Switch Mounting Bolt: 8.8 N·m (0.90 kgf·m, 78 in·l…
-
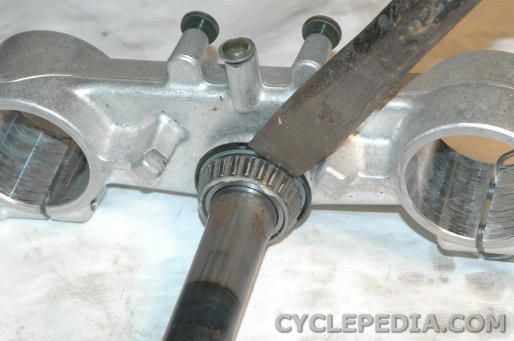
413, STEERING 14-5 Steering Steering Inspection • Refer to the Steering Play Inspection in the Periodic Main- tenance chapter. Steering Adjustment • Refer to the Steering Play Adjustment in the Periodic Maintenance chapter.
… -
215, COOLING SYSTEM 4-13 Water Pump • Clean both sliding surfaces of a new mechanical seal with a high-flash point solvent (e.g. ethyl alcohol), and apply a little coolant to the sliding surface to give the mechanical seal initial lubrication. • Apply coolant to the surfaces of the rubber seal [A] and sealing seat [B], and press the rubber seal and sealing seat into the impeller by hand until the seat bottoms out. • Install the new O-ring on the water pump shaft. • Tighten: Torque — Water…
-
193, FUEL SYSTEM (DFI) 3-109 Throttle Body Assy • Pull out the injector [A] from the delivery pipe [B]. NOTE Do not damage the insertion portions of the injector when they are pulled out from the delivery pipe. NOTICE Never drop the fuel injector especially on a hard surface. Such a shock to the injector can damage it. Throttle Body Assy Assembly • Replace the O-ring [A] of fuel injector and dust seal [B] with a new one. �…
-
297, Kawasaki KLX250 D-Tracker X ENGINE REMOVAL/INSTALLATION 8-5 Engine Removal/Installation Engine Removal • Place a jack [A] under the frame to raise the rear wheel off the ground. Special Tool — Jack: 57001-1238 WARNING Since the swingarm pivot shaft also serves as the engine mounting bolt, removing it may cause the motorcycle to fall over and cause injury. When removing the swingarm pivot shaft, be sure the frame is well supported so the motorcycle will not fall when the pivot is removed. • Squeeze …
-
432, 15-12 FRAME Battery Case Battery Case Removal • Remove: Battery (see Battery Removal in the Electrical System chapter) Bolts [A] Reserve Tank [B] NOTICE Make sure that the reserve tank will not be put up- side down, or the coolant may leak from the over- flow hose. • Remove: Bolt [A] Screw [B] Nut [C] Battery Case [D] Battery Case Installation • Install the battery case so that the projection [A] of the battery case bottom fit hole [B] of the frame.
… -
480, 16-44 ELECTRICAL SYSTEM Ignition System Ignition Coil Primary Peak Voltage Inspection NOTE Be sure the battery is fully charged. • Remove: Left Radiator Shroud (see Radiator Shroud Removal in the Frame chapter) • Pull off the spark plug cap from the spark plug (see Igni- tion Coil Removal). Do not remove the spark plug. • Measure the primary peak voltage as follows. Install the new spark plug [A] into the plug cap, and ground it onto the engine. Set the hand tester to the × DC …
-
Kawasaki KLX250 D-Tracker X User Manual
-
Kawasaki KLX250 D-Tracker X User Guide
-
Kawasaki KLX250 D-Tracker X PDF Manual
-
Kawasaki KLX250 D-Tracker X Owner’s Manuals
Recommended: PROFESSIONAL DUAL MP3/CD PLAYER MCD-810, FMS530, 95105, FORTISSIMO III 7.1, Sub Bravo
Links & Tools
Operating Impressions, Questions and Answers:


The Cyclepedia Kawasaki KLX250 / Kawasaki KLX300 online service manual features detailed full-color photographs and wiring diagrams, complete specifications with step-by-step procedures performed and written by a veteran Kawasaki dealer trained technician.
This manual covers the following motorcycles:
1993-1996 Kawasaki KLX250D (Offroad)
1999-2007 Kawasaki KLX250S D-Tracker (Street)
1997-2007 Kawasaki KLX300 (Offroad)
2008-2014 Kawasaki KLX250T KLX250S (Dual Sport)
2009-2010 Kawasaki KLX250W KLX250SF (Super Moto)
Save time and money be accessing the information you need right now. There are no PDFs to download, no special software to install and no worries about accessing pirated information. If you need additional assistance we’re here to help you – just pick up the phone or open a support ticket. Free technical support with a professional technician is included with your subscription.
When you subscribe you’ll get instant access to the following topics:

Periodic Maintenance
Air Filter, Spark Plug, Drive Chain Inspection & Adjustment, Engine Idle Speed, Throttle Free Play, Spokes, Engine Oil, Compression Check, Valve Inspection, Valve Adjustment

Brakes
Adjustment, Brake Bleeding, Front Brake Pad Replacement, Rear Brake Pad Replacement, Front Brake Caliper, Front Master Cylinder, Rear Brake Caliper, Rear Master Cylinder

Cooling System
Cooling System, Coolant Replacement, Radiators, Water Pump
Fuel System
Carburetor Removal and Installation, Carburetor Disassembly and Inspection
Final Drive
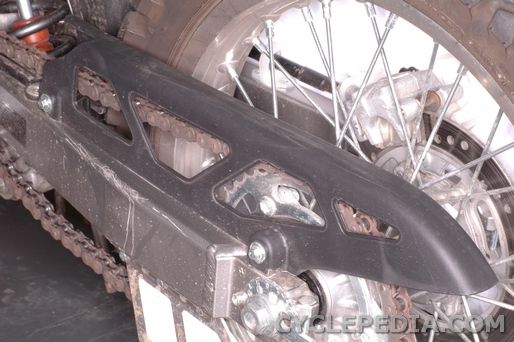
Drive Chain Replacement, Engine Sprocket Replacement, Rear Sprocket Replacement

External Components
Radiator Shrouds, Seat, Fuel Tank, Side Covers
Engine
Camshaft Chain Tensioner, Cylinder Head Cover, Camshaft Removal, Camshaft Installation, Valve Inspection, Valve Adjustment, Clutch, Cylinder Head, Piston and Cylinder, Engine Removal and Installation, Crankshaft and Transmission
Wheels
Front & Rear Wheel Removal

Suspension
Suspension Settings, Front Fork Removal and Installation, Fork Seal Replacement, Swing Arm Removal, Inspection and Installation, Uni-Trak and Shock Absorber, Shock Rebuild
Steering
Steering Bearing Replacement
Electrical System
Digital Meter, Battery, Fuses, Horn, Lights, Charging Components, Charging System, Cooling Fan System, Ignition System, Starter System, Switches, Wiring Diagrams
Online Parts Diagrams
Troubleshooting
Professional Tech Support