XINSTALL BY CLICKING THE DOWNLOAD FILE
This software will repair common computer errors, protect you from file loss, malware, hardware failure and optimize your PC for maximum performance. Fix PC issues and remove viruses now in 3 easy steps:
- Download Restoro PC Repair Tool that comes with Patented Technologies (patent available here).
- Click Start Scan to find Windows issues that could be causing PC problems.
- Click Repair All to fix issues affecting your computer’s security and performance
- Restoro has been downloaded by 0 readers this month.
Visual Basic 6 (VB6) was one of the easiest programming languages to learn back in the day. It was released in 1998 and is now replaced by Visual Basic .NET (VB.NET). Even though it is outdated by several years, the programs created and compiled with VB6 can still work with the latest Windows operating systems which is why you can still find people attempting to install VB6 on Windows 10.
If you’re trying to install VB6 on newer operating systems starting from Windows 8 onward, especially with 64-bit architecture, you are sure to encounter installation problems. These range from not being able to continue the install without first installing discontinued versions of Java to the setup process hanging and crashing.
In this article, we’ll show you how to successfully install Visual Basic 6 (VB6) in Windows 10 64-bit.
Bypass Update Microsoft Virtual Machine for Java Requirement
A computer should always maintain the latest version of Java and it’s pointless having the discontinued Microsoft Virtual Machine for Java on the computer just to install Visual Basic 6. The problem is, the VB6 setup does not allow you to continue with the installation if you untick the “Update Microsoft Virtual Machine for Java” checkbox as it grays out the Next button.

The solution is to bypass the VB6 setup by either tricking it into thinking Microsoft Java is already installed or by telling it not to install Java in the first place. Then you can reach the next phase of the installation.
There are two ways in which you can do this which we’ll list below, you only need to use one of them.
Trick VB6 setup into thinking Microsoft Virtual Machine for Java is Installed
The VB6 installer checks if the file msjava.dll exists in the SysWOW64 folder for 64-bit systems or System32 for 32-bit systems. Placing the file into the right folder will let the VB6 install continue.
a) For the quickest and easiest way of doing this, you can download the msjava.dll file from the link below and copy it to the required directory.
Download MSJava.dll
If you’re unsure about the architecture of your Windows operating system, simply try to copy msjava.dll to the C:\Windows\SysWOW64 folder. If it doesn’t exist, you have a 32-bit system and should copy the file to the C:\Windows\System32 folder instead.
b) Alternatively, the same DLL file is also present on the installation disc. You can extract it if you have an archiver such as 7-Zip installed on your system. Go to the IE4 folder located on the install CD, right click on MSJAVX86.exe, go to 7-Zip and select “Open archive“.
In 7-Zip, double click on javabase.cab which will open it. Look for msjava.dll in the list, drag it onto the Desktop and then copy it to SysWOW64 or System32. Copying to the Desktop first will avoid any access denied error when trying to copy the file directly from 7-Zip.

After copying msjava.dll to either the System32 or SysWOW64 folder, you can launch the Visual Basic 6 setup.exe file to start the installation. It now doesn’t prompt you to update Microsoft Virtual Machine for Java.
Tell VB6 setup Not To Install Microsoft Virtual Machine for Java
If you have the VB6 setup files on your hard drive, it’s possible to edit the settings file for the installer and tell it not to ask for Microsoft Virtual Machine for Java. This will ignore the requirement and continue the install process.
a) The simplest option here is to download the SETUPWIZ.INI file from the link below. As the name implies, this is the setup wizard configuration file. Make sure to download the correct INI for your version of Visual Studio.
Download SETUPWIZ.INI (For Visual Studio 6 Enterprise)
Download SETUPWIZ.INI (For Visual Studio 6 Professional)
Place the INI file in the main installation files folder overwriting the current file. Then start the installation and it won’t ask to install Java.
b) If you want to edit the file manually, go to the main folder and open the SETUPWIZ.INI file with Notepad. Look for the line “VmPath=ie4\msjavx86.exe”.
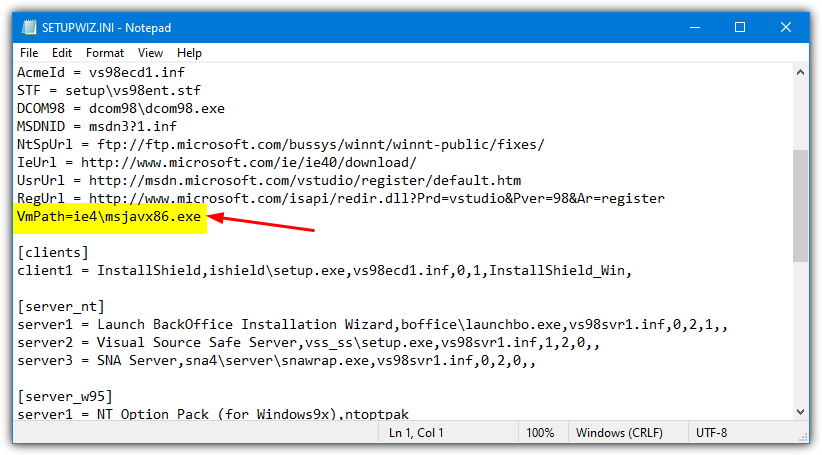
Simply delete the whole line or everything after the “=” sign and save the file. The install can be continued but you must also follow the next steps as well or the installation will not complete successfully.
Change VB6 Setup Options To Prevent The Install From Hanging Or Failing
While fixing the above issue gets round the first hurdle of installing Visual Basic 6 on Windows 10, there are some other things that will cause the install to fail.
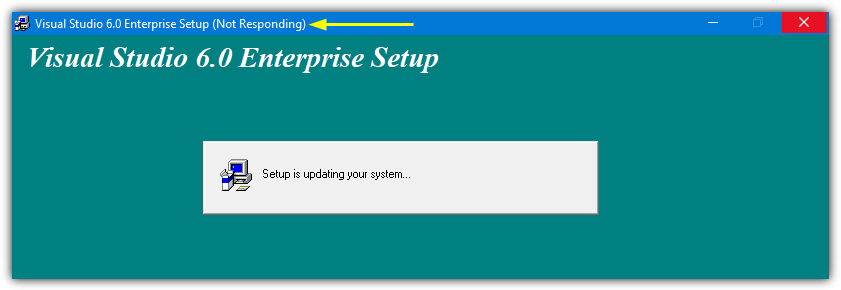
First of all, you will likely experience the “Setup is updating your system…” progress getting stuck and doing nothing else. After a few seconds, the installer becomes unresponsive and then hangs. Looking in Task Manager will show high CPU usage for ACMSETUP.EXE and the setup window has to be closed manually.
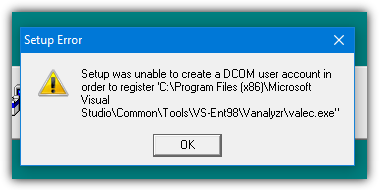
If you fix that, another error that appears will be a “Setup was unable to create a DCOM user account in order to register…valec.exe” message box.
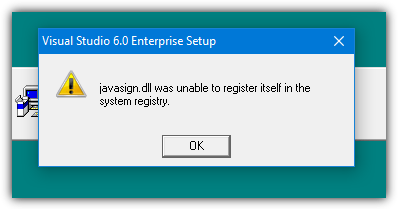
With the default install options, the VB6 installer will likely produce another error message which is “javasign.dll was unable to register itself in the system registry”.
These last two error messages will cause the install to halt with a message saying the setup could not be completed. Since the Visual Basic 6 installer is over 20 years old, there are unsurprisingly some components that will not install properly in Windows 10 which causes the failures. Excluding those components from the install process will allow VB6 to install without errors.
You can use either method below to turn off the options during setup that cause the install to fail.
Disable the Setup Components Automatically
This method is the easiest and requires no manual changes to the setup options during install. We found that the install process is handled by an STF file in the Setup folder on the disc. The optional components are pre-enabled in this file so we found the offenders and disabled them by default.
1. Download the correct file according to the version of Visual Studio you are using. Click on the link below then right click on the grey Download button and select “Save link as” in your browser. This stops the file opening in a browser tab as a text file.
Download VS98ENT.STF (For Visual Studio 6 Enterprise)
Download VS98PRO.STF (For Visual Studio 6 Professional)
2. Make sure that the VB6 install files are on your hard drive as you need to replace the original STF file. You can do that by simply copying all the files from the CD to a folder on your drive. This won’t work if you are trying to install from CD.
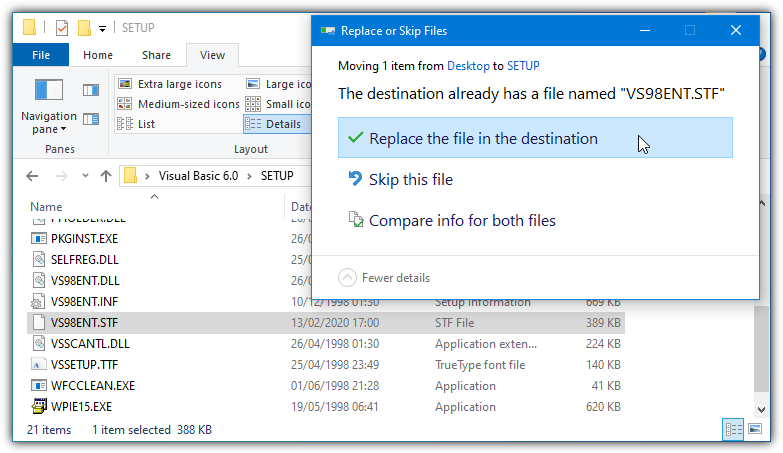
3. Go to the SETUP folder and copy the VS98***.STF you downloaded above replacing the file already there.
4. Run the installer and go through the setup steps as usual. When you reach the component selection window, nothing has to be changed because the edited STF already did it.
Any other options that you want to enable or disable can be changed although you must make sure “Microsoft Visual InterDev 6.0”, “ADO and RDS”, and “Visual Studio Analyzer” remain disabled.
Disable the VB6 Setup Components Manually
This method is useful if you are installing from CD or the automatic option above doesn’t work.
1. During the setup, make sure the Custom install option is selected.
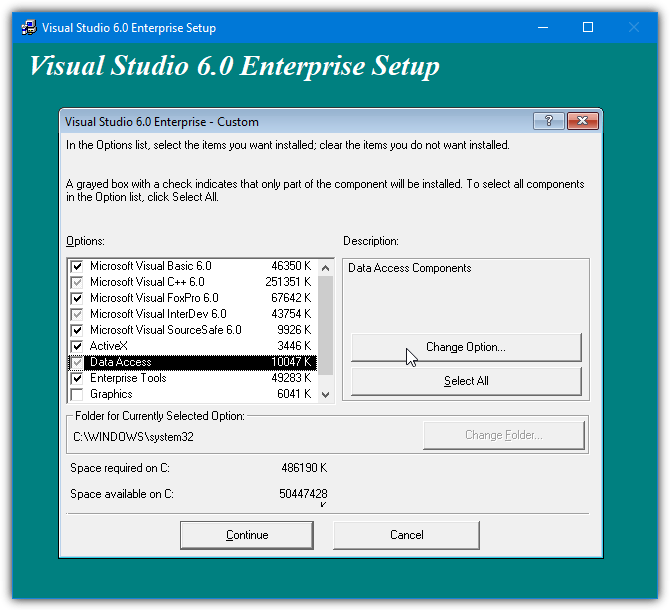
2. Continue the install until you’re asked to choose the components from the list. Highlight Data Access and click the “Change Option…” button to the right, then click “Change Option..” for a second time.
3. Now you’ll get another list of components that belong to the ADO, RDS, and OLE DB Providers. Simply uncheck the first ADO and RDS option.
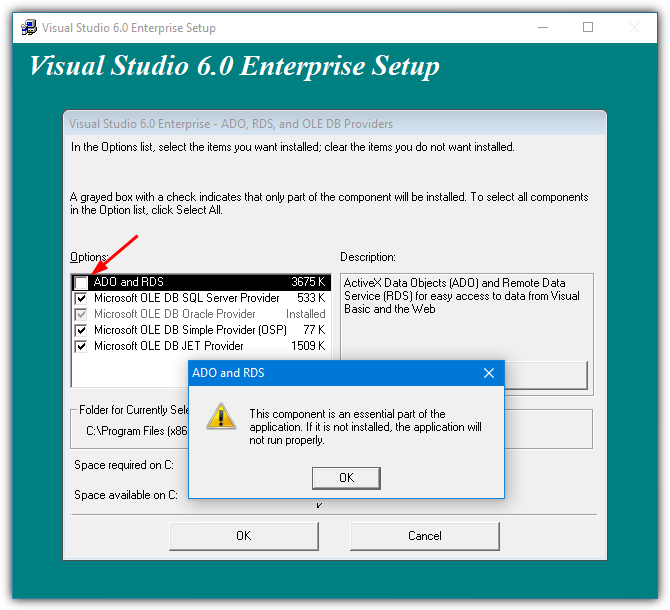
A warning will popup that this component is an essential part of the application and it will not run properly if not installed. Click OK to acknowledge the warning and then click OK two more times to get back to the main install options window.
This will stop the installer hanging and crashing at the updating your system window.
3. Highlight Enterprise Tools and click the “Change Option…” button. At the bottom, uncheck Visual Studio Analyzer and click OK. This option is not in Visual Studio Professional so those users can ignore it.
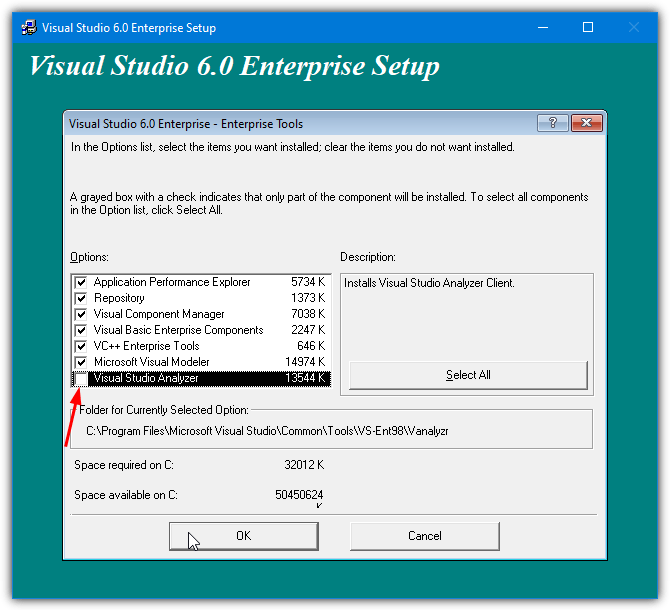
Disabling the Visual Studio Analyzer will stop the DCOM user account error.
4. Uncheck Microsoft Visual InterDev 6.0 box in the main install options window. This will stop the javasign.dll error from appearing during install.
You can, of course, enable or disable other options in this window depending on personal preference. But make sure the components mentioned here are not enabled or the install won’t finish properly. Continue with the install and you should be able to reach the end with no major errors after a reboot.
Run Visual Basic In Compatibility Mode
After the install is complete, Visual Basic 6 should start. If you get an error on the New Project screen, an optional step to help is running VB6 in compatibility mode. In Explorer, navigate to C:\Program Files (x86)\Microsoft Visual Studio\VB98, right click on VB6.exe and select Properties.
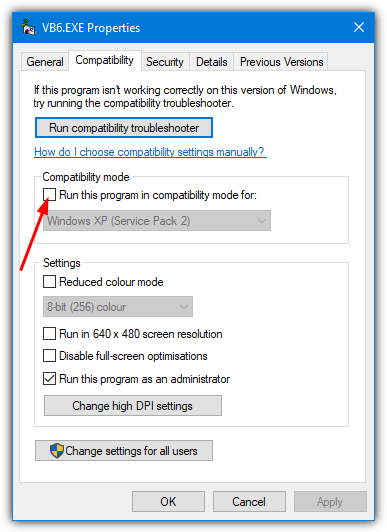
In the Compatibility tab, check the “Run this program in compatibility mode for:” box and click OK. The default option of Windows XP (Service Pack 2) should be fine but you can experiment with Windows Vista or 98/Me if you wish.
Skip to content
VB6 installs just fine on Windows 7, Windows 8 and even Windows 10 with a few caveats.
Just follow instructions bellow to make VisualBasic 6 IDE (VisualStudio) works on your system.
Here is how to install VB6 on Windows 7/8/10
- Before proceeding with the installation process below, create a zero-byte file in
C:\WindowscalledMSJAVA.DLL. The setup process will look for this file, and if it doesn’t find it, will force an installation of old, old Java, and require a reboot. By creating the zero-byte file, the installation of moldy Java is bypassed, and no reboot will be required. - Turn off UAC.
- Insert Visual Studio 6 CD.
- Exit from the Autorun setup.
- Browse to the root folder of the VS6 CD.
- Right-click
SETUP.EXE, selectRun As Administrator. - On this and other Program Compatibility Assistant warnings, click Run Program.
- Click Next.
- Click “I accept agreement”, then Next.
- Enter name and company information, click Next.
- Select Custom Setup, click Next.
- Click Continue, then Ok.
- Setup will “think to itself” for about 2 minutes. Processing can be verified by starting Task Manager, and checking the CPU usage of ACMSETUP.EXE.
- On the options list, select the following:
- Microsoft Visual Basic 6.0
- ActiveX
- Data Access
- Graphics
- All other options should be unchecked.
- Click Continue, setup will continue.
- Finally, a successful completion dialog will appear, at which click Ok. At this point, Visual Basic 6 is installed.
- If you do not have the MSDN CD, clear the checkbox on the next dialog, and click next. You’ll be warned of the lack of MSDN, but just click Yes to accept.
- Click Next to skip the installation of Installshield. This is a really old version you don’t want anyway.
- Click Next again to skip the installation of BackOffice, VSS, and SNA Server. Not needed!
- On the next dialog, clear the checkbox for “Register Now”, and click Finish.
- The wizard will exit, and you’re done. You can find VB6 under Start, All Programs, Microsoft Visual Studio 6. Enjoy!
- Turn On UAC again
What to do after VB6 installation on Windows 7/8/10
You might notice after successfully installing VB6 on Windows 7 that working in the IDE is a bit, well, sluggish. For example, resizing objects on a form is a real pain.
- After installing VB6, you’ll want to change the compatibility settings for the IDE executable.
- Using Windows Explorer, browse the location where you installed VB6. By default, the path is
C:\Program Files\Microsoft Visual Studio\VB98\ - Right click the VB6.exe program file, and select properties from the context menu.
- Click on the Compatibility tab.
- Place a check in each of these checkboxes:
- Run this program in compatibility mode for Windows XP (Service Pack 3)
- Disable Visual Themes
- Disable Desktop Composition
- Disable display scaling on high DPI settings
- If you have UAC turned on, it is probably advisable to check the ‘Run this program as an Administrator’ box
After changing these settings, fire up the IDE, and things should be back to normal, and the IDE is no longer sluggish.
XINSTALL BY CLICKING THE DOWNLOAD FILE
This software will repair common computer errors, protect you from file loss, malware, hardware failure and optimize your PC for maximum performance. Fix PC issues and remove viruses now in 3 easy steps:
- Download Restoro PC Repair Tool that comes with Patented Technologies (patent available here).
- Click Start Scan to find Windows issues that could be causing PC problems.
- Click Repair All to fix issues affecting your computer’s security and performance
- Restoro has been downloaded by 0 readers this month.
Visual Basic 6 (VB6) was one of the easiest programming languages to learn back in the day. It was released in 1998 and is now replaced by Visual Basic .NET (VB.NET). Even though it is outdated by several years, the programs created and compiled with VB6 can still work with the latest Windows operating systems which is why you can still find people attempting to install VB6 on Windows 10.

If you’re trying to install VB6 on newer operating systems starting from Windows 8 onward, especially with 64-bit architecture, you are sure to encounter installation problems. These range from not being able to continue the install without first installing discontinued versions of Java to the setup process hanging and crashing.
In this article, we’ll show you how to successfully install Visual Basic 6 (VB6) in Windows 10 64-bit.
Bypass Update Microsoft Virtual Machine for Java Requirement
A computer should always maintain the latest version of Java and it’s pointless having the discontinued Microsoft Virtual Machine for Java on the computer just to install Visual Basic 6. The problem is, the VB6 setup does not allow you to continue with the installation if you untick the “Update Microsoft Virtual Machine for Java” checkbox as it grays out the Next button.

The solution is to bypass the VB6 setup by either tricking it into thinking Microsoft Java is already installed or by telling it not to install Java in the first place. Then you can reach the next phase of the installation.
There are two ways in which you can do this which we’ll list below, you only need to use one of them.
Trick VB6 setup into thinking Microsoft Virtual Machine for Java is Installed
The VB6 installer checks if the file msjava.dll exists in the SysWOW64 folder for 64-bit systems or System32 for 32-bit systems. Placing the file into the right folder will let the VB6 install continue.
a) For the quickest and easiest way of doing this, you can download the msjava.dll file from the link below and copy it to the required directory.
Download MSJava.dll
If you’re unsure about the architecture of your Windows operating system, simply try to copy msjava.dll to the C:WindowsSysWOW64 folder. If it doesn’t exist, you have a 32-bit system and should copy the file to the C:WindowsSystem32 folder instead.
b) Alternatively, the same DLL file is also present on the installation disc. You can extract it if you have an archiver such as 7-Zip installed on your system. Go to the IE4 folder located on the install CD, right click on MSJAVX86.exe, go to 7-Zip and select “Open archive“.
In 7-Zip, double click on javabase.cab which will open it. Look for msjava.dll in the list, drag it onto the Desktop and then copy it to SysWOW64 or System32. Copying to the Desktop first will avoid any access denied error when trying to copy the file directly from 7-Zip.

After copying msjava.dll to either the System32 or SysWOW64 folder, you can launch the Visual Basic 6 setup.exe file to start the installation. It now doesn’t prompt you to update Microsoft Virtual Machine for Java.
Tell VB6 setup Not To Install Microsoft Virtual Machine for Java
If you have the VB6 setup files on your hard drive, it’s possible to edit the settings file for the installer and tell it not to ask for Microsoft Virtual Machine for Java. This will ignore the requirement and continue the install process.
a) The simplest option here is to download the SETUPWIZ.INI file from the link below. As the name implies, this is the setup wizard configuration file. Make sure to download the correct INI for your version of Visual Studio.
Download SETUPWIZ.INI (For Visual Studio 6 Enterprise)
Download SETUPWIZ.INI (For Visual Studio 6 Professional)
Place the INI file in the main installation files folder overwriting the current file. Then start the installation and it won’t ask to install Java.
b) If you want to edit the file manually, go to the main folder and open the SETUPWIZ.INI file with Notepad. Look for the line “VmPath=ie4msjavx86.exe”.

Simply delete the whole line or everything after the “=” sign and save the file. The install can be continued but you must also follow the next steps as well or the installation will not complete successfully.
Change VB6 Setup Options To Prevent The Install From Hanging Or Failing
While fixing the above issue gets round the first hurdle of installing Visual Basic 6 on Windows 10, there are some other things that will cause the install to fail.
First of all, you will likely experience the “Setup is updating your system…” progress getting stuck and doing nothing else. After a few seconds, the installer becomes unresponsive and then hangs. Looking in Task Manager will show high CPU usage for ACMSETUP.EXE and the setup window has to be closed manually.

If you fix that, another error that appears will be a “Setup was unable to create a DCOM user account in order to register…valec.exe” message box.

With the default install options, the VB6 installer will likely produce another error message which is “javasign.dll was unable to register itself in the system registry”.

These last two error messages will cause the install to halt with a message saying the setup could not be completed. Since the Visual Basic 6 installer is over 20 years old, there are unsurprisingly some components that will not install properly in Windows 10 which causes the failures. Excluding those components from the install process will allow VB6 to install without errors.
You can use either method below to turn off the options during setup that cause the install to fail.
Disable the Setup Components Automatically
This method is the easiest and requires no manual changes to the setup options during install. We found that the install process is handled by an STF file in the Setup folder on the disc. The optional components are pre-enabled in this file so we found the offenders and disabled them by default.
1. Download the correct file according to the version of Visual Studio you are using. Click on the link below then right click on the grey Download button and select “Save link as” in your browser. This stops the file opening in a browser tab as a text file.
Download VS98ENT.STF (For Visual Studio 6 Enterprise)
Download VS98PRO.STF (For Visual Studio 6 Professional)
2. Make sure that the VB6 install files are on your hard drive as you need to replace the original STF file. You can do that by simply copying all the files from the CD to a folder on your drive. This won’t work if you are trying to install from CD.
3. Go to the SETUP folder and copy the VS98***.STF you downloaded above replacing the file already there.

4. Run the installer and go through the setup steps as usual. When you reach the component selection window, nothing has to be changed because the edited STF already did it.
Any other options that you want to enable or disable can be changed although you must make sure “Microsoft Visual InterDev 6.0”, “ADO and RDS”, and “Visual Studio Analyzer” remain disabled.
Disable the VB6 Setup Components Manually
This method is useful if you are installing from CD or the automatic option above doesn’t work.
1. During the setup, make sure the Custom install option is selected.
2. Continue the install until you’re asked to choose the components from the list. Highlight Data Access and click the “Change Option…” button to the right, then click “Change Option..” for a second time.

3. Now you’ll get another list of components that belong to the ADO, RDS, and OLE DB Providers. Simply uncheck the first ADO and RDS option.

A warning will popup that this component is an essential part of the application and it will not run properly if not installed. Click OK to acknowledge the warning and then click OK two more times to get back to the main install options window.
This will stop the installer hanging and crashing at the updating your system window.
3. Highlight Enterprise Tools and click the “Change Option…” button. At the bottom, uncheck Visual Studio Analyzer and click OK. This option is not in Visual Studio Professional so those users can ignore it.

Disabling the Visual Studio Analyzer will stop the DCOM user account error.
4. Uncheck Microsoft Visual InterDev 6.0 box in the main install options window. This will stop the javasign.dll error from appearing during install.
You can, of course, enable or disable other options in this window depending on personal preference. But make sure the components mentioned here are not enabled or the install won’t finish properly. Continue with the install and you should be able to reach the end with no major errors after a reboot.
Run Visual Basic In Compatibility Mode
After the install is complete, Visual Basic 6 should start. If you get an error on the New Project screen, an optional step to help is running VB6 in compatibility mode. In Explorer, navigate to C:Program Files (x86)Microsoft Visual StudioVB98, right click on VB6.exe and select Properties.

In the Compatibility tab, check the “Run this program in compatibility mode for:” box and click OK. The default option of Windows XP (Service Pack 2) should be fine but you can experiment with Windows Vista or 98/Me if you wish.
Мастер установки
Мастер установки Visual Studio 6.0
По умолчанию следующие пакеты не устанавливаются должным образом в Windows 10:
- Visual Studio 6 Enterprise
- Visual Studio 6 Professional
- Visual Basic 6 Enterprise
- Visual Basic 6 Professional
Чтобы установить вышеуказанные пакеты, вам нужно будет либо выполнить множество настроек, либо взломать реестр, либо воспользоваться фантастическим мастером установщика Visual Studio 6.0 от Giorgio Brausi.
Перед запуском вам понадобятся следующие элементы:
- Оригинальные компакт-диски и клавиши Visual Studio / Basic Program
- Оригинальные компакт-диски MSDN
- Visual Studio Service Pack 6
- Мастер установки Visual Studio 6.0
- В Windows 10 build 1511 или более поздней версии вам понадобятся права администратора.
Мастер проведет вас через необходимые шаги для успешной установки Visual Basic 6.
Обратите внимание, что установка серверных приложений в настоящее время невозможна.
Back to the past
Publicado en CodingMarkers el 28 de marzo del 2018

I was recently requested to debug a pre-.NET application Visual Basic, so I had to set up the environment for Windows 98 development… but nowdays all that software is deprecated and has no support. This is what I learned from my experience to get it up and running, but in case you can make a choice, I’d recommend you to rewrite the code in .NET, as this kind of DLL code relies platform, and things have changed a lot in 20 years.
1.- Delete all the files from the previously failed VB6 installation attempts
Be careful to avoid deleting the recent Visual Studio versions, as they may have similar paths.
The Visual Studio 6.0 files are by default under ‘C:Program Files (x86)’ in 64 bits systems.
C:Program Files (x86)Microsoft Visual StudioCommon
C:Program Files (x86)Microsoft Visual StudioMSDN
C:Program Files (x86)Microsoft Visual StudioMSDN98
C:Program Files (x86)Microsoft Visual StudioVB98
C:Program Files (x86)Microsoft Visual StudioVC98
C:Program Files (x86)Microsoft Visual Studio*.HTM
C:Program Files (x86)Microsoft Visual Studio*.TXT
C:Program Files (x86)Common FilesMicrosoft SharedMSDesigners98
C:Program Files (x86)Common FilesMicrosoft SharedMSDN
C:Program Files (x86)Common FilesMicrosoft SharedVS98
C:Program Files (x86)Common FilesMicrosoft SharedWizards98
Clean up the Windows registry entrys: run ‘regedit.exe’ and delete the following keys if they exist.
HKEY_LOCAL_MACHINESoftwareMicrosoftDevStudio
HKEY_LOCAL_MACHINESoftwareMicrosoftHTML Help Collections
HKEY_LOCAL_MACHINESoftwareMicrosoftMSVSDG
HKEY_LOCAL_MACHINESoftwareMicrosoftVisual Basic6.0
HKEY_LOCAL_MACHINESoftwareMicrosoftVisual Component Manager
HKEY_LOCAL_MACHINESoftwareMicrosoftVisual Modeler
HKEY_LOCAL_MACHINESoftwareMicrosoftVisualStudio6.0
HKEY_LOCAL_MACHINESoftwareWow6432NodeMicrosoftDevStudio
HKEY_LOCAL_MACHINESoftwareWow6432NodeMicrosoftHTML Help Collections
HKEY_LOCAL_MACHINESoftwareWow6432NodeMicrosoftMSVSDG
HKEY_LOCAL_MACHINESoftwareWow6432NodeMicrosoftVisual Basic6.0
HKEY_LOCAL_MACHINESoftwareWow6432NodeMicrosoftVisual Component Manager
HKEY_LOCAL_MACHINESoftwareWow6432NodeMicrosoftVisual Modeler
HKEY_LOCAL_MACHINESoftwareWow6432NodeMicrosoftVisualStudio6.0
HKEY_CURRENT_USERSoftwareMicrosoftDevStudio
HKEY_CURRENT_USERSoftwareMicrosoftMSVSDG
HKEY_CURRENT_USERSoftwareMicrosoftVisual Basic6.0
HKEY_CURRENT_USERSoftwareMicrosoftVisual Modeler
HKEY_CURRENT_USERSoftwareMicrosoftVisualFoxPro
HKEY_CURRENT_USERSoftwareMicrosoftVisualStudio6.0
2.- Modify the installation files to adapt them to current tech
First of all you will need a copy of the Visual Studio installer in your hard drive. I copied the content of an old college licensed CD into a folder, and proceeded to edit.
- Open ‘SETUPWIZ.INI’ with a text editor (e.g. Notepad++), and replace ‘VmPath=ie4msjavx86.exe’, which tries to install a really old Java implementation and makes the installation process fail, with an empty va. So the first part of the file should look like this:
[setup wizard]
eula = eula.txt
NTSP = NTsp3nt4sp3_i.exe
NTSpMinVer = 3
IE4 = ie4ie4setup.exe
CommonFilesMin = 50
IEIni=ie4check.ini
WFCClean = setupwfcclean.exe
readme = readmevs.htm
pid = setup.ini
MSDN = setup.exe
Acme = acmboot.exe
AcmeId = vs98ecd1.inf
STF = setupvs98ent.stf
DCOM98 = dcom98dcom98.exe
MSDNID = msdn3?1.inf
NtSpUrl = ftp://ftp.microsoft.com/bussys/winnt/winnt-public/fixes/
IeUrl = http://www.microsoft.com/ie/ie40/download/
UsrUrl = http://msdn.microsoft.com/vstudio/register/default.htm
RegUrl = http://www.microsoft.com/isapi/redir.dll?Prd=vstudio&Pver=98&Ar=register
VmPath=
- You must also edit the ‘SETUP.EXE’ properties. Go to the context menu of the file (right click as default), select properties, and got to the ‘compatibility’ tab. Check that you have selected:
- Compatibility mode: execute as ‘Windows XP (Service Pack 3)’.
- Configuration: ‘execute this program as administrator’.
3.- Execute the wizard installer
- Open the context menu of ‘SETUP.EXE’ and choose ‘run as administrator’.
- Don’t install ‘Source Safe’, as it fails.
- When we get to ‘choose the installation mode’ select ‘Custom’. Then follow these steps:
- Do not install (as they fail):
- Microsoft Visual FoxPro 6.0
- Microsoft Visual InterDev 6.0
- Microsoft Visual SourceDafe 6.0
- ActiveX (obsolete version, generates conflict with the current version)
- Install the unicode libraries: from the custom main menu, select the text ‘Microsoft Visual C++ 6.0’, and the button ‘Change option’ on the right side will be set as active. Click on it and follow a similar process for ‘VC++ MFC and Template Libraries’ and ‘MS Foundation Class Libraries’. Finally select all these options:
- Static libraries
- Shared libraries
- Static libraries for Unicode
- Shared libraries for Unicode
- Browser database
- Source code
- Install the database: from the main ‘Custom’ menu, click on the ‘Data Access’ text , and the button ‘Change option’ on the right side will be set as active. Click on it and make sure that ‘ADO, RDS and OLE DB Providers’ is not selected. You will get a warning message saying that this component is esential for the application, but you should ignore it, as it will crash on Windows 10. Do select only the following options:
- Microsoft ODBC Drivers
- Remote Data Objects and Controls
- Data environment
- Install the tools: from the main ‘Custom’ menu, click on the ‘Enterprise Tools’ text, and the button ‘Change option’ on the right side will be set as active. Check that ‘Visual Studio Analyzer’ is not selected. Therefore, select only:
- Aplication Performance Explorer
- Repository
- Visual Component Manager
- Visual Basic Enterprise Components
- VC++ Enterprise Tools
- Microsoft Visual Modeler
- As the last step, before pressing on ‘Finish’, do not let the program configure the environment vars.
- If you have waited more than 5 minutes and the program is still ‘configuring the system’, you can assume something has gone wrong and the install has been frozen somewhere. Cancel it, clean up (see the first section on top of this post) and start all over again, reading carefully the steps.
- If there is an error message about the Java machine you can ignore it. At that point you should be able by then to run ‘Visual Basic’ without the MSDN help package, so you get the bare bones yet fully functional experience.
4.- Execute the application
Run it always in administrator mode (right click on Visual Basic 6.0, and select ‘run as administrator’). Then, here it is, ready to run and debug ancient DLLs.

❗️ If you want it the program to run using a Microsoft Office 2010 instance, you will need to load some dependencies. Go to ‘Project/References’ and select:
- Visual Basic for Applications
- Visual Basic runtime objects and procedures
- Visual Basic objects and procedures
- OLE Automation
- Microsoft Excel 15.0 Object Library
- Microsoft Word 15.0 Object Library
5.- References
My sources should get the credit they deserve for their help:
- Installing Visual Basic/Studio 6 on Windows 10 | danbrust.net: the blog
- Install Visual Studio 6.0 on Windows 10 — CodeProject
I made this script a while ago because I was having trouble with the installers and fixes I found around the internet. It incorporates all the tricks and tips that I found around the internet into one powershell script.
To run the script you will need to following:
- VB6 Installer
- Service Pack 6
- Mouse Wheel Fix (Optional, set
-SkipMouseWheelswitch to skip.)
Each of the above should be placed in its own folder. If you save (and then dot-source) the script in a folder that contains these three folders it’ll auto-detect everything for you. You can also set your current location in powershell to this folder and copy the script directly to you session and it’ll detect everything as well.
Once the script is dot-sourced or pasted in an elevated powershell instance you can run it by calling Install-VB6.
It also has the following parameters if you want to override any default behaviour:
| Parameter | Type | Usage |
|---|---|---|
Vb6InstallerPath |
String | Path of main VB6 Installer folder |
SP6InstallerPath |
String | Path of Service Pack 6 Installer folder |
SkipMouseWheel |
Switch | Skip installing the Mouse Wheel Fixer folder |
MouseWheelPath |
String | Path of Mouse Wheel fixer. Ignored if -SkipMouseWheel is specified |
Regsvr32Path |
String | Path to regsvr32.exe. Uses ‘%SYSTEMROOT%SysWoW64regsvr32.exe’ if not specified |
RegEditPath |
String | Path to regedit.exe. ‘%SYSTEMROOT%regedit.exe’ if not specified |
OrganizationName |
String | Sets the organization name in the VB6 installer |
Notes:
- The VB6 and SP6 installer don’t like being run from a network drive, so the script will stop if it detects one of the install folders is not on a local drive.
- I’ve only tested this with VB6 Pro, not VB6 Enterprise.
- It doesn’t install MSDN.
Install-VB6.ps1
#Requires -RunAsAdministrator
#Requires -Version 3
<#
.SYNOPSIS
Installs VB6 to the computer.
.DESCRIPTION
Installs VB6 ide with Service Pack 6 and (optional) Mouse Wheel Fix to the local computer.
.PARAMETER Vb6InstallerPath
The path to the VB6 installer folder.
.PARAMETER SP6InstallerPath
The path the the Service Pack 6 installer folder.
.PARAMETER SkipMouseWheel
Skip installing the Mouse Wheel fix.
.PARAMETER MouseWheelPath
The path the Mouse wheel fix folder.
.PARAMETER Regsvr32Path
The path to RegSvr32.exe
.PARAMETER OrganizationName
The organization name
.PARAMETER RegEditPath
The path to regedit.exe
#>
Function Install-VB6{
[CmdletBinding()]
param (
[Parameter(Mandatory=$false)]
[string]$Vb6InstallerPath,
[Parameter(Mandatory=$false)]
[string]$SP6InstallerPath,
[Parameter(Mandatory=$false)]
[switch]$SkipMouseWheel,
[Parameter(Mandatory=$false)]
[string]$MouseWheelPath,
[Parameter(Mandatory=$false)]
[string]$Regsvr32Path,
[Parameter(Mandatory=$false)]
[string]$OrganizationName,
[Parameter(Mandatory=$false)]
[string]$RegEditPath
)
# Tests if the path is a local path. The installer doesn't like network paths.
function Test-LocalDrive{
[CmdletBinding()]
[OutputType([bool])]
param(
[Parameter(Mandatory=$true,
Position=0)]
[string]$Path
)
begin{
$localDrives = Get-WmiObject -Class Win32_logicaldisk -Filter "DriveType<>4" -Property "DeviceID" | Foreach-Object {$_.DeviceID.Replace(":", "")}
}
process{
if(!([bool](Test-Path -Path $Path))){
return $false
}
$item = Get-Item -Path $Path
$drive = $item.PSDrive
if($null -eq $drive){
return $false
}
return ($localDrives -contains $drive.Name)
}
}
function Search-ForFile{
[CmdletBinding()]
[OutputType([System.IO.FileInfo])]
param(
[Parameter(Mandatory=$true,
Position=0)]
[string]$File,
[Parameter(Mandatory=$true,
Position=1)]
[string]$CurrentLocation,
[switch]$IncludeSubDirectory
)
process{
$newPath = $currentLocation
if($IncludeSubDirectory.IsPresent){
$newPath = Join-Path -Path $newPath -ChildPath "*"
}
$newPath = Join-Path -Path $newPath -ChildPath $file
$item = @(Get-Item -Path $newPath)
if($null -eq $item -or $item.Count -eq 0 -or $null -eq $item[0]){
throw ("Could Not find the {0} file." -f $file)
}
return $item[0]
}
}
#region Setting Up File Paths
$currentLocation = $PSScriptRoot
if([System.String]::IsNullOrWhiteSpace($currentLocation)){
$currentLocation = (Get-Location)
}
if([System.String]::IsNullOrWhiteSpace($currentLocation)){
throw "Unable to determine current location"
}
if(!$PSBoundParameters.ContainsKey("Vb6InstallerPath") -or [System.String]::IsNullOrWhiteSpace($Vb6InstallerPath)){
if(!(Test-LocalDrive -Path ($currentLocation))){
Write-Error "The script cannot be ran from a network share."
Write-Host -NoNewLine 'Press any key to continue...';
$null = $Host.UI.RawUI.ReadKey('NoEcho,IncludeKeyDown');
return
}
$installerInfo = Search-ForFile -File "SETUP.EXE" -CurrentLocation $currentLocation -IncludeSubDirectory
$installFolder = $installerInfo.DirectoryName
}
else {
if(!(Test-LocalDrive -Path ($Vb6InstallerPath))){
Write-Error "The VB6 Installer Path cannot be a share."
Write-Host -NoNewLine 'Press any key to continue...';
$null = $Host.UI.RawUI.ReadKey('NoEcho,IncludeKeyDown');
return
}
$installFolder = $Vb6InstallerPath
$installerInfo = Search-ForFile -File "SETUP.EXE" -CurrentLocation $installFolder
}
$installer2Info = Search-ForFile -File "ACMSETUP.EXE" -CurrentLocation $installFolder -IncludeSubDirectory
$installLocation = $installerInfo.FullName
$install2Location = $installer2Info.FullName
if(!$PSBoundParameters.ContainsKey("SP6InstallerPath") -or [System.String]::IsNullOrWhiteSpace($SP6InstallerPath)){
if(!(Test-LocalDrive -Path ($currentLocation))){
Write-Error "The script cannot be ran from a network share."
Write-Host -NoNewLine 'Press any key to continue...';
$null = $Host.UI.RawUI.ReadKey('NoEcho,IncludeKeyDown');
return
}
$SP6Info = Search-ForFile -File "setupsp6.exe" -CurrentLocation $currentLocation -IncludeSubDirectory
$SP6Folder = $SP6Info.DirectoryName
}
else {
if(!(Test-LocalDrive -Path ($SP6InstallerPath))){
Write-Error "The SP6 Installer Path cannot be a network share."
Write-Host -NoNewLine 'Press any key to continue...';
$null = $Host.UI.RawUI.ReadKey('NoEcho,IncludeKeyDown');
return
}
$SP6Folder = $SP6InstallerPath
$SP6Info = Search-ForFile -File "setupsp6.exe" -CurrentLocation $SP6Folder
}
$SP6Location = $SP6Info.FullName
if(!$SkipMouseWheel.IsPresent){
if(!$PSBoundParameters.ContainsKey("MouseWheelPath") -or [System.String]::IsNullOrWhiteSpace($MouseWheelPath)){
if(!(Test-LocalDrive -Path ($currentLocation))){
Write-Error "The script cannot be ran from a network share."
Write-Host -NoNewLine 'Press any key to continue...';
$null = $Host.UI.RawUI.ReadKey('NoEcho,IncludeKeyDown');
return
}
$MouseWheelDllInfo = Search-ForFile -File "VB6IDEMouseWheelAddin.dll" -CurrentLocation $currentLocation -IncludeSubDirectory
$MouseWheelRegistryInfo = Search-ForFile -File "VBA Mouse Wheel Fix.reg" -CurrentLocation $currentLocation -IncludeSubDirectory
}
else {
if(!(Test-LocalDrive -Path ($SP6InstallerPath))){
Write-Error "The Mouse Wheel Path cannot be a network share."
Write-Host -NoNewLine 'Press any key to continue...';
$null = $Host.UI.RawUI.ReadKey('NoEcho,IncludeKeyDown');
return
}
$MouseWheelDllInfo = Search-ForFile -File "VB6IDEMouseWheelAddin.dll" -CurrentLocation $MouseWheelPath
$MouseWheelRegistryInfo = Search-ForFile -File "VBA Mouse Wheel Fix.reg" -CurrentLocation $MouseWheelPath
}
$MouseWheelDll = $MouseWheelDllInfo.FullName
$MouseWheelRegistry = $MouseWheelRegistryInfo.FullName
}
if(!$PSBoundParameters.ContainsKey("Regsvr32Path") -or [System.String]::IsNullOrWhiteSpace($Regsvr32Path)){
$regSvrPath = "$($env:systemroot)SysWoW64regsvr32.exe"
}
else{
$regSvrPath = $Regsvr32Path
}
if(!$PSBoundParameters.ContainsKey("RegEditPath") -or [System.String]::IsNullOrWhiteSpace($RegEditPath)){
$RegEditPath = "$($env:systemroot)regedit.exe"
}
#endregion Setting Up File Paths
#region Test Required Installer Paths Exist
if(!([bool](Test-Path -Path $regSvrPath))){
Write-Error ("Unable to find '{0}'.`r`nThe exe must exist." -f $regSvrPath)
Write-Host -NoNewLine 'Press any key to continue...';
$null = $Host.UI.RawUI.ReadKey('NoEcho,IncludeKeyDown');
return
}
if(!([bool](Test-Path -Path $RegEditPath))){
Write-Error ("Unable to find '{0}'.`r`nThe exe must exist." -f $RegEditPath)
Write-Host -NoNewLine 'Press any key to continue...';
$null = $Host.UI.RawUI.ReadKey('NoEcho,IncludeKeyDown');
return
}
if(!$SkipMouseWheel.IsPresent){
if(!([bool](Test-Path -Path $MouseWheelDll))){
Write-Error ("Unable to find '{0}'.`r`nThe 'MouseWheel' Folder must be in the same directory as the install script and the file must exist." -f $MouseWheelDll)
Write-Host -NoNewLine 'Press any key to continue...';
$null = $Host.UI.RawUI.ReadKey('NoEcho,IncludeKeyDown');
return
}
if(!([bool](Test-Path -Path $MouseWheelRegistry))){
Write-Error ("Unable to find '{0}'.`r`nThe 'MouseWheel' Folder must be in the same directory as the install script and the file must exist." -f $MouseWheelRegistry)
Write-Host -NoNewLine 'Press any key to continue...';
$null = $Host.UI.RawUI.ReadKey('NoEcho,IncludeKeyDown');
return
}
}
if(!([bool](Test-Path -Path $installFolder))){
Write-Error ("Unable to find '{0}'.`r`nThe 'Installer' Folder must be in the same directory as the install script." -f $installFolder)
Write-Host -NoNewLine 'Press any key to continue...';
$null = $Host.UI.RawUI.ReadKey('NoEcho,IncludeKeyDown');
return
}
if(!([bool](Test-Path -Path $installLocation))){
Write-Error ("Unable to find '{0}'.`r`nThe 'Installer' Folder must be in the same directory as the install script and the file must exist." -f $installLocation)
Write-Host -NoNewLine 'Press any key to continue...';
$null = $Host.UI.RawUI.ReadKey('NoEcho,IncludeKeyDown');
return
}
if(!([bool](Test-Path -Path $install2Location))){
Write-Error ("Unable to find '{0}'.`r`nThe 'Installer' Folder must be in the same directory as the install script and the file must exist." -f $install2Location)
Write-Host -NoNewLine 'Press any key to continue...';
$null = $Host.UI.RawUI.ReadKey('NoEcho,IncludeKeyDown');
return
}
if(!([bool](Test-Path -Path $SP6Location))){
Write-Error ("Unable to find '{0}'.`r`nThe 'SP6' Folder must be in the same directory as the install script and the file must exist." -f $SP6Location)
Write-Host -NoNewLine 'Press any key to continue...';
$null = $Host.UI.RawUI.ReadKey('NoEcho,IncludeKeyDown');
return
}
#endregion Test Required Installer Paths Exist
#region Installer Compatibility
# The installer doesn't auto-elevate to run as an administrator.
# We are setting the required keys in the registry to force the installers to run as administrator
# Same as running the 'troubleshoot compatibilty' wizard and selecting the exe's to run as admins.
Write-Host "Setting compatibility mode on setup files."
$layersPath = "REGISTRY::HKEY_LOCAL_MACHINESOFTWAREMicrosoftWindows NTCurrentVersionAppCompatFlagsLayers"
if(){
New-Item -Path $layersPath -Force | Out-Null
}
$registryPath = Get-Item -LiteralPath $layersPath
if($null -eq $registryPath.GetValue($installLocation, $null)){
New-ItemProperty -Path $layersPath -Name $installLocation -Value "^ WINXPSP3" -PropertyType "String" -Force | Out-Null
}
if($null -eq $registryPath.GetValue($SP6Location, $null)){
New-ItemProperty -Path $layersPath -Name $SP6Location -Value "^ WINXPSP3" -PropertyType "String" -Force | Out-Null
}
#endregion Installer Compatibility
#region Previous Install Cleanup
# Locations and keys where old vb6 installs can live.
Write-Host "Cleaning up previous install."
$itemsToDelete = @(
"C:Program Files*Microsoft Visual StudioCommon",
"C:Program Files*Microsoft Visual StudioMSDN",
"C:Program Files*Microsoft Visual StudioMSDN98",
"C:Program Files*Microsoft Visual StudioVB98",
"C:Program Files*Microsoft Visual StudioVC98",
"C:Program Files*Microsoft Visual Studio*.HTM",
"C:Program Files*Microsoft Visual Studio*.TXT",
"C:Program Files*Common FilesMicrosoft SharedMSDesigners98",
"C:Program Files*Common FilesMicrosoft SharedMSDN",
"C:Program Files*Common FilesMicrosoft SharedVS98",
"C:Program Files*Common FilesMicrosoft SharedWizards98",
"REGISTRY::HKEY_LOCAL_MACHINESoftwareMicrosoftDevStudio",
"REGISTRY::HKEY_LOCAL_MACHINESoftwareMicrosoftHTML Help Collections",
"REGISTRY::HKEY_LOCAL_MACHINESoftwareMicrosoftMSVSDG",
"REGISTRY::HKEY_LOCAL_MACHINESoftwareMicrosoftVisual Basic6.0",
"REGISTRY::HKEY_LOCAL_MACHINESoftwareMicrosoftVisual Component Manager",
"REGISTRY::HKEY_LOCAL_MACHINESoftwareMicrosoftVisual Modeler",
"REGISTRY::HKEY_LOCAL_MACHINESoftwareMicrosoftVisualStudio6.0",
"REGISTRY::HKEY_LOCAL_MACHINESoftwareWow6432NodeMicrosoftDevStudio",
"REGISTRY::HKEY_LOCAL_MACHINESoftwareWow6432NodeMicrosoftHTML Help Collections",
"REGISTRY::HKEY_LOCAL_MACHINESoftwareWow6432NodeMicrosoftMSVSDG",
"REGISTRY::HKEY_LOCAL_MACHINESoftwareWow6432NodeMicrosoftVisual Basic6.0",
"REGISTRY::HKEY_LOCAL_MACHINESoftwareWow6432NodeMicrosoftVisual Component Manager",
"REGISTRY::HKEY_LOCAL_MACHINESoftwareWow6432NodeMicrosoftVisual Modeler",
"REGISTRY::HKEY_LOCAL_MACHINESoftwareWow6432NodeMicrosoftVisualStudio6.0",
"REGISTRY::HKEY_CURRENT_USERSoftwareMicrosoftDevStudio",
"REGISTRY::HKEY_CURRENT_USERSoftwareMicrosoftMSVSDG",
"REGISTRY::HKEY_CURRENT_USERSoftwareMicrosoftVisual Basic6.0",
"REGISTRY::HKEY_CURRENT_USERSoftwareMicrosoftVisual Modeler",
"REGISTRY::HKEY_CURRENT_USERSoftwareMicrosoftVisualFoxPro",
"REGISTRY::HKEY_CURRENT_USERSoftwareMicrosoftVisualStudio6.0"
)
$itemsToDelete | Where-Object { Test-Path -Path $_ } | Remove-Item -Force -Recurse | Out-Null
#endregion Previous Install Cleanup
#region Installer Registry Permissions
# The installer needs to be able to write to 'HKEY_CLASSES_ROOTRDSServer.DataFactoryClsid'
# but since the installer isn't built for windows and we have to force it to run as an administrator
# we have to give explicit permissions for your computers Administrators group to write to this key (and all its children)
Write-Host "Setting required permissions for installing user on registry."
$registryPermissionPath = "REGISTRY::HKEY_CLASSES_ROOTRDSServer.DataFactoryClsid"
Write-Host "`tSetting Up required information."
$acl = Get-ACL -Path $registryPermissionPath
$oldOwner = [System.Security.Principal.NTAccount]::new($acl.Owner)
$administratorIdentity = [System.Security.Principal.NTAccount]::new("Administrators")
Write-Host "`tGiving the script required permissions."
$import = '[DllImport("ntdll.dll")] public static extern int RtlAdjustPrivilege(ulong a, bool b, bool c, ref bool d);'
$ntdll = Add-Type -Member $import -Name NtDll -PassThru
$privileges = @{ SeTakeOwnership = 9; SeBackup = 17; SeRestore = 18 }
foreach ($i in $privileges.Values) {
$null = $ntdll::RtlAdjustPrivilege($i, 1, 0, [ref]0)
}
Write-Host "`tGettting The registry key."
$regKey = [Microsoft.Win32.Registry]::ClassesRoot.OpenSubKey("RDSServer.DataFactoryClsid", 'ReadWriteSubTree', 'TakeOwnership')
# We force the Administrators group to be the owner on the key so we can then add required the permissions.
Write-Host "`tSetting Owner."
$acl.SetOwner($administratorIdentity)
$regKey.SetAccessControl($acl)
Write-Host "`tSetting Permission."
$permission = [System.Security.AccessControl.RegistryAccessRule]::new($administratorIdentity, "FullControl", "ContainerInherit", "InheritOnly", "Allow")
$acl.AddAccessRule($permission)
$permission2 = [System.Security.AccessControl.RegistryAccessRule]::new($administratorIdentity, "FullControl", "Allow")
$acl.AddAccessRule($permission2)
$regKey.SetAccessControl($acl)
# Reset the owner to clean-up
Write-Host "`tResetting Owner."
$acl.SetOwner($oldOwner)
$regKey.SetAccessControl($acl)
#endregion Installer Registry Permissions
#region Install
Write-Host "`tStarting Install."
$tempPath = [System.IO.Path]::GetTempPath()
$tempFolder = Join-Path -Path $tempPath -ChildPath ([System.Guid]::NewGuid().ToString("n"))
New-Item -Path $tempFolder -ItemType Directory -Force | Out-Null
$KeyFile = Join-Path -Path $tempFolder -ChildPath ("{0}.dat" -f [System.Guid]::NewGuid().ToString("n"))
$keyFileText = @"
REGEDIT4
[HKEY_LOCAL_MACHINESOFTWAREMicrosoftVisualStudio6.0SetupMicrosoft Visual BasicSetupWizard]
"aspo"=dword:00000000
[HKEY_LOCAL_MACHINESOFTWAREWow6432NodeMicrosoftVisualStudio6.0SetupMicrosoft Visual BasicSetupWizard]
"aspo"=dword:00000000
"@
$keyFileText | Set-Content -Path $keyFile -Force
& $RegEditPath /S $KeyFile
[string[]]$installerArguments = ("/T", "VB98PRO.stf", "/S", $installFolder, "/n", ($env:USERNAME), "/k", "0000000000", "/b", "1", "/qn1")
if($PSBoundParameters.ContainsKey("OrganizationName") -and ![System.String]::IsNullOrWhiteSpace($OrganizationName)){
$installerArguments += "/o"
$installerArguments += $OrganizationName
}
Start-Process -FilePath $install2Location -wait -NoNewWindow -ArgumentList $installerArguments
Start-Process -FilePath $SP6Location -wait -NoNewWindow -ArgumentList ("/qn1")
Write-Host "Setting Vb6 Compatibility"
$vb6ExeLocations = @(Get-Item -Path "C:Program Files*Microsoft Visual StudioVB98VB6.EXE" | Select-Object -ExpandProperty FullName)
$registryPath = Get-Item -LiteralPath $layersPath
foreach($vb6ExeLocation in $vb6ExeLocations){
if($null -eq $registryPath.GetValue($vb6ExeLocation, $null)){
New-ItemProperty -Path $layersPath -Name $vb6ExeLocation -Value "^ WINXPSP3" -PropertyType "String" -Force | Out-Null
}
}
if(!$SkipMouseWheel.IsPresent){
Write-Host "Installing Mouse Wheel"
& $regSvrPath /s $MouseWheelDll
& $RegEditPath /S $MouseWheelRegistry
$registryHeaderText = @"
Windows Registry Editor Version 5.00
"@
$registryItemFormat = @"
[{0}SOFTWAREMicrosoftVisual Basic6.0AddinsVB6IDEMouseWheelAddin.Connect]
"FriendlyName"="MouseWheel Fix"
"LoadBehavior"=dword:00000003
"CommandLineSafe"=dword:00000000
"@
$users = Get-ChildItem -Path "REGISTRY::HKEY_USERS" | Where-Object {$_.Name -notlike "*_Classes"} | Select-Object -ExpandProperty Name
$content = $registryHeaderText
# Install for every user.
foreach($user in $users){
$content += ($registryItemFormat -f $user)
}
$MouseWheelApplyRegistry = Join-Path -Path $tempFolder -ChildPath ("{0}.reg" -f [System.Guid]::NewGuid().ToString("n"))
$content | Set-Content -Path $MouseWheelApplyRegistry -Force
Start-Process $RegEditPath -wait -NoNewWindow -ArgumentList ("/S", $MouseWheelApplyRegistry)
Write-Host "You will still need to enable Mouse Wheel fix in the VB6 IDE." -BackgroundColor Black -ForegroundColor Red
Write-Host "Open a Visual Basic project and go to 'Add-Ins' -> 'Add-In Manager...' " -BackgroundColor Black -ForegroundColor Red
Write-Host "Select 'MouseWheel Fix' and click 'Loaded/Unloaded' and 'Load on Startup'" -BackgroundColor Black -ForegroundColor Red
}
Remove-Item -Path $tempFolder -Force -Recurse | Out-Null
#endregion Install
Write-Host "Install Complete"
Write-Host -NoNewLine 'Press any key to continue...';
$null = $Host.UI.RawUI.ReadKey('NoEcho,IncludeKeyDown');
}
Installation Wizard
Visual Studio 6.0 Installer wizard
By default, the following packages do not install properly under Windows 10:
- Visual Studio 6 Enterprise
- Visual Studio 6 Professional
- Visual Basic 6 Enterprise
- Visual Basic 6 Professional
To install the above packages, you’ll either need to make numerous adjustments and registry hacks, or use the fantastic Visual Studio 6.0 Installer wizard by Giorgio Brausi.
You’ll need the following items before starting:
- Your original Visual Studio/Basic Program CDs and keys
- Your original MSDN CDs
- Visual Studio Service Pack 6
- Visual Studio 6.0 Installer wizard
- On Windows 10 build 1511 or later, you’ll require Admin Rights.
The Wizard will take you through the necessary steps for a successful installation of Visual Basic 6.
Note that the installation of the Server Applications is not currently possible.

-
#1
Вот инструкция по установке дистрибутива VB6 на современные системы Windows (от Vista и выше):
1) Скачиваете дистрибутив* (не портативный, не патченный, не кривой), желательно английскую версию (в русской бывают баги, если названия файлов модулей будут написаны на русском языке).
* Дистрибутив VB6 обычно называется Microsoft Visual Studio 6.0 или Visual Basic 6.0 IDE.
У читателей иногда возникает такой вопрос, поэтому кратко опишу, что означают эти термины, и как определить, какой у Вас дистрибутив.
«Кривой» — подразумеваю, что дистрибутив может недокачаться, скачаться с ошибкой и т.д. (в таком случае можно попробовать его перекачать).
Также Вы можете скачать сборку, в описании к которой будут указаны разные «улучшения», дополнения и т.д. Не рекомендую. По моему мнению, лучше взять чистый оригинальный дистрибутив и доустанавливать только нужные Вам дополнения на свой вкус.
«Патченный» — автор сборки мог обновить и перепаковать дистрибутив. За корректность работы такой сборки никто не отвечает. Внимательно читайте описание того, что Вы скачиваете.
«Портативный» (или «portable») — опять же за корректность работы такой сборки Microsoft не отвечает. Если Вы планируете использовать VB6 не на 1 раз, лучше выполнить обычную нормальную установку.
Во всех случаях почитайте отзывы людей, которые использовали дистрибутивы из того же источника.
Если Вы скачали образ (например, файл с расширением .iso), смонтируйте его с помощью программы Daemon Tools или другого эмулятора дисков.
Затем двойной клик по диску в «Моем компьютере».
2) Запускается установщик. На вопрос «Помощника о совместимости программ» отвечаете кнопкой «Запуск программы».
* Если установщик даже в этом случае не запускается -> заходите на диск (правой кнопкой по диску «Открыть»).
Затем запускаете файл Setup.exe.
Дальше ввод серийного кода, места установки и т.п.
3) Когда прогрессбар установки дойдёт до 100%, установщик возможно зависнет (замечено на Windows 10). В этом случае зайдите в «Диспетчер задач» и завершите процесс установщика VB6.exe
После установки перезагружаете систему. При загрузке ОС возможно появится окно об ошибке INI, не обращаете внимания.
4) В меню пуск «Microsoft Visual Basic 6.0», ярлык от VB6 нажимаете правой кнопкой мыши и выбираете пункт «Запуск от имени Администратора».
Это действие нужно проделать один раз, так как системе потребуется зарегистрировать все необходимые компоненты при первом запуске среды.
Последнее редактирование: 30 Июн 2016
Skip to content
VB6 installs just fine on Windows 7, Windows 8 and even Windows 10 with a few caveats.
Just follow instructions bellow to make VisualBasic 6 IDE (VisualStudio) works on your system.
Here is how to install VB6 on Windows 7/8/10
- Before proceeding with the installation process below, create a zero-byte file in
C:WindowscalledMSJAVA.DLL. The setup process will look for this file, and if it doesn’t find it, will force an installation of old, old Java, and require a reboot. By creating the zero-byte file, the installation of moldy Java is bypassed, and no reboot will be required. - Turn off UAC.
- Insert Visual Studio 6 CD.
- Exit from the Autorun setup.
- Browse to the root folder of the VS6 CD.
- Right-click
SETUP.EXE, selectRun As Administrator. - On this and other Program Compatibility Assistant warnings, click Run Program.
- Click Next.
- Click “I accept agreement”, then Next.
- Enter name and company information, click Next.
- Select Custom Setup, click Next.
- Click Continue, then Ok.
- Setup will “think to itself” for about 2 minutes. Processing can be verified by starting Task Manager, and checking the CPU usage of ACMSETUP.EXE.
- On the options list, select the following:
- Microsoft Visual Basic 6.0
- ActiveX
- Data Access
- Graphics
- All other options should be unchecked.
- Click Continue, setup will continue.
- Finally, a successful completion dialog will appear, at which click Ok. At this point, Visual Basic 6 is installed.
- If you do not have the MSDN CD, clear the checkbox on the next dialog, and click next. You’ll be warned of the lack of MSDN, but just click Yes to accept.
- Click Next to skip the installation of Installshield. This is a really old version you don’t want anyway.
- Click Next again to skip the installation of BackOffice, VSS, and SNA Server. Not needed!
- On the next dialog, clear the checkbox for “Register Now”, and click Finish.
- The wizard will exit, and you’re done. You can find VB6 under Start, All Programs, Microsoft Visual Studio 6. Enjoy!
- Turn On UAC again
What to do after VB6 installation on Windows 7/8/10
You might notice after successfully installing VB6 on Windows 7 that working in the IDE is a bit, well, sluggish. For example, resizing objects on a form is a real pain.
- After installing VB6, you’ll want to change the compatibility settings for the IDE executable.
- Using Windows Explorer, browse the location where you installed VB6. By default, the path is
C:Program FilesMicrosoft Visual StudioVB98 - Right click the VB6.exe program file, and select properties from the context menu.
- Click on the Compatibility tab.
- Place a check in each of these checkboxes:
- Run this program in compatibility mode for Windows XP (Service Pack 3)
- Disable Visual Themes
- Disable Desktop Composition
- Disable display scaling on high DPI settings
- If you have UAC turned on, it is probably advisable to check the ‘Run this program as an Administrator’ box
After changing these settings, fire up the IDE, and things should be back to normal, and the IDE is no longer sluggish.
Содержание
- Как установить Visual Basic в Windows 10?
- Могу ли я установить VB6 на 64-разрядную версию Windows 10?
- Как установить Visual Basic на свой ноутбук?
- Как установить Visual Basic 10?
- Как загрузить и установить Visual Basic 2010?
- Можете ли вы установить VB6 в Windows 10?
- Поддерживает ли Windows 10 VB6?
- Как установить визуальный код?
- Visual Basic и Visual Studio — это одно и то же?
- Как загрузить Visual Basic 2019?
- Могу ли я удалить Microsoft Visual C ++?
- Могу ли я удалить Microsoft Visual C ++?
- Зачем мне нужна Microsoft Visual Studio?
- Является ли Visual Basic бесплатным программным обеспечением?
- Как установить vs2010 на Windows 10?
- Как установить Microsoft Visual Basic для приложений?
- Статья Как правильно установить Visual Basic 6
- Dragokas
- Как установить vb6 на windows 10
- 1. Turn off UAC and grant full access to the Admin user
- 2. Copy MSJAVA.DLL to Windows
- 3. Get the software
- 4. Change the SETUP.EXE properties so it runs in XP SP3 compatibility mode
- 7. Now you could try to install Service Pack 6
- 8. A few other points
- 9. Turn UAC on again!
- 10. Change the compatibility on VB6 executable
- 11. Links
- How To Install Visual Basic 6 (VB6) in Windows 10
- Bypass Update Microsoft Virtual Machine for Java Requirement
- Trick VB6 setup into thinking Microsoft Virtual Machine for Java is Installed
- Tell VB6 setup Not To Install Microsoft Virtual Machine for Java
- Change VB6 Setup Options To Prevent The Install From Hanging Or Failing
- Disable the Setup Components Automatically
- Disable the VB6 Setup Components Manually
- Run Visual Basic In Compatibility Mode
- Как установить Visual Basic в Windows 10?
- Могу ли я установить VB6 на 64-разрядную версию Windows 10?
- Как установить Visual Basic на свой ноутбук?
- Как установить Visual Basic 10?
- Как загрузить и установить Visual Basic 2010?
- Можете ли вы установить VB6 в Windows 10?
- Поддерживает ли Windows 10 VB6?
- Как установить визуальный код?
- Visual Basic и Visual Studio — это одно и то же?
- Как загрузить Visual Basic 2019?
- Могу ли я удалить Microsoft Visual C ++?
- Могу ли я удалить Microsoft Visual C ++?
- Зачем мне нужна Microsoft Visual Studio?
- Является ли Visual Basic бесплатным программным обеспечением?
- Как установить vs2010 на Windows 10?
- Как установить Microsoft Visual Basic для приложений?
Как установить Visual Basic в Windows 10?
Могу ли я установить VB6 на 64-разрядную версию Windows 10?
Программа установки VB6 проверяет наличие файла msjava. dll существует в папке SysWOW64 для 64-битных систем или System32 для 32-битных систем. Размещение файла в правой папке позволит продолжить установку VB6. а) Чтобы сделать это быстрее и проще, вы можете загрузить файл msjava.
Как установить Visual Basic на свой ноутбук?
Мы шаг за шагом проведем вас через это.
Как установить Visual Basic 10?
Как удалить Visual Studio с помощью панели управления
Как загрузить и установить Visual Basic 2010?
Чтобы загрузить Visual Basic 2010 Express, запустите свой веб-браузер (например, Internet Explorer) и перейдите по этому адресу: https://s3.amazonaws.com/cspublic/setup/VBExpress.exe. Как только вы нажмете кнопку «Установить», ваш веб-браузер должен либо запросить подтверждение, либо автоматически начать загрузку.
Можете ли вы установить VB6 в Windows 10?
VB6 при запуске в Windows 10 будет испытывать задержку, когда вы рисуете, перемещаете или изменяете размер объектов в форме в VB IDE. … Щелкните правой кнопкой мыши VB6.exe и выберите «Свойства». Перейдите на вкладку «Совместимость», установите флажок «Запустить эту программу в режиме совместимости для» и выберите «Windows Vista (Service Pack 2)».
Поддерживает ли Windows 10 VB6?
Здравствуйте, VB6 поддерживается, согласно https: //docs.microsoft.com/en-us/previous-versions/visualstudio/visual-basic-6/visual-basic-6-suppor …
Как установить визуальный код?
Как установить Visual Studio Code на macOS?
Visual Basic и Visual Studio — это одно и то же?
Visual Basic — это компонент Visual Studio. Visual Studio обычно относится ко всему набору приложений для разработки (Visual Basic, Visual C #, Visual C ++ и т. Д.). Visual Studio — это интегрированная среда разработки (IDE), используемая для создания программ на Visual Basic или других именованных языках Visual.
Как загрузить Visual Basic 2019?
Новая функция и шаги по установке предварительной версии Visual Studio 2019
Могу ли я удалить Microsoft Visual C ++?
Вы можете удалить любой (или все) распространяемый компонент Visual C ++, но если прикладная программа, для которой он требуется, все еще установлена, эта программа больше не будет работать. Нет простого способа заранее определить, какие из ваших прикладных программ полагаются на какие версии распространяемого пакета VC ++.
Могу ли я удалить Microsoft Visual C ++?
Вы можете удалить распространяемые файлы так же, как и любую другую программу в приложении панели управления «Программы и компоненты». Затем вы можете загрузить и установить последние версии из Центра загрузки Microsoft. Вот несколько прямых ссылок на каждую версию: Microsoft Visual C ++ 2005 SP1 Redistributable (x86)
Зачем мне нужна Microsoft Visual Studio?
Он используется для разработки компьютерных программ, а также веб-сайтов, веб-приложений, веб-сервисов и мобильных приложений. Visual Studio использует платформы разработки программного обеспечения Microsoft, такие как Windows API, Windows Forms, Windows Presentation Foundation, Windows Store и Microsoft Silverlight.
Является ли Visual Basic бесплатным программным обеспечением?
Экспресс-выпуск программного обеспечения Visual Basic можно использовать совершенно бесплатно. Однако у него есть некоторые ограничения по сравнению с профессиональным пакетом, и это конкретное программное обеспечение не является бесплатным.
Как установить vs2010 на Windows 10?
Как скачать и установить Visual Studio
Как установить Microsoft Visual Basic для приложений?
Установка компонента VBA
Источник
Статья Как правильно установить Visual Basic 6

Dragokas
Very kind Developer
Вот инструкция по установке дистрибутива VB6 на современные системы Windows (от Vista и выше):
1) Скачиваете дистрибутив* (не портативный, не патченный, не кривой), желательно английскую версию (в русской бывают баги, если названия файлов модулей будут написаны на русском языке).
* Дистрибутив VB6 обычно называется Microsoft Visual Studio 6.0 или Visual Basic 6.0 IDE.
У читателей иногда возникает такой вопрос, поэтому кратко опишу, что означают эти термины, и как определить, какой у Вас дистрибутив.
Во всех случаях почитайте отзывы людей, которые использовали дистрибутивы из того же источника.
2) Запускается установщик. На вопрос «Помощника о совместимости программ» отвечаете кнопкой «Запуск программы».
Дальше ввод серийного кода, места установки и т.п.
3) Когда прогрессбар установки дойдёт до 100%, установщик возможно зависнет (замечено на Windows 10). В этом случае зайдите в «Диспетчер задач» и завершите процесс установщика VB6.exe
После установки перезагружаете систему. При загрузке ОС возможно появится окно об ошибке INI, не обращаете внимания.
4) В меню пуск «Microsoft Visual Basic 6.0», ярлык от VB6 нажимаете правой кнопкой мыши и выбираете пункт «Запуск от имени Администратора».
Это действие нужно проделать один раз, так как системе потребуется зарегистрировать все необходимые компоненты при первом запуске среды.
Источник
Как установить vb6 на windows 10
How to install Visual Basic 6 on Windows 10

There are quite a lot of pages out there which gives parts of the story. None of them has the lot. I link to the important ones at the bottom.
1. Turn off UAC and grant full access to the Admin user

Donovan Brown reckons you should also disable IE Enhanced Security Configuration. I didn’t do this; but then my install didn’t complete either.

2. Copy MSJAVA.DLL to Windows
A computer should always maintain the latest version of Java and is pointless to have the discontinued Microsoft Virtual Machine for Java on the computer just to install Visual Basic 6. The problem is, the VB6 setup does not allow you to continue with the installation if you untick the «Update Microsoft Virtual Machine for Java» checkbox as it grays out the Next button.
The solution is to trick the VB6 setup into thinking that the Microsoft Virtual Machine for Java already exists on the system so the installer automatically skips this step. Basically the VB6 setup checks if the file MSJAVA.DLL exists in the System32 folder for 32-bit operating systems or in SysWOW64 for 64-bit operating systems. It is possible to create a zero byte MSJAVA.DLL fake file and place it in either System32 or SysWOW64 depending on the Windows architecture but this doesn’t work in Windows 10.
Assuming you have the 7-Zip archiver tool:
Go to the IE4 folder located in the VB6 installation files, right click at MSJAVX86.exe, go to 7-Zip and select «Open archive».
In 7-Zip, double click on javabase.cab which will open another list of files. Look for msjava.dll in the list, extract and copy it to C:\Windows\System32\ if you’re on a 32-bit of Windows or C:\Windows\SysWOW64\ if you’re on a 64-bit Windows. If you are unable to follow the steps above, or don’t want to install additional programs such as 7-Zip, you can download the MSJAVA.DLL file from the link below and copy it to the directory mentioned above.
Here’s my copy of the file.
3. Get the software
Download Visual Basic Service Pack 6 from here. This is actually the patches for VS 6 Enterprise Edition. Run the downloaded EXE to create a temporary directory with the installer in it.
Then get your copy of Visual Studio 6.0 Enterprise edition. Choices:
I have Visual Studio 6.0 Enterprise edition, which came from my MSDN subscription a very long time ago. So I used that.

Or you might have an MSDN subscription, in which case you can do this.
4. Change the SETUP.EXE properties so it runs in XP SP3 compatibility mode
This is where things get interesting. This installation will eventually hang in «Setup is updating your system». UPDATE: there is a fix for this here.
Once you reach this point, kill the installation and restart your machine. (Donovan Brown suggests trying to install it again; but this did not work on Win10).
Visual Basic is now, basically, installed. You should be able to find it and run it from the Windows Start menu.
7. Now you could try to install Service Pack 6
8. A few other points
9. Turn UAC on again!
10. Change the compatibility on VB6 executable
After installing VB6, you’ll want to change the compatibility settings for the IDE executable. Otherwise it can run very slowly!
After changing these settings, fire up the IDE, and things should be back to normal, and the IDE is no longer sluggish.
11. Links
This page has been online since 22nd February 2019.
Источник
How To Install Visual Basic 6 (VB6) in Windows 10

If you’re trying to install VB6 on newer operating systems starting from Windows 8 onward, especially with 64-bit architecture, you are sure to encounter installation problems. These range from not being able to continue the install without first installing discontinued versions of Java to the setup process hanging and crashing.
In this article, we’ll show you how to successfully install Visual Basic 6 (VB6) in Windows 10 64-bit.
Bypass Update Microsoft Virtual Machine for Java Requirement
A computer should always maintain the latest version of Java and it’s pointless having the discontinued Microsoft Virtual Machine for Java on the computer just to install Visual Basic 6. The problem is, the VB6 setup does not allow you to continue with the installation if you untick the “Update Microsoft Virtual Machine for Java” checkbox as it grays out the Next button.

The solution is to bypass the VB6 setup by either tricking it into thinking Microsoft Java is already installed or by telling it not to install Java in the first place. Then you can reach the next phase of the installation.
There are two ways in which you can do this which we’ll list below, you only need to use one of them.
Trick VB6 setup into thinking Microsoft Virtual Machine for Java is Installed
The VB6 installer checks if the file msjava.dll exists in the SysWOW64 folder for 64-bit systems or System32 for 32-bit systems. Placing the file into the right folder will let the VB6 install continue.
a) For the quickest and easiest way of doing this, you can download the msjava.dll file from the link below and copy it to the required directory.
If you’re unsure about the architecture of your Windows operating system, simply try to copy msjava.dll to the C:\Windows\SysWOW64 folder. If it doesn’t exist, you have a 32-bit system and should copy the file to the C:\Windows\System32 folder instead.
b) Alternatively, the same DLL file is also present on the installation disc. You can extract it if you have an archiver such as 7-Zip installed on your system. Go to the IE4 folder located on the install CD, right click on MSJAVX86.exe, go to 7-Zip and select “Open archive“.
In 7-Zip, double click on javabase.cab which will open it. Look for msjava.dll in the list, drag it onto the Desktop and then copy it to SysWOW64 or System32. Copying to the Desktop first will avoid any access denied error when trying to copy the file directly from 7-Zip.

After copying msjava.dll to either the System32 or SysWOW64 folder, you can launch the Visual Basic 6 setup.exe file to start the installation. It now doesn’t prompt you to update Microsoft Virtual Machine for Java.
Tell VB6 setup Not To Install Microsoft Virtual Machine for Java
If you have the VB6 setup files on your hard drive, it’s possible to edit the settings file for the installer and tell it not to ask for Microsoft Virtual Machine for Java. This will ignore the requirement and continue the install process.
a) The simplest option here is to download the SETUPWIZ.INI file from the link below. As the name implies, this is the setup wizard configuration file. Make sure to download the correct INI for your version of Visual Studio.
Download SETUPWIZ.INI (For Visual Studio 6 Enterprise)
Download SETUPWIZ.INI (For Visual Studio 6 Professional)
Place the INI file in the main installation files folder overwriting the current file. Then start the installation and it won’t ask to install Java.
b) If you want to edit the file manually, go to the main folder and open the SETUPWIZ.INI file with Notepad. Look for the line “VmPath=ie4\msjavx86.exe”.

Simply delete the whole line or everything after the “=” sign and save the file. The install can be continued but you must also follow the next steps as well or the installation will not complete successfully.
Change VB6 Setup Options To Prevent The Install From Hanging Or Failing
While fixing the above issue gets round the first hurdle of installing Visual Basic 6 on Windows 10, there are some other things that will cause the install to fail.
First of all, you will likely experience the “Setup is updating your system…” progress getting stuck and doing nothing else. After a few seconds, the installer becomes unresponsive and then hangs. Looking in Task Manager will show high CPU usage for ACMSETUP.EXE and the setup window has to be closed manually.

If you fix that, another error that appears will be a “Setup was unable to create a DCOM user account in order to register…valec.exe” message box.

With the default install options, the VB6 installer will likely produce another error message which is “javasign.dll was unable to register itself in the system registry”.

These last two error messages will cause the install to halt with a message saying the setup could not be completed. Since the Visual Basic 6 installer is over 20 years old, there are unsurprisingly some components that will not install properly in Windows 10 which causes the failures. Excluding those components from the install process will allow VB6 to install without errors.
You can use either method below to turn off the options during setup that cause the install to fail.
Disable the Setup Components Automatically
This method is the easiest and requires no manual changes to the setup options during install. We found that the install process is handled by an STF file in the Setup folder on the disc. The optional components are pre-enabled in this file so we found the offenders and disabled them by default.
1. Download the correct file according to the version of Visual Studio you are using. Click on the link below then right click on the grey Download button and select “Save link as” in your browser. This stops the file opening in a browser tab as a text file.
2. Make sure that the VB6 install files are on your hard drive as you need to replace the original STF file. You can do that by simply copying all the files from the CD to a folder on your drive. This won’t work if you are trying to install from CD.
3. Go to the SETUP folder and copy the VS98***.STF you downloaded above replacing the file already there.

4. Run the installer and go through the setup steps as usual. When you reach the component selection window, nothing has to be changed because the edited STF already did it.
Any other options that you want to enable or disable can be changed although you must make sure “Microsoft Visual InterDev 6.0”, “ADO and RDS”, and “Visual Studio Analyzer” remain disabled.
Disable the VB6 Setup Components Manually
This method is useful if you are installing from CD or the automatic option above doesn’t work.
1. During the setup, make sure the Custom install option is selected.
2. Continue the install until you’re asked to choose the components from the list. Highlight Data Access and click the “Change Option…” button to the right, then click “Change Option..” for a second time.

3. Now you’ll get another list of components that belong to the ADO, RDS, and OLE DB Providers. Simply uncheck the first ADO and RDS option.

A warning will popup that this component is an essential part of the application and it will not run properly if not installed. Click OK to acknowledge the warning and then click OK two more times to get back to the main install options window.
This will stop the installer hanging and crashing at the updating your system window.
3. Highlight Enterprise Tools and click the “Change Option…” button. At the bottom, uncheck Visual Studio Analyzer and click OK. This option is not in Visual Studio Professional so those users can ignore it.

Disabling the Visual Studio Analyzer will stop the DCOM user account error.
4. Uncheck Microsoft Visual InterDev 6.0 box in the main install options window. This will stop the javasign.dll error from appearing during install.
You can, of course, enable or disable other options in this window depending on personal preference. But make sure the components mentioned here are not enabled or the install won’t finish properly. Continue with the install and you should be able to reach the end with no major errors after a reboot.
Run Visual Basic In Compatibility Mode
After the install is complete, Visual Basic 6 should start. If you get an error on the New Project screen, an optional step to help is running VB6 in compatibility mode. In Explorer, navigate to C:\Program Files (x86)\Microsoft Visual Studio\VB98, right click on VB6.exe and select Properties.

In the Compatibility tab, check the “Run this program in compatibility mode for:” box and click OK. The default option of Windows XP (Service Pack 2) should be fine but you can experiment with Windows Vista or 98/Me if you wish.
Источник
Как установить Visual Basic в Windows 10?
Могу ли я установить VB6 на 64-разрядную версию Windows 10?
Программа установки VB6 проверяет наличие файла msjava. dll существует в папке SysWOW64 для 64-битных систем или System32 для 32-битных систем. Размещение файла в правой папке позволит продолжить установку VB6. а) Чтобы сделать это быстрее и проще, вы можете загрузить файл msjava.
Как установить Visual Basic на свой ноутбук?
Мы шаг за шагом проведем вас через это.
Как установить Visual Basic 10?
Как удалить Visual Studio с помощью панели управления
Как загрузить и установить Visual Basic 2010?
Чтобы загрузить Visual Basic 2010 Express, запустите свой веб-браузер (например, Internet Explorer) и перейдите по этому адресу: https://s3.amazonaws.com/cspublic/setup/VBExpress.exe. Как только вы нажмете кнопку «Установить», ваш веб-браузер должен либо запросить подтверждение, либо автоматически начать загрузку.
Можете ли вы установить VB6 в Windows 10?
VB6 при запуске в Windows 10 будет испытывать задержку, когда вы рисуете, перемещаете или изменяете размер объектов в форме в VB IDE. … Щелкните правой кнопкой мыши VB6.exe и выберите «Свойства». Перейдите на вкладку «Совместимость», установите флажок «Запустить эту программу в режиме совместимости для» и выберите «Windows Vista (Service Pack 2)».
Поддерживает ли Windows 10 VB6?
Здравствуйте, VB6 поддерживается, согласно https: //docs.microsoft.com/en-us/previous-versions/visualstudio/visual-basic-6/visual-basic-6-suppor …
Как установить визуальный код?
Как установить Visual Studio Code на macOS?
Visual Basic и Visual Studio — это одно и то же?
Visual Basic — это компонент Visual Studio. Visual Studio обычно относится ко всему набору приложений для разработки (Visual Basic, Visual C #, Visual C ++ и т. Д.). Visual Studio — это интегрированная среда разработки (IDE), используемая для создания программ на Visual Basic или других именованных языках Visual.
Как загрузить Visual Basic 2019?
Новая функция и шаги по установке предварительной версии Visual Studio 2019
Могу ли я удалить Microsoft Visual C ++?
Вы можете удалить любой (или все) распространяемый компонент Visual C ++, но если прикладная программа, для которой он требуется, все еще установлена, эта программа больше не будет работать. Нет простого способа заранее определить, какие из ваших прикладных программ полагаются на какие версии распространяемого пакета VC ++.
Могу ли я удалить Microsoft Visual C ++?
Вы можете удалить распространяемые файлы так же, как и любую другую программу в приложении панели управления «Программы и компоненты». Затем вы можете загрузить и установить последние версии из Центра загрузки Microsoft. Вот несколько прямых ссылок на каждую версию: Microsoft Visual C ++ 2005 SP1 Redistributable (x86)
Зачем мне нужна Microsoft Visual Studio?
Он используется для разработки компьютерных программ, а также веб-сайтов, веб-приложений, веб-сервисов и мобильных приложений. Visual Studio использует платформы разработки программного обеспечения Microsoft, такие как Windows API, Windows Forms, Windows Presentation Foundation, Windows Store и Microsoft Silverlight.
Является ли Visual Basic бесплатным программным обеспечением?
Экспресс-выпуск программного обеспечения Visual Basic можно использовать совершенно бесплатно. Однако у него есть некоторые ограничения по сравнению с профессиональным пакетом, и это конкретное программное обеспечение не является бесплатным.
Как установить vs2010 на Windows 10?
Как скачать и установить Visual Studio
Как установить Microsoft Visual Basic для приложений?
Установка компонента VBA
Источник
Мастер установки
Мастер установки Visual Studio 6.0
По умолчанию следующие пакеты не устанавливаются должным образом в Windows 10:
- Visual Studio 6 Enterprise
- Visual Studio 6 Professional
- Visual Basic 6 Enterprise
- Visual Basic 6 Professional
Чтобы установить вышеуказанные пакеты, вам нужно будет либо выполнить множество настроек, либо взломать реестр, либо воспользоваться фантастическим мастером установщика Visual Studio 6.0 от Giorgio Brausi.
Перед запуском вам понадобятся следующие элементы:
- Оригинальные компакт-диски и клавиши Visual Studio / Basic Program
- Оригинальные компакт-диски MSDN
- Visual Studio Service Pack 6
- Мастер установки Visual Studio 6.0
- В Windows 10 build 1511 или более поздней версии вам понадобятся права администратора.
Мастер проведет вас через необходимые шаги для успешной установки Visual Basic 6.
Обратите внимание, что установка серверных приложений в настоящее время невозможна.