Диаметр выходного отверстия: 98мм.
Производительность: 115 / 36 м.куб./час.***
Крепление: настенное, потолочное
Уровень шума, не более: 31 / 17 Дб.***
Потребляемая мощность: 8 / 4 Вт.***
Обороты: 2600 / 1100 об./мин.
Отделка : белое стекло
+ Таймер автоотключения
+ Датчик влажности
+ Цифровая индикация
+ Интеллектуальное управление
+ Термометр
+ Контроль влажности
Производство: Испания
Гарантия: 2 года.
Скачать инструкцию и схему подключения на вентилятор Cata E100 GTH (с датчиком влажности и таймером).

ØA=98мм.; B=150мм.; C=94мм.; D=28,5мм.
***Двухскоростной вентилятор ( значение для максимальных оборотов / значение для пониженных оборотов)!
Этот вентилятор показал наилучшие характеристики по уровню звукового давления (17Дб. при 4Вт и 31Дб при 8Вт.).
Обращаем Ваше внимание, что в отличии от других моделей с датчиком влажности, в модели Cata e100 gth, после отработки времени заданного таймером, вентилятор может либо вообще отключится, либо перейти на работу на пониженных оборотах, то есть у вентилятора cata e100 gth имеется еще одна скорость(1100об./мин).
При запуске же в автоматическом режиме (от датчика влажности), вентилятор остановится не через время заданное таймером (как в подавляющем большинстве аналогичных моделей, в том числе и фирмы Cata), а по достижении уровня влажности на один процент меньше заданного и, далее вентилятор либо отключится, для режима»OFF», либо перейдет на пониженные обороты, для режима «ON», подробнее про это рассказано в видеоролике ниже (по настройке и подключению вентилятора Cata e100GTH.
Таким образом, пожалуйста, уделите особое внимание как настройке времени отключения таймера, так и настройке желаемого уровня влажности, однако это не означает, что таймер необходимо установить в максимальное положение, ведь тогда вентилятор будет большее время работать впустую, значительно снижая таким образом общий ресурс работы вентилятора. Вообще говоря, избыточная вентиляция — это ведь и расходы на отопление. И именно эта модель с датчиками и возможностью настройки в широком диапазоне и позволяет оптимизировать работу вентиляции.
Отметим также, что косвенно проследить за эффективностью работы вентилятора можно и по показаниям температуры воздуха (отображаются на индикаторе, см. видеоролик), если температура заметно падает после включения вентилятора, значит начал поступать воздух из вне (из коридора, или окна, где температура как правило заметно ниже, чем в ванной). И соответственно можете руководствоваться этими показаниями и при настройке вентилятора.
И еще раз напоминаем, что подключение вентилятора с датчиком влажности отличается от обычного, поэтому внимательно изучите схему подключения вентилятора cata e100 gth с таймером и датчиком влажности (инструкцию можете скачать выше).

Cata e100gth. Видео по настройке и электрическому подключению:

Видеоролик cata e 100gth
Внимание! Отсутствие обратного клапана обусловлено отнюдь не недостатком мощности! Дело в том, что при совсем незначительном перепаде давления, лопасти этого вентилятора начинают вращаться самостоятельно, даже в выключенном состоянии усиливая таким образом естественную вентиляцию (как вентиляционный дефлетор), это достигается, благодаря качественным подшипникам и особой геометрии крыльчатки этих вентиляторов. Сами клапаны можно докупать отдельно, если это все таки необходимо.
Однако, клапаны эти не должны быть из ПВХ, ведь при установке клапана из ПВХ, большая часть работы будет уходить на сам подъем такого клапана,а клапан должен быть из легкого полиэтилена, такие продаются у дилеров «Cata», но даже клапаны купленные у дилеров «Cata», по мнению специалистов не стоит устанавливать именно на этот вентилятор, при использовании режим «ON» (когда вентилятор переходит на пониженные обороты, см.выше), в таком случае, по мнению специалистов, большая часть работы также будет уходить на открывание клапана, из-за малого давления.
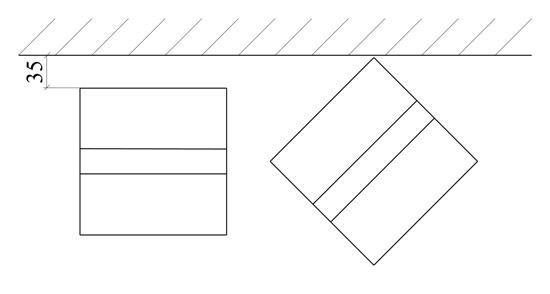
Внимание! Обратите особое внимание на рисунок ниже. Чтобы снять декоративную стеклянную панель, эту панель придется повернуть против часовой стрелки, таким образом, панель займет положение, похожее, как на рисунке справа, но для этого гарантированного поворота необходимо, чтобы расстояние от потолка до декоративной панели в рабочем (обычном) положении составляло значение, указанное на рисунке, также и расстояние до ближайшей стены должно быть не менее указанного значения!
Внимание!!! Наши специалисты оказывают услуги по электромонтажу вытяжных вентиляторов, в том числе моделей с таймером и датчиком влажности, а также осуществляют монтаж воздуховодов. Данная услуга может включать выезд специалистов на объект для замера, монтаж воздуховодов и подвод электрических проводов и окончательный монтаж.
Посмотреть инструкция для CATA E-100 GTH бесплатно. Руководство относится к категории вытяжки, 4 человек(а) дали ему среднюю оценку 8.9. Руководство доступно на следующих языках: английский. У вас есть вопрос о CATA E-100 GTH или вам нужна помощь? Задайте свой вопрос здесь
Вытяжка CATA E-100 GTH – это кухонный прибор, который используется для удаления запахов, дыма и пара при готовке. Эта вытяжка имеет ширину 150 мм и высоту 150 мм.
CATA E-100 GTH имеет современный и привлекательный дизайн. Она оснащена эффективным вентилятором, который быстро удаляет запахи и пар из кухни, а также эффективно очищает воздух. Кроме того, она оснащена жироулавливающим фильтром, который предотвращает накопление жира в трубах и вентиляционной системе.
CATA E-100 GTH легко устанавливается и проста в использовании. Она оснащена двумя скоростными режимами, которые позволяют выбрать оптимальную скорость вентиляции в зависимости от потребностей пользователей.
CATA E-100 GTH изготовлена из качественных материалов, что обеспечивает ее надежность и долговечность с течением времени.
В целом, вытяжка CATA E-100 GTH – это надежный и эффективный кухонный прибор, который обеспечивает быстрое и эффективное удаление запахов, дыма и паров во время готовки. Она легко устанавливается и проста в использовании, что делает ее идеальным выбором для любого дома.
Главная
| CATA | |
| E-100 GTH | 00900200 | |
| вытяжка | |
| 8422248049634, 0752584280285 | |
| английский | |
| Руководство пользователя (PDF), Техническая спецификация (PDF) |
Технические характеристики
| Совместимые продукты | — |
| Входное напряжение | 220 — 240 V |
Свойства
| Цвет товара | Белый |
| Материал | — |
| Тип устройства | — |
| Совместимость c брэндом | — |
| Тип | — |
| Цвет товара | Белый |
| Материал | — |
Вес и размеры
| Ширина | 150 mm |
| Высота | 150 mm |
| Ширина | 150 mm |
| Высота | 150 mm |
показать больше
Не можете найти ответ на свой вопрос в руководстве? Вы можете найти ответ на свой вопрос ниже, в разделе часто задаваемых вопросов о CATA E-100 GTH.
Как часто следует менять угольный фильтр вытяжки?
Угольный фильтр необходимо менять раз в 3–12 месяцев.
Как часто следует чистить металлические жироулавливающие фильтры?
Металлические жироулавливающие фильтры необходимо чистить каждые 8–10 недель.
Где указан номер модели кухонной вытяжки?
Номер модели вытяжки обычно указан на белой этикетке внутри вытяжки.
Какая высота CATA E-100 GTH?
CATA E-100 GTH имеет высоту 150 mm.
Какая ширина CATA E-100 GTH?
CATA E-100 GTH имеет ширину 150 mm.
Инструкция CATA E-100 GTH доступно в русский?
К сожалению, у нас нет руководства для CATA E-100 GTH, доступного в русский. Это руководство доступно в английский.
Не нашли свой вопрос? Задайте свой вопрос здесь
Page: 2
desproporcionada, debiendo llevarse a cabo en un plazo razonable. Si la reparación o
sustitución no fuese posible o apropiada, el consumidor podrá optar por una rebaja en
el precio o por la cancelación de la compra, con devolución del precio.
La presente garantía no se aplicará en los supuestos de mal uso o uso inadecuado del
producto, así como por la manipulación indebida del mismo por persona no
autorizada o por la falta de limpieza ni a operaciones de mantenimiento periódico
del producto (limpieza de los filtros, substitución de bombillas). Este producto ha
sido diseñado para uso único y exclusivo doméstico y por ello la garantía no ampara el
uso profesional o su utilización para funcionalidades no previstas.
La acción para reclamar el cumplimiento de lo dispuesto en la garantía prescribirá a los
tres años desde la entrega del producto, debiendo el consumidor informar de la falta de
conformidad en el plazo de dos meses desde que tuvo conocimiento de la misma.
La presente garantía no afecta a los derechos de que dispone el consumidor conforme
a lo pre- vista en la Ley 23/2003, de 10 de julio, de Garantías en la Venta de Bienes de
Consumo.
El símbolo en el producto o en su embalaje indica que este producto no se
puede tratar como desperdicios normales del hogar. Este producto se debe entregar al
punto de recolección de equipos eléctricos y electrónicos para reciclaje. Al asegurarse
de que este producto se deseche correctamente, usted ayudará a evitar posibles
consecuencias negativas para el ambiente y la salud pública, lo cual podría ocurrir si
este producto no se manipula de forma adecuada. Para obtener información más
detallada sobre el reciclaje de este producto, póngase en contacto con la
administración de su ciudad, con su servicio de desechos del hogar o con la tienda
donde compró el producto.
Dear Customer,
To guarantee the safety and correct working of the appliance, please read the following
instructions CAREFULLY before beginning the installation.
IMPORTANT:
Make sure that the power supply has been disconnected before performing the
installation or electrical connection of the appliance.
Installation, electrical connections and settings must be carried out by a qualified
person in line with local regulations.
If these installation instructions are not followed the product may be damaged.
For optimal performance, the appliance must be installed correctly (installation of the
unit, ducts and air replacement inlets).
This extractor fan is designed for the ventilation of households or similar premises. Do
not use for any purpose other than that for which it was designed.
This appliance is not intended for use by persons (including children) with reduced
physical, sensory or mental capabilities, or lack of experience and knowledge, unless
they have been given supervision or instruction concerning use of the appliance by a
person responsible for their safety.
Children should be supervised to ensure that they do not play with the appliance.
This extractor fan must be installed at least 2.3 m from the ground.
This extractor fan does not produce radio/television interference (Directive
2004/108/EC).
Prior to piping installation, consult the municipal by-laws on air outlets and request
permission from the person responsible for the building.
Precaution must be taken to avoid the backflow of gases into the room from the open
gas pipe or from other open-flame devices.
The room must have adequate ventilation if this appliance is used simultaneously with
other appliances that run on gas or other fuels.
Do not install the exhaust conduit (D) of the extractor fan to a chimney flume, ventilation
pipes, hot air ducts or ducts used to evacuate fumes from appliances that run on gas or
other fuels.
DO NOT install this product in areas with the follow characteristics:
• Excess of oil or grease.
• Areas with corrosive or flammable liquid gas or vapour.
• Areas with temperatures higher than 40 °C or lower than -5 °C.
• Areas exposed to the environment (rain, sun, snow, etc.)
• Areas with possible obstacles that obstruct the access to the fan.
The product and its parts must not be submerged in water or other liquids.
Page: 3
The IP rating is only valid if the installation of the appliance complies with what is
indicated in this manual.
The manufacturer declines all responsibility for personal injury or damage to animals or
objects caused by inappropriate use of the appliance according to the warnings for
installation, use and maintenance described in this instruction manual.
After finishing the installation these instructions should be given to the owner/user of
the appliance.
INSTALLATION:
The appliance shall be installed according to the attached graphic documentation. It
may be installed on the wall or ceiling, with direct exhaust to an individual exhaust duct
(see fig. 1A)
To start the installation, make a circular opening with a 100 mm diameter in the wall or
ceiling where the extractor fan is to be installed, as well as the holes for supporting the
appliance (see fig. 2).
Remove the cover as shown in fig. 1B
Run the power supply cables through the «PC» part and the conduit in the appliance
(see fig. 3A). Connect according to section “ELECTRICAL CONNECTION”
If the assembly is done with an individual exhaust tube, place the Ø100mm tube (D) in
the hole prepared for air exhaust.
Whether the assembly is done with an individual exhaust tube or with a direct outlet, air
grilles must be installed that comply with national safety requirements for preventing
access to the fan blades (see fig. 1A)
Make sure that there is no obstacle blocking the flow of air.
Attach the base of the casing using the plugs and screws supplied by the manufacturer.
ELECTRICAL CONNECTION:
Make sure that the voltage (V) and frequency (Hz) of the power supply correspond to
the values indicated on the nameplate.
The installation must have a two-pole switch with a distance equal to or above 3 mm
between contacts.
The appliance must be permanently connected with fixed installation wiring, fitted in the
wall and entering the appliance through the rear side.
(2- or 3-core cable with a minimum cross-section of 1 mm2
and maximum of 1.5 mm2
).
No earthing connection is required, given that this is a doubly-insulated appliance.
(Class II).
The power supply cable must be placed so that no liquid or vapour can enter the
appliance along it. If this were not possible, the cable entry should be sealed
additionally, e.g. with silicone. Otherwise, the indicated IP rating would not be
maintained.
Available versions:
E-100: STANDARD fan. Does not require setting
E-100GT: Fan with TIMER control. Adjustable timer from 3′ to 15′.
E-100GTH: Fan with TIMER-HYGRO control. Activation by humidity control between
40% and 95%. Adjustable timer from 0′ to 29′.
Designed for continuous general ventilation of humid rooms (bathrooms, kitchens,
washing rooms and toilets).
For the electrical connection, follow the connection diagram according to the model that
is to be connected (see fig. 3A-3B).
SETTINGS AND OPERATION:
Perform the necessary settings according to the model installed.
TIMER (see fig. 4B)
To set the timer, turn the “TIMER” pin clockwise to increase the time (3’- 15’).
The extractor fan will start, activated by the switch. When the switch is deactivated, the
fan continues working for the set time and then turns off.
TIMER-HYGRO (see fig. 4A)
When power is applied for the first time, the fan goes into test mode for a few seconds,
and during that time the displays show the factory-set Timer — Hygro values.
To adjust the timer, turn the “TIMER” pin until the desired value appears on the display
(0’-15’).
To adjust the level of humidity, turn the “HYGRO” pin until the desired value appears on
the display (40% — 95%).
The GTH model permits the continuous ventilation (for 24 hours) of damp rooms
through the ACTIVATION of S1 switch (S1: ON).
When the level of humidity is higher than the set level, the Hygro function is activated
and the fan will operate at maximum speed.
Once the level of humidity falls below the set value, the device will continue to operate
at maximum speed for the period of time set in the Timer function, and will eventually
stop if S1=OFF or continue to operate at low speed if S1=ON.
Maximum and slow speeds are factory settings.
The extractor fan will also start, at maximum speed, if activated by the light switch in the
room. When the light switch in the room is turned off, the fan will continue to work at
maximum speed for the period of time set in the Timer function, and will eventually stop
if S1=OFF or continue to operate at low speed if S1=ON.
To finish the installation, verify that all the connections have been done correctly and
make sure that the cables are placed correctly.
Install the front cover in its position and make sure that it cannot be removed without
using a tool (see fig. 7).
Page: 4
Make sure that the blades turn freely.
Cleaning and Maintenance:
• Before cleaning make sure that the appliance is not connected to the electric
network and prevent it from being reconnected by accident.
• Clean with a damp cloth regularly.
• The appliance does not require additional maintenance.
Always demand original spare parts for repairs.
THE MANUFACTURER reserves the right to make any technological improvement or
modification without prior notification.
CATA ELECTRODOMÉSTICOS S.L. guarantees that this product will fulfill the use for
which it was designed for a period of two (3) years.
This guarantee includes both materials and labour. Due to its small size and ease of
transport, the product must be taken by the user to the nearest Official Technical
Service Department of CATA.
To repair the product, it should be taken by the consumer to the brand’s official
technical assistance service department; and to replace the product, cancel the sale or
obtain a reduction in the price, where appropriate, it should be taken to the point
of sale. The product must be presented with its invoice or purchase ticket, or delivery
note if later.
If a fault is detected, the consumer is entitled to demand the repair or replacement of
the product, unless either of these options is impossible or disproportionate, within a
reasonable period of time. If repairing or replacing the product is impossible or
inappropriate, the consumer may choose to receive a discount on the price of the
product or to cancel the purchase and receive a full refund.
This guarantee will not be applicable in the event of the improper use or misuse of the
product, its improper handling by unauthorised persons, or the consumer’s failure to
clean or maintain the product on a periodic basis (cleaning of filters, replacement of
bulbs). This product has been designed solely and exclusively for domestic use;
hence, this guarantee does not cover professional use or the use of the product in any
unforeseen way.
The right to demand the fulfilment of the provisions of this guarantee will lapse after
three years from the delivery of the product, and the consumer is required to provide
notice of any fault within two months of becoming aware of it.
This guarantee does not affect the consumer’s rights under the provisions of Law
23/2003, of 10 July, on Guarantees in the Sale of Consumer Goods.
The symbol on the product or on its packaging indicates that this product may
not be treated as household waste. Instead it shall be handed over to the applicable
collection point for the recycling of electrical and electronic equipment. By ensuring this
product is disposed of correctly, you will help prevent potential negative consequences
for the environment and human health, which could otherwise be caused by
inappropriate waste handling of this product. For more detailed information about
recycling of this product, please contact your local city office, your household waste
disposal service or the shop where you purchased the product.
Покажем товар по видеосвязи, камеру включать не нужно
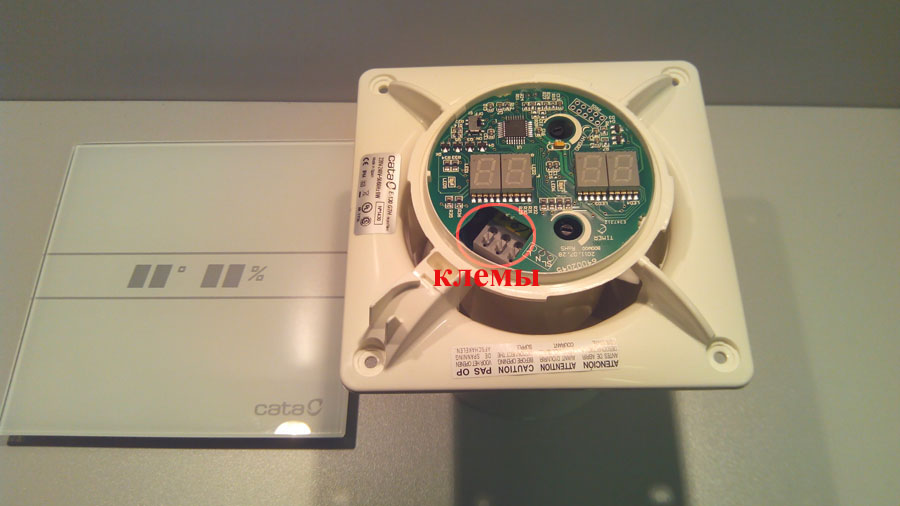
Вентиляторы Cata – производство Испания. Вентиляторы для ванной комнаты Cata E-серии вобрали все самое лучшее от своих предшественников. Стеклянная панель вентилятора – новомодный изыск, водружающий данный вентилятор на вершину сегмента элитной вентиляции. Данный вентилятор оборудован электронным табло, которое отображает температуру и влажность в помещении. Двигатель имеет защиту от перегрева. Также, вентилятор оборудован таймером задержки отключения от 3 до 30 мин и датчиком влажности. Для подключения и корректного пользования функциями вытяжного вентилятора с таймером необходимо подвести к месту установки и подключить к клеммам вентилятора три провода (сетевая фаза – к контакту L , 0 – к контакту N и управляющая фаза, которая приходит от выключателя света в помещении при его замыкании – к контакту SL. При таком способе подключения вентилятор будет включаться вместе с включением освещения в помещении (появляется фаза на управляющем контакте SL вентилятора), а при выключении освещения (пропадает фаза на управляющем контакте SL вентилятора) будет продолжать работать время, установленное на плате таймера. Устанавливается в вентиляционную шахту или в воздуховод соответствующего диаметра. Вентилятор используется только для настенного монтажа. Подключение к сети осуществляется через отдельный выключатель или через штатный выключатель освещения в помещении. Предназначен для постоянной или периодической вытяжной вентиляции санузлов, ванных комнат, кухонь и других бытовых помещений. Имеет двигатель с защитой от перегрева и световой индикатор работы. Устанавливается в вентиляционную шахту или в воздуховод соответствующего диаметра. Вентилятор используется только для настенного монтажа. Подключение к сети осуществляется через отдельный выключатель или через штатный выключатель освещения в помещении.
Детали
Для подключения и корректного пользования функциями вытяжного вентилятора с таймером (в данном вентиляторе он есть, читайте внимательно инструкцию) и датчиком влажности необходимо подвести к месту установки и подключить три провода – постоянная фаза к контакту, помеченному буковкой L, ноль к контакту N и фазу, которая приходит с выключателя при его замыкании к контакту SL. При таком способе подключения вентилятор будет включаться вместе с включением освещения (появляется фаза на контакте SL вентилятора) в месте установки (например, ванной комнаты) и при выключении освещения (пропадает фаза на контакте SL вентилятора) будет продолжать работать время, установленное на плате таймера.
Характеристики
-
Тип товара
Вентилятор
-
Бренд
-
Вид
-
Диаметр, мм
100
-
Уровень шума, дБ
-
С обратным клапаном
Нет
-
С таймером
Да
-
С антимоскитной сеткой
Нет
-
С тяговым выключателем
Нет
-
С фланцем
Да
-
Макс. расход воздуха, м3/ч
115
-
Высота панели, мм
150
-
Ширина панели, мм
150
-
Материал
-
Цвет
Белый
-
Мощность (Вт)
-
Диаметр присоединения, мм
100
-
Размер фланца, мм
94
-
Напряжение, В
220
-
Степень защиты
-
Бесшумный
Нет
-
Страна-производитель
Испания
-
Вес, кг
0,95
Санкт-Петербург
14 марта 2022
Всё качественно, красиво и работоспособно. Долго рассматривал контактную группу, не знал как подключить провода. Разобрался, контакты нажимные.
Вам могут понадобиться
Похожие товары
Последние просмотренные товары
Рекомендуем вам
С этим товаром покупают
Популярные товары в категории
Вентилятор осевой Cata E-100 GTH с датчиком влажности и таймером d100 мм белый в Санкт-Петербурге представлен в интернет-магазине Петрович по отличной цене. Перед оформлением онлайн заказа рекомендуем ознакомиться с описанием, характеристиками, отзывами.Купить вентилятор осевой Cata E-100 GTH с датчиком влажности и таймером d100 мм белый в интернет-магазине Петрович в Санкт-Петербурге.Оформить и оплатить заказ можно на официальном сайте Петрович. Условия продажи, доставки и цены на товар вентилятор осевой Cata E-100 GTH с датчиком влажности и таймером d100 мм белый действительны в Санкт-Петербурге.